Introduction
A person is an individual associated with your content (for example a player, talent, or staff member). You create the person object in ViewLift Tools, complete identity and profile details, then place it on site pages in Template Builder. You can also link the person to a team roster.
This article explains how to add a new person, complete the object, publish it, and place it on the site.
Purpose
The purpose of this article is to help you:
- Create a new person object in ViewLift Tools
- Fill in the metadata and images required to publish
- Complete Additional Information (name, profile, and sports fields)
- Know how to place the person on trays and which Template Page renders it
Scope
This article covers:
- Creating a person in ViewLift Tools → Content Management → Person
- Completing the person object (metadata, images, editor, additional information)
- Publishing the person
- The required Template Builder points for trays and the Person Template Page
It does not cover full Template Builder how-to (that is a separate documentation set), or creating teams. Create those with Create a Team Object. For videos, see Create a VOD Object.
Prerequisites
Before you begin, ensure you have:
- Access to ViewLift Tools with permission to create and publish person content
- Access to Template Builder
- A 16:9 thumbnail image (recommended 1920 × 1080 px), already cut to size — Tools does not crop images for you
- Your metadata ready before you start: display name, first name, tags, and categories
Example used in this article
Throughout the steps below we use one running example — a person called Alex Moore. Replace the sample values with your own.
Step 1: Open Person in ViewLift Tools
- Log into ViewLift Tools.
- From the main menu, open Content Management.
- In the content type selector at the top of the list, choose Person.
.png)
Figure 1. ViewLift Tools → Content Management → Person. Use the content-type dropdown to select Person, then click + Add New Person.
The Person list shows existing person objects. You can search by title, tag, or category.
Step 2: Create a Person Object
- On the Person list, select + Add New Person in the header. The button is labelled with the content type you selected, so it reads Add New Person while Person is active.
- The Add New Person dialog opens.
- Enter a Title (required). Use the customer-facing display name. Example:
Alex Moore. - Select Create.
Tools creates the person as a draft and opens the editor.
Permalink is not set in this dialog. It is generated on the detail page — editorialize it before you publish (see Step 3). First name and last name are set later on Additional Information.
.png)
Figure 2. Add New Person dialog. Enter a Title (required), then select Create.
Step 3: Complete Content Metadata
Open the person. The detail page sidebar includes Content Metadata, Manage Images, Editor, Additional Information, and Metadata & Macros.
Start with Content Metadata.
.png)
Figure 3. Person detail page, Content Metadata. Required fields are Title and Permalink.
| Field | Required | Description | Example |
|---|---|---|---|
| Title | Yes | Customer-facing display name on trays and the URL. | Alex Moore |
| Permalink | Yes | The URL path for this person. See permalink guidelines below. | /alex-moore |
| Description | No | Short summary shown on the person detail page and in discovery. | Championship midfielder for City United. |
| Author | No | Attribution (person or staff name). | Sports Desk |
| Tags | No | Keywords for search and programmatic trays. Type to choose an existing tag or create a new one. | championship, city-united, midfielder |
| Categories | No | Higher-level grouping used to drive trays and landing pages. | Players |
| External ID | No | Read-only. Tools fills this in automatically for lookups in external systems. | (system-generated) |
Long-form biography goes on Editor (Step 6), not in Description.
You do not attach a team on this object. After the person exists, open the team and add them under Players. See Create a Team Object.
Permalink guidelines
Use the same rules as other content types:
-
Start with a slash (
/) -
Lower-case letters only
-
No spaces or special characters except dash (
-) or underscore (_); dashes are preferred -
No leading or trailing whitespace
-
Keep it SEO-friendly (about 59 characters)
-
Remove auto-generated numeric identifiers when you editorialize the path
-
Good:
/alex-moore -
Avoid:
/Alex Moore_final
Step 4: Manage Images
Open Manage Images.
The 16:9 Landscape image is required to publish. Recommended size: 1920 × 1080 px. Upload images already cropped to the correct aspect ratio. Tools does not crop for you.
| Image slot | Typical use | Recommended size |
|---|---|---|
| 16:9 Landscape (required) | Primary thumbnail on trays, search, and detail | 1920 × 1080 px |
| 1:1 Square | Square grids and some mobile layouts | 1200 × 1200 px |
| 32:9 Ultra-Wide (OTT) | Required if you use the 32:9 carousel | 3840 × 1080 px |
| 3:4 Portrait | Poster-style featured placements | 1200 × 1600 px |
| 9:16 Vertical | Mobile-first experiences | 1080 × 1920 px |
| 4:3 Standard | Legacy and editorial layouts | 1600 × 1200 px |
| 2:3 Portrait | Compact posters and listings | 800 × 1200 px |
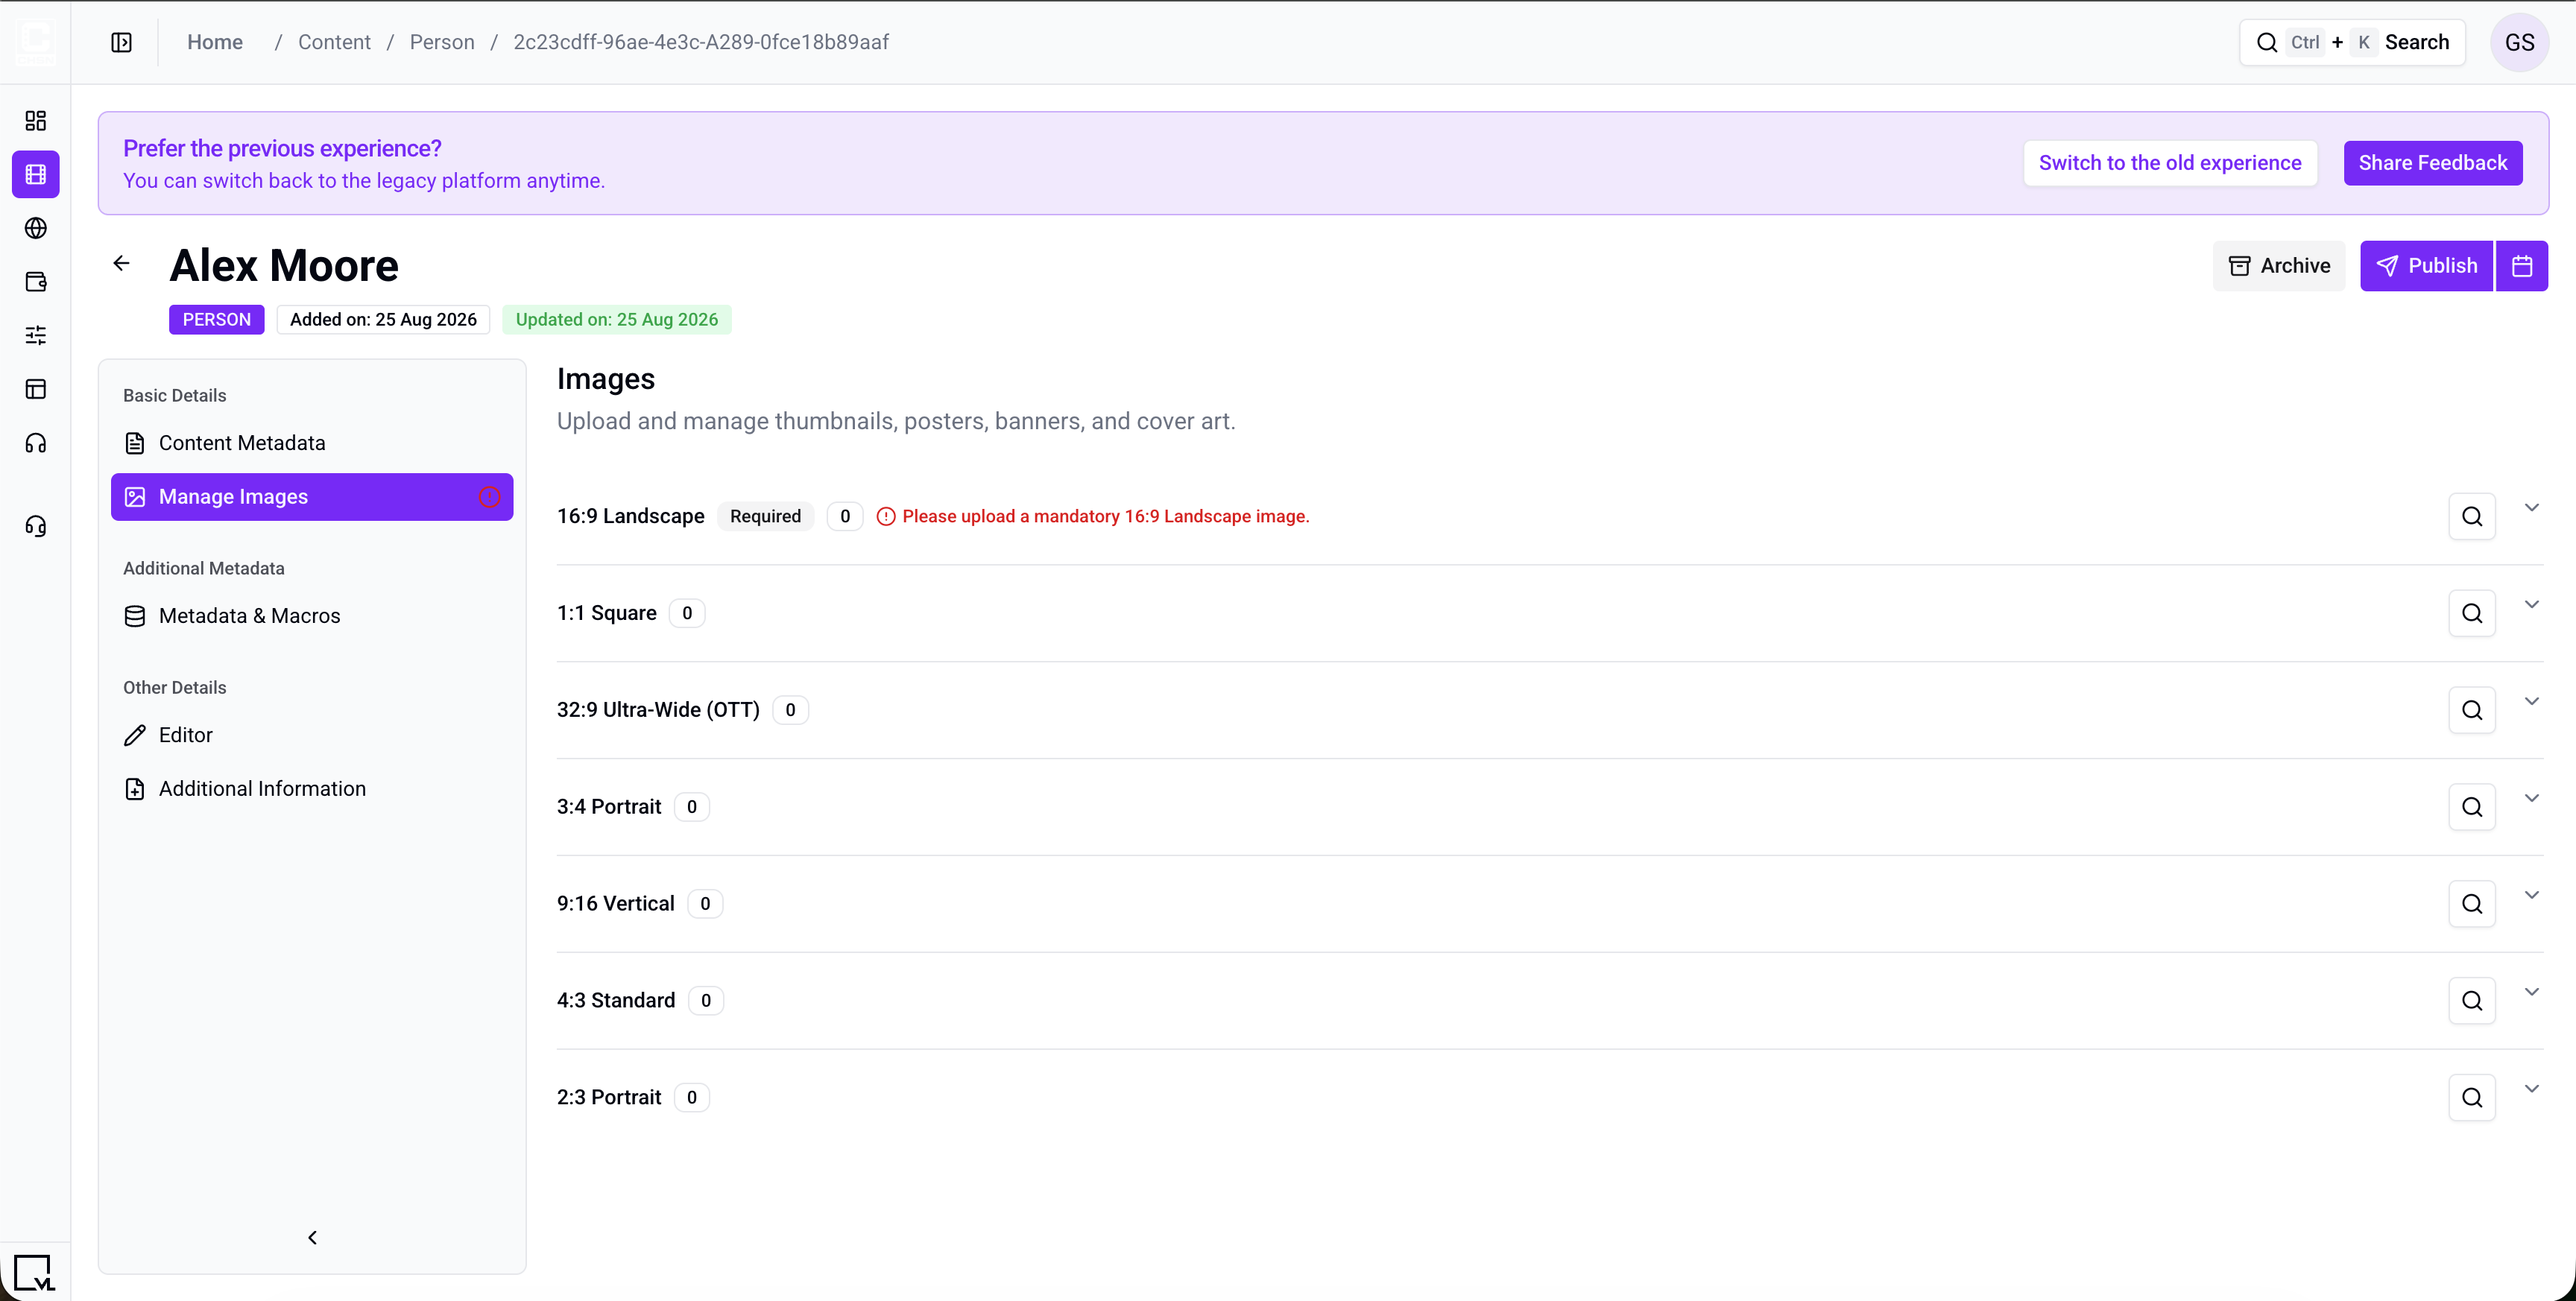
Figure 4. Manage Images. 16:9 Landscape is required to publish.
Step 5: Additional Information
Open Additional Information. This is the step that is unique to persons.
Identity
| Field | Required | Description | Example |
|---|---|---|---|
| First Name | Yes | Legal or preferred first name. | Alex |
| Middle Name | No | Optional middle name. | James |
| Last Name | No | Last name. | Moore |
| Person Type | No | Role label. | Athlete |
| External ID | No | Read-only. Same system value as on Content Metadata. | (system-generated) |
Contact & Social
Optional Email, Website, Facebook URL, Instagram URL, Twitter / X URL, and YouTube URL.
Physical Details
Optional profile fields:
| Field | Placeholder / example |
|---|---|
| Date of Birth | YYYY-MM-DD |
| Hometown | e.g. Los Angeles, CA |
| School | e.g. UCLA |
| Weight | e.g. 185 lbs |
| Height | e.g. 6'2" |
Player Info
| Field | Description |
|---|---|
| Position | For example Forward |
| Number | Jersey number |
| Player Order | Display order on a roster (placeholder e.g. 1) |
| Leagues | Search and link league objects |
| Shoot / Glove | Left or Right. Placeholder: Select Shoot / Glove |
| Weight Category | Select from the list if your sport uses weight classes. Placeholder: Select weight class |
T6 ID and Champions ID appear only if your site has those sports integrations enabled.
Tools saves when you leave a field or change a dropdown.
Step 6: Editor and Macros
Editor
Open Editor to add a biography or other long-form copy (rich text). Select Save on that tab when you finish.
Metadata & Macros
Extra metadata and playback macros if your site uses them. Select Add Metadata to add a row.
Step 7: Publish the Person
Required before publish:
- Title
- Permalink
- 16:9 Landscape image
Set First Name on Additional Information as well; that field is required on that tab (asterisk in the form).
- When you are ready, select Publish to go live now.
- Or use Schedule to publish at a later date and time.
- After publish, use Update for further metadata changes, Unpublish to take it down, or Archive to retire it.
Duplicate is not available for persons in ViewLift Tools. Create a new person if you need a similar title.
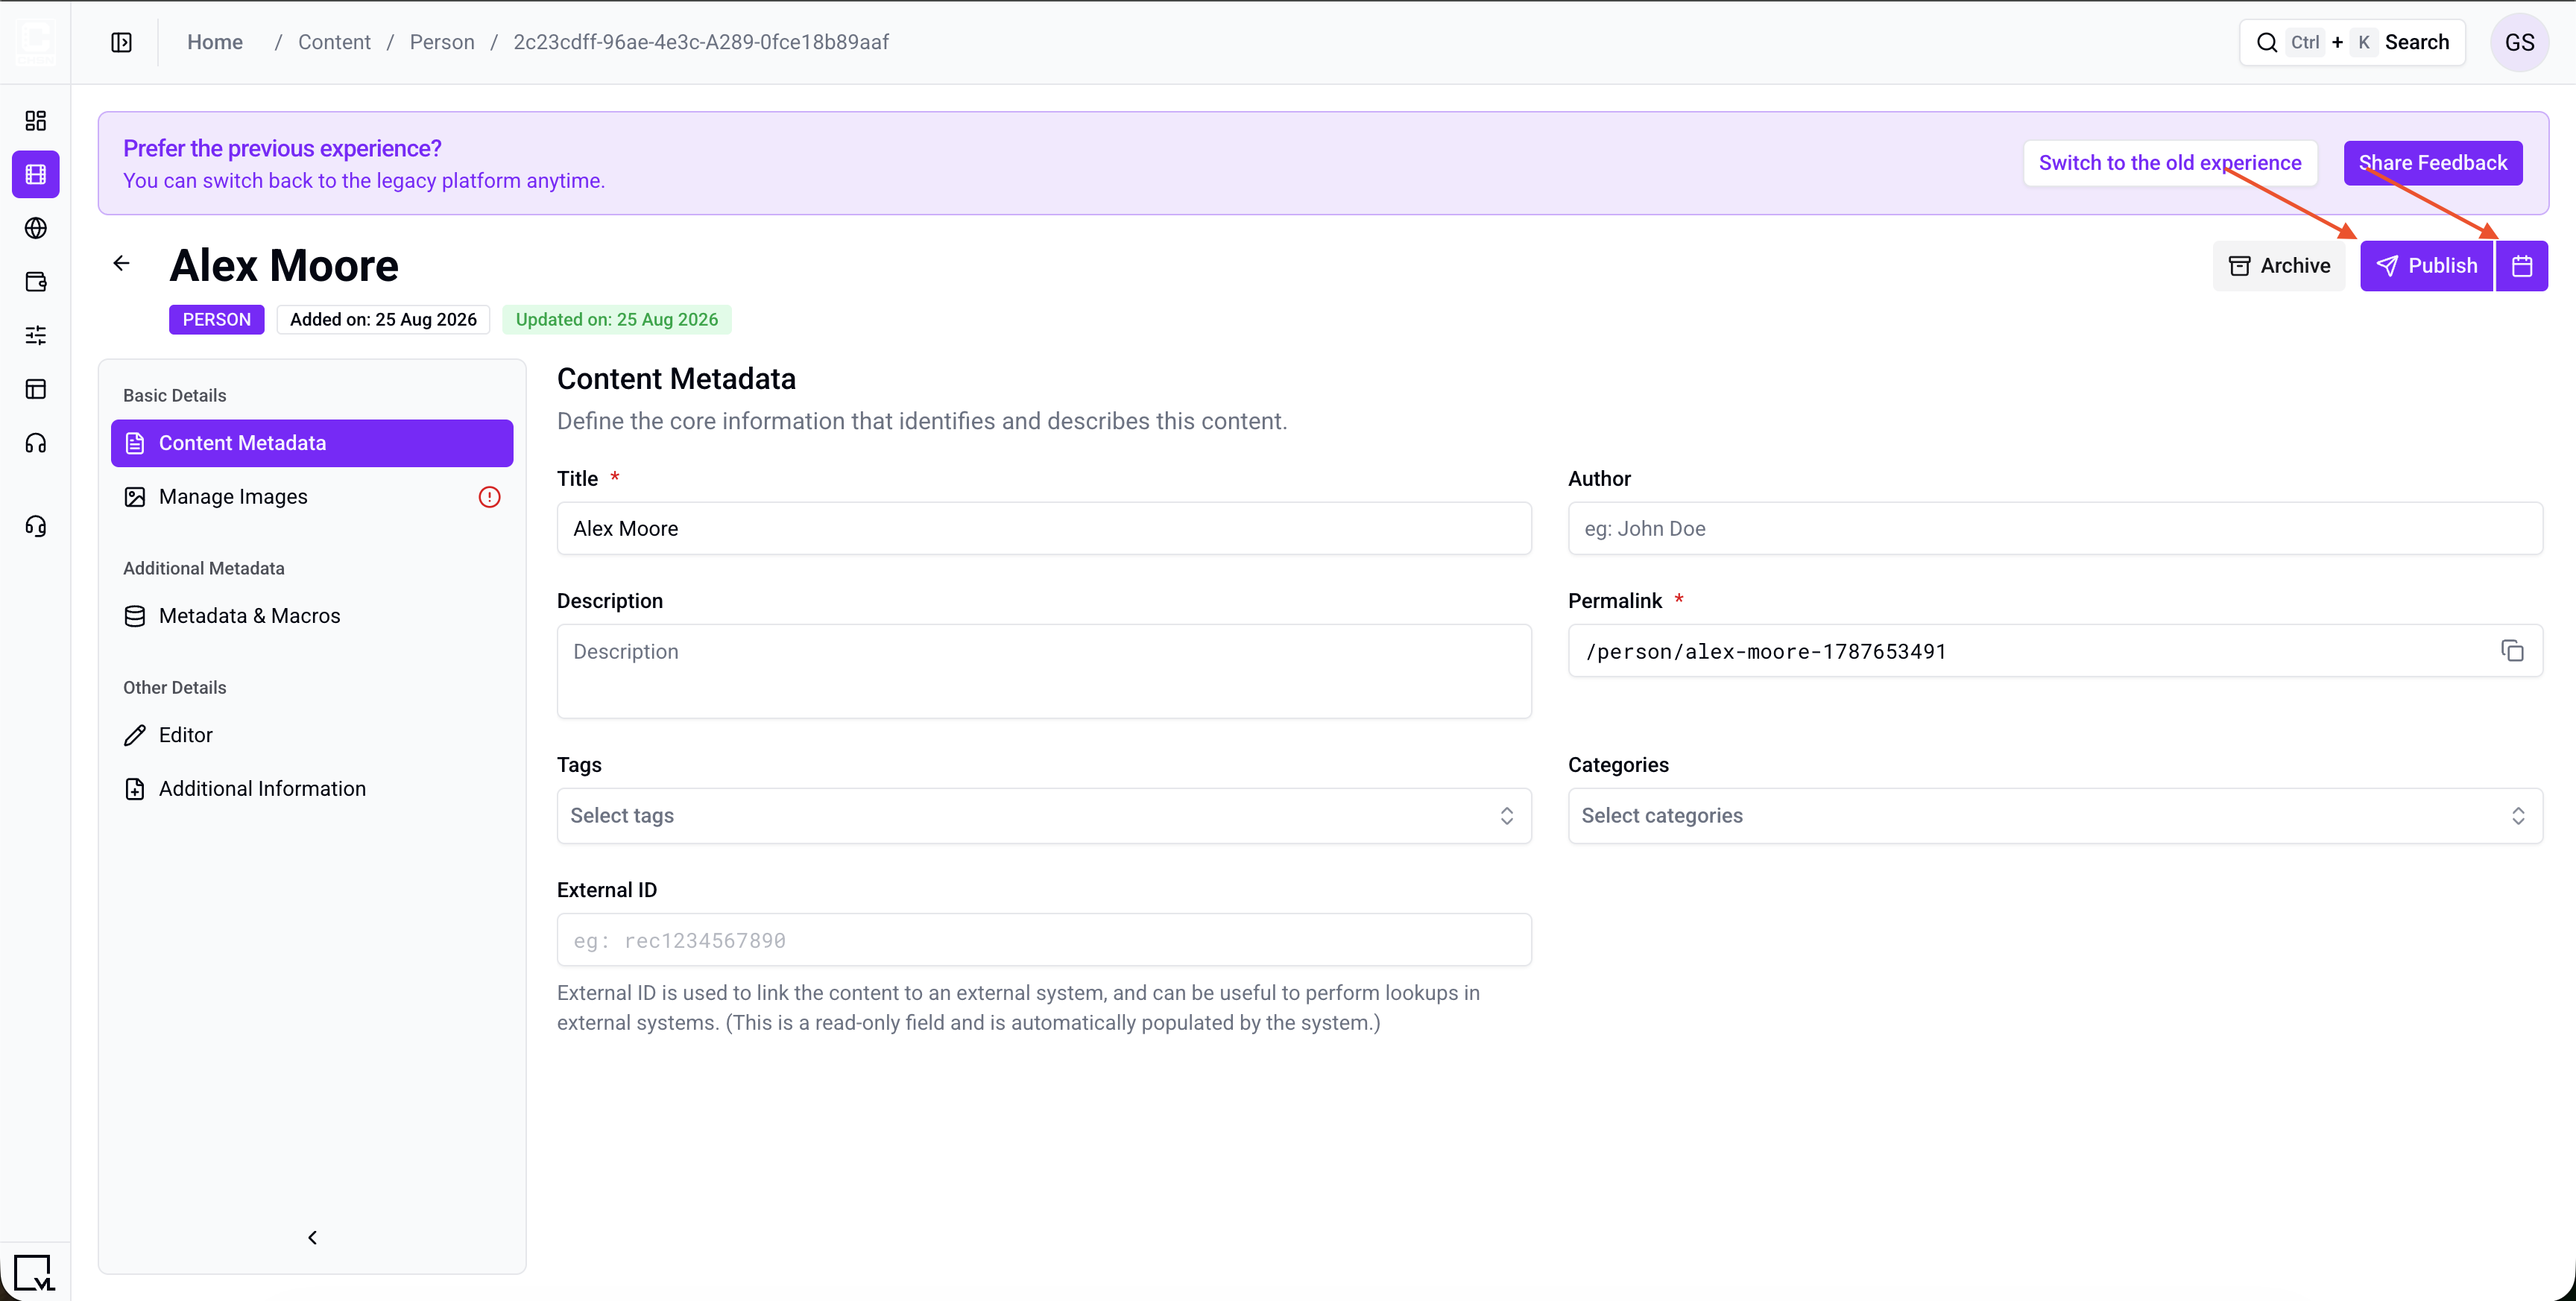
Figure 5. Person detail header. Use Publish (or Schedule) to go live in the CMS.
The person is now in the CMS library. It does not appear on the website until you curate it onto a page or a user opens its permalink (which uses the Person Template Page).
To show this person on a team roster, open the team and add them under Players. See Create a Team Object.
Step 8: Curate the Person on a Template Builder Page
To show the person on Home (or any Modular Page):
- Open AppCMS → Edit Template Builder.
- Open Modular Pages and find the page (for example, Home).
- Add or select a tray module. Typical trays:
- VL HighlightTray
- VL LandscapeTray
- VL Vertical Tray
- Open module settings and set a tray title, for example
Championship Players. - Choose Content Selection:
- Manually Curate — search for the person. In the Content Type list it appears as Person.
- Programmatically Generate — fill the tray from tags or categories. For example, generate from the tag
players.
- Set Content Type to Person (or Any) if the tray filters by type.
- In Thumbnail Type, choose the ratio that matches the images you uploaded. Template Builder writes these with an asterisk —
16*9,3*4,32*9,9*16,1*1,4*3. - Publish the Template Builder page.
Changes can take about 5–10 minutes to appear on the website because of caching. To verify sooner, use a private window, another browser, or clear cookies and cache.
Clicking the person thumbnail takes the user to the person detail page. That layout is the Person Template Page. Keep one default Person Template Page unless this person is assigned a custom template. The detail module caption is VL Person Detail.
Tray modules, player cards, and template-page customization are covered in the Template Builder documentation.
Troubleshooting
| Problem | What to check |
|---|---|
| Publish is greyed out or shows an error | Confirm Title, Permalink, and a 16:9 Landscape image. |
| First Name shows as required | Fill First Name on Additional Information. Title on Content Metadata is the display name; it is not the same field. |
| There is no team field on the person | Attach the person from the team object, under Players. |
| There is no Preview | Person does not support Preview in Tools. |
| The person is published but viewers cannot find them | Confirm they are curated onto a tray on a published page. Person has no Hide Content (Search & Trays) control. |
| The thumbnail is missing or stretched on a tray | The tray’s Thumbnail Type must match a ratio you actually uploaded in Manage Images. |
Best Practices
- Write titles for viewers.
Alex Mooreworks far better thanplayer_final_v3. - Set First Name as soon as you create the person. Keep Title aligned with first and last name.
- Create the person first, then attach them to a team under Players.
- Tag consistently. Programmatic trays are built from tags and categories.
- Upload images at the exact ratio. Tools does not crop for you.
FAQs
Q. What is the difference between Title and First Name / Last Name?
Title is the display name on trays and the URL. First Name (required) and Last Name are profile fields on Additional Information.
Q. Can I publish without a 16:9 image?
No. Title, permalink, and a 16:9 Landscape image are required to publish.
Q. How do I put this person on a team?
Create the person, then open the team and add them under Players. See Create a Team Object.
Q. Can I duplicate a person?
No. Duplicate is not available for persons in ViewLift Tools. Create a new person.
Q. Can I edit a person after publishing?
Yes. Open the person, change what you need, and select Update. Editor copy still needs Save on the Editor tab. You do not have to unpublish first.
Q. Why is there no Preview?
Preview is not available for person objects in Tools.
Q. I published the person but I do not see them on Home.
Publishing adds them to the library. You still need to curate them onto a tray (manually or by tag/category) and publish that Template Builder page. Allow a few minutes for cache.
Q. Which Template Page does a person use?
The Person Template Page. The detail module caption is VL Person Detail.
Important Information
- Create the person object in Tools. Template Builder only places that object on pages and defines the detail layout.
- Set First Name on Additional Information. Set Title and Permalink on Content Metadata.
- Person has no Monetization, Geo, Availability, SEO, Quick Settings, Preview, or Version History tab.
- Upload images at the correct aspect ratio. Tools will not crop them.
- Use the same permalink style as other content:
/lowercase-path-with-dashes. - Tray thumbnail type must match the image ratios you uploaded (especially 32:9 for ultra-wide carousels).
- Cache can delay frontend updates by 5–10 minutes.
Glossary
| Term | Definition |
|---|---|
| Person | A Tools object that represents an individual (player, talent, or staff). |
| Title | The display name used on trays and in the permalink. |
| First Name | Required profile field on Additional Information. |
| Person Template Page | The Template Builder page that defines the layout for an individual person detail screen. |
| Permalink | The permanent URL path for the person, for example /alex-moore. |
| Tray | A horizontal row of content on a page in Template Builder. |
Contact Support
If you need help beyond this article, contact the ViewLift support team.
- Email: techsupport@viewlift.com
- Phone (US): +1-800-859-0420
- Phone (UK): +44-203-014-8921
Support hours: B2C requests are handled Monday to Friday. B2B support is available 24/7.
After the person is published in Tools, users can open the profile on the site by permalink, or from a tray after you curate it in Template Builder. The detail layout is the Person Template Page.