Introduction
A video (VOD) is the core content type for on-demand playback. You create the video object in ViewLift Tools, then place it on site pages and detail layouts in Template Builder.
This article explains how to add a new video, complete its metadata, publish it, and place it on the site.
Purpose
The purpose of this article is to help you:
- Create a new video object in ViewLift Tools
- Fill in the metadata, images, and other settings required to publish
- Know how to place the video on trays and which Template Page renders it
Scope
This article covers:
- Creating a video in ViewLift Tools → Content Management → Videos
- Completing the video object (metadata, images, monetization, captions, availability, SEO)
- Publishing or scheduling the video
- The required Template Builder points for trays and the Video Template Page
It does not cover full Template Builder how-to (that is a separate documentation set), live streams, series/episodes, or playlists.
Prerequisites
Before you begin, ensure you have:
- Access to ViewLift Tools with permission to create and publish content
- Access to Template Builder
- A video file (or a cloud / HLS source URL) ready to ingest. Tools accepts standard video files such as
.mp4,.mov, and.m4v - A 16:9 thumbnail image (recommended 1920 × 1080 px), already cut to size — Tools does not crop images for you
- Your metadata ready before you start: title, description, tags, categories, and the monetization model the video should sit behind
Example used in this article
Throughout the steps below we use one running example — a highlights video called Championship Final — Match Highlights. Replace the sample values with your own.
Step 1: Open Videos in ViewLift Tools
- Log into ViewLift Tools.
- From the main menu, open Content Management.
- In the content type selector at the top of the list, choose Videos.
.png)
Figure 1. ViewLift Tools → Content Management → Videos. Use the content-type dropdown to select Videos, then click + Add New Video.
The Videos list shows existing VOD objects. You can search by title, tag, or category, and filter by status:
| Status | Meaning |
|---|---|
| Processing | The file is still encoding and is not yet playable |
| Publish | Live and available to viewers |
| Unpublish | Created but taken off the site |
| Scheduled | Set to publish automatically at a future date and time |
| In Review | Waiting for editorial approval |
| Archived | Retired from the library but not deleted |
Step 2: Create a VOD Object
- On the Videos list, select + Add New Video in the header. The button is labelled with the content type you selected, so it reads Add New Video while Videos is active.
- The Add New VOD Content dialog opens, with the subtitle Upload a new video or use link to an existing source.
You can create a video in three ways. Choose the tab that matches your source.
Option A: File Upload
Use this when the video file is on your computer.
- Select the File Upload tab.
- Optionally turn on:
- Enable DRM Protection — protect playback with FairPlay, Widevine, and PlayReady. If enabled, choose a DRM Provider (Axinom or EZDRM).
- Enable Vertical Video — turn this on if the file is shot in portrait (9:16). The video then plays in the vertical player on mobile and can appear in vertical trays. Leave it off for standard landscape videos.
- Optionally add Cue Points. These are the timestamps, in seconds, where an ad break should play. Enter them separated by commas and use up to three decimal places.
- Example:
0.000, 1219.000, 1729.000places an ad at the start, at 20 minutes 19 seconds, and at 28 minutes 49 seconds. - A value must not end with a decimal point —
12.5is valid,12.is rejected.
- Example:
- Drag and drop a video file onto Drag & drop a video here, or browse to select a file. Example:
championship-final-highlights.mp4.
Upload starts immediately. Tools creates the video as a draft and begins encoding. You do not click a separate Create button on this tab.
When the upload finishes, the new video appears in the Videos list. Encoding status shows as Processing until transcoding completes.
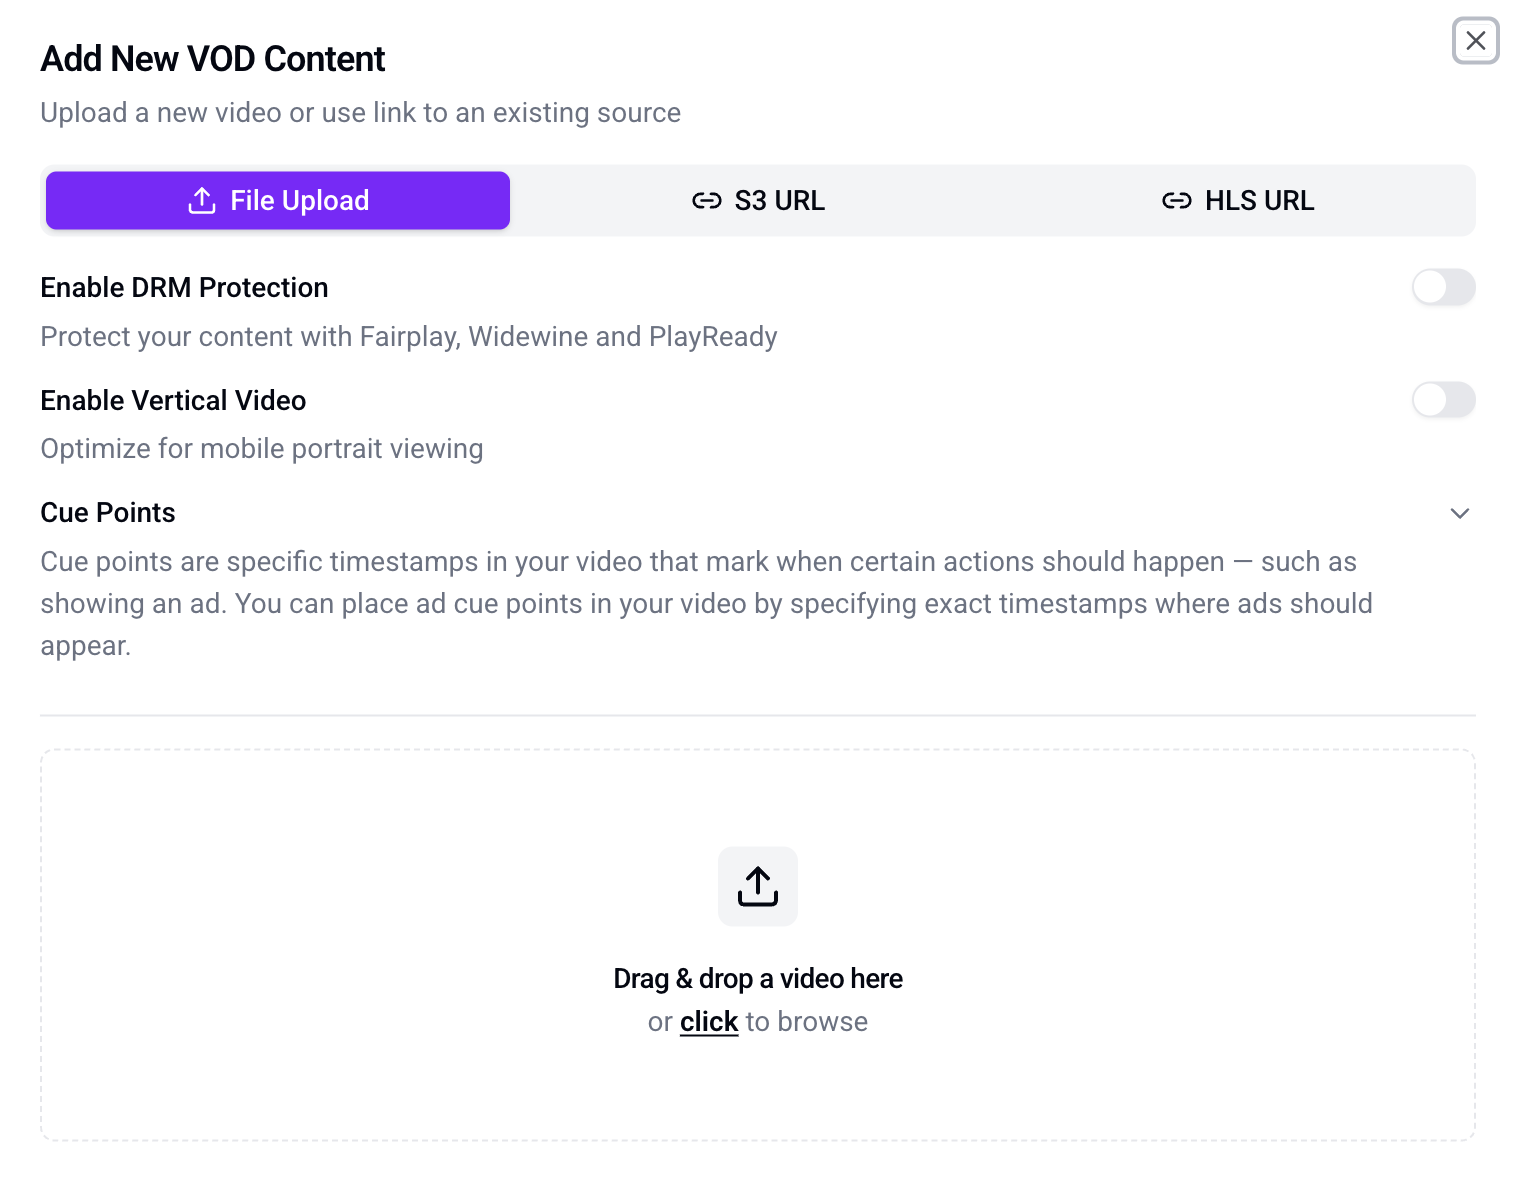
Figure 2. Add New VOD Content dialog, File Upload tab. Optional DRM and Vertical Video switches, Cue Points, and the drag-and-drop zone. Upload starts as soon as you add a file; there is no Create button on this tab.
Option B: Cloud URL (S3 URL or GCS URL)
Use this when the mezzanine file is already in your site’s cloud storage.
- Select the S3 URL tab (AWS sites) or GCS URL tab (GCP sites). On some sites this tab is labeled Cloud URL.
- Optionally enable DRM Protection and choose a DRM Provider.
- Optionally add cue points.
- Enter the Source URL of the video file. Example:
https://my-bucket.s3.amazonaws.com/championship-final-highlights.mp4. - Confirm or edit the Title. The title is auto-generated from the URL; you can change it.
- Select Create.
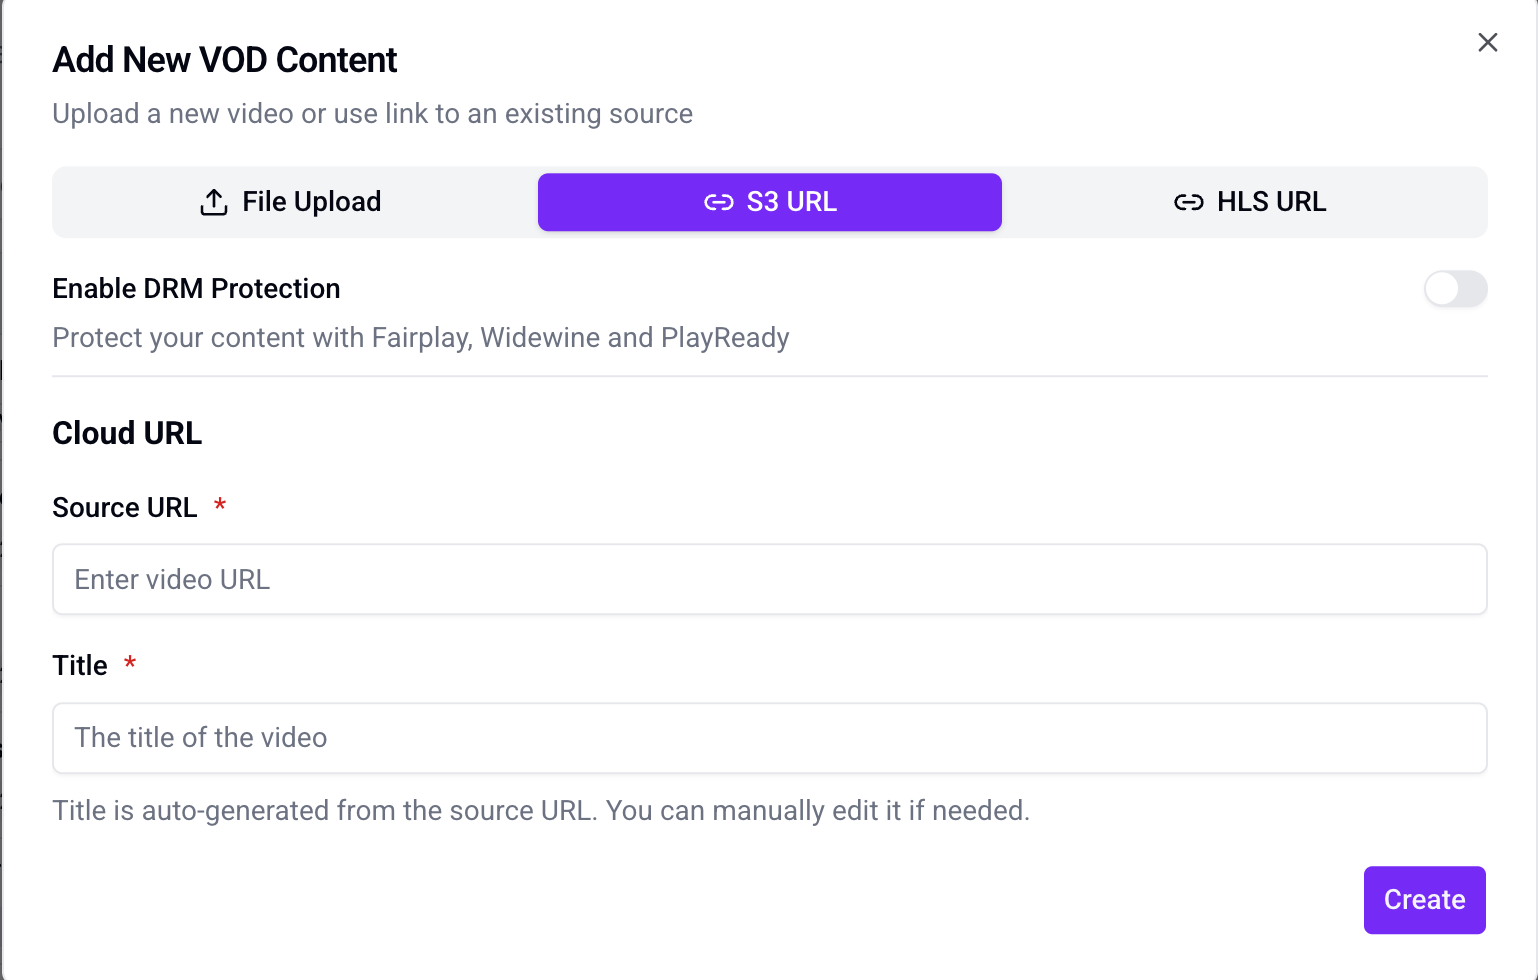
Figure 3. Add New VOD Content dialog, S3 URL tab (GCP sites show GCS URL). Enter Source URL and Title, then click Create.
Option C: HLS URL
Use this when you already have an HLS playback URL (.m3u8) and do not need Tools to transcode a mezzanine file.
- Select the HLS URL tab.
- Optionally turn on Enable Trickplay so viewers see thumbnail previews when they hover on the scrub bar.
- Optionally add cue points.
- Enter the HLS Source URL (for example
https://cdn.example.com/championship-final/master.m3u8). - Confirm or edit the Title.
- Select Create.
DRM settings are not shown on the HLS URL tab.
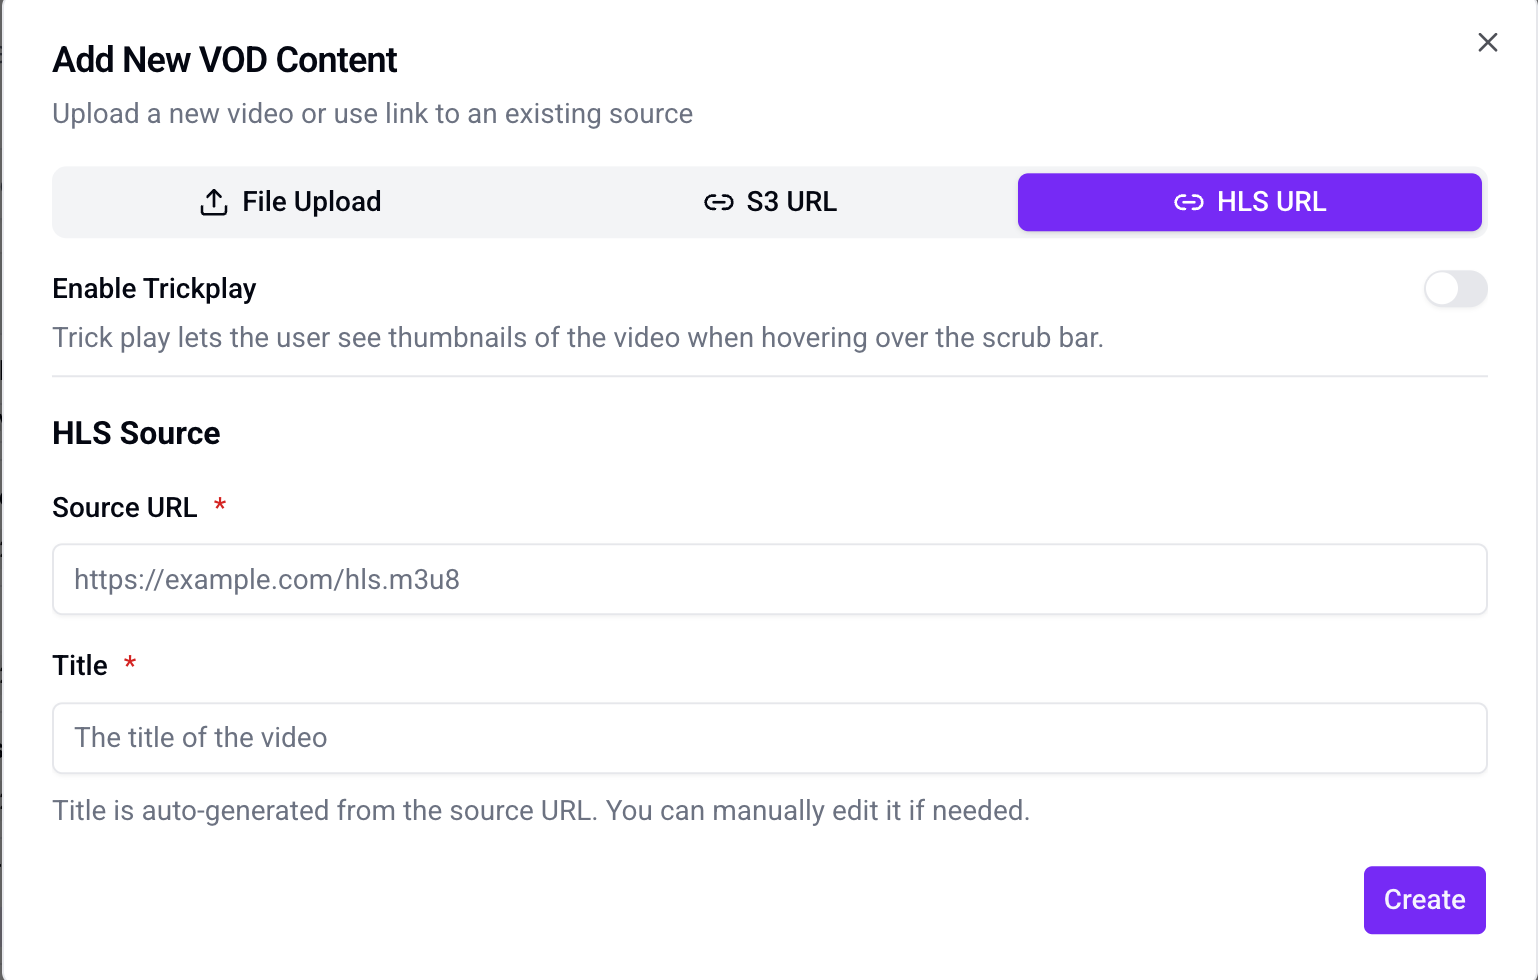
Figure 4. Add New VOD Content dialog, HLS URL tab. Optional Trickplay, required Source URL (.m3u8) and Title, then Create. DRM is not shown on this tab.
After create, open the video from the list to complete metadata and publish.
Step 3: Complete Content Metadata
Open the video. The detail page is grouped into Basic Details, Additional Metadata, and Other Details.
Start with Content Metadata.
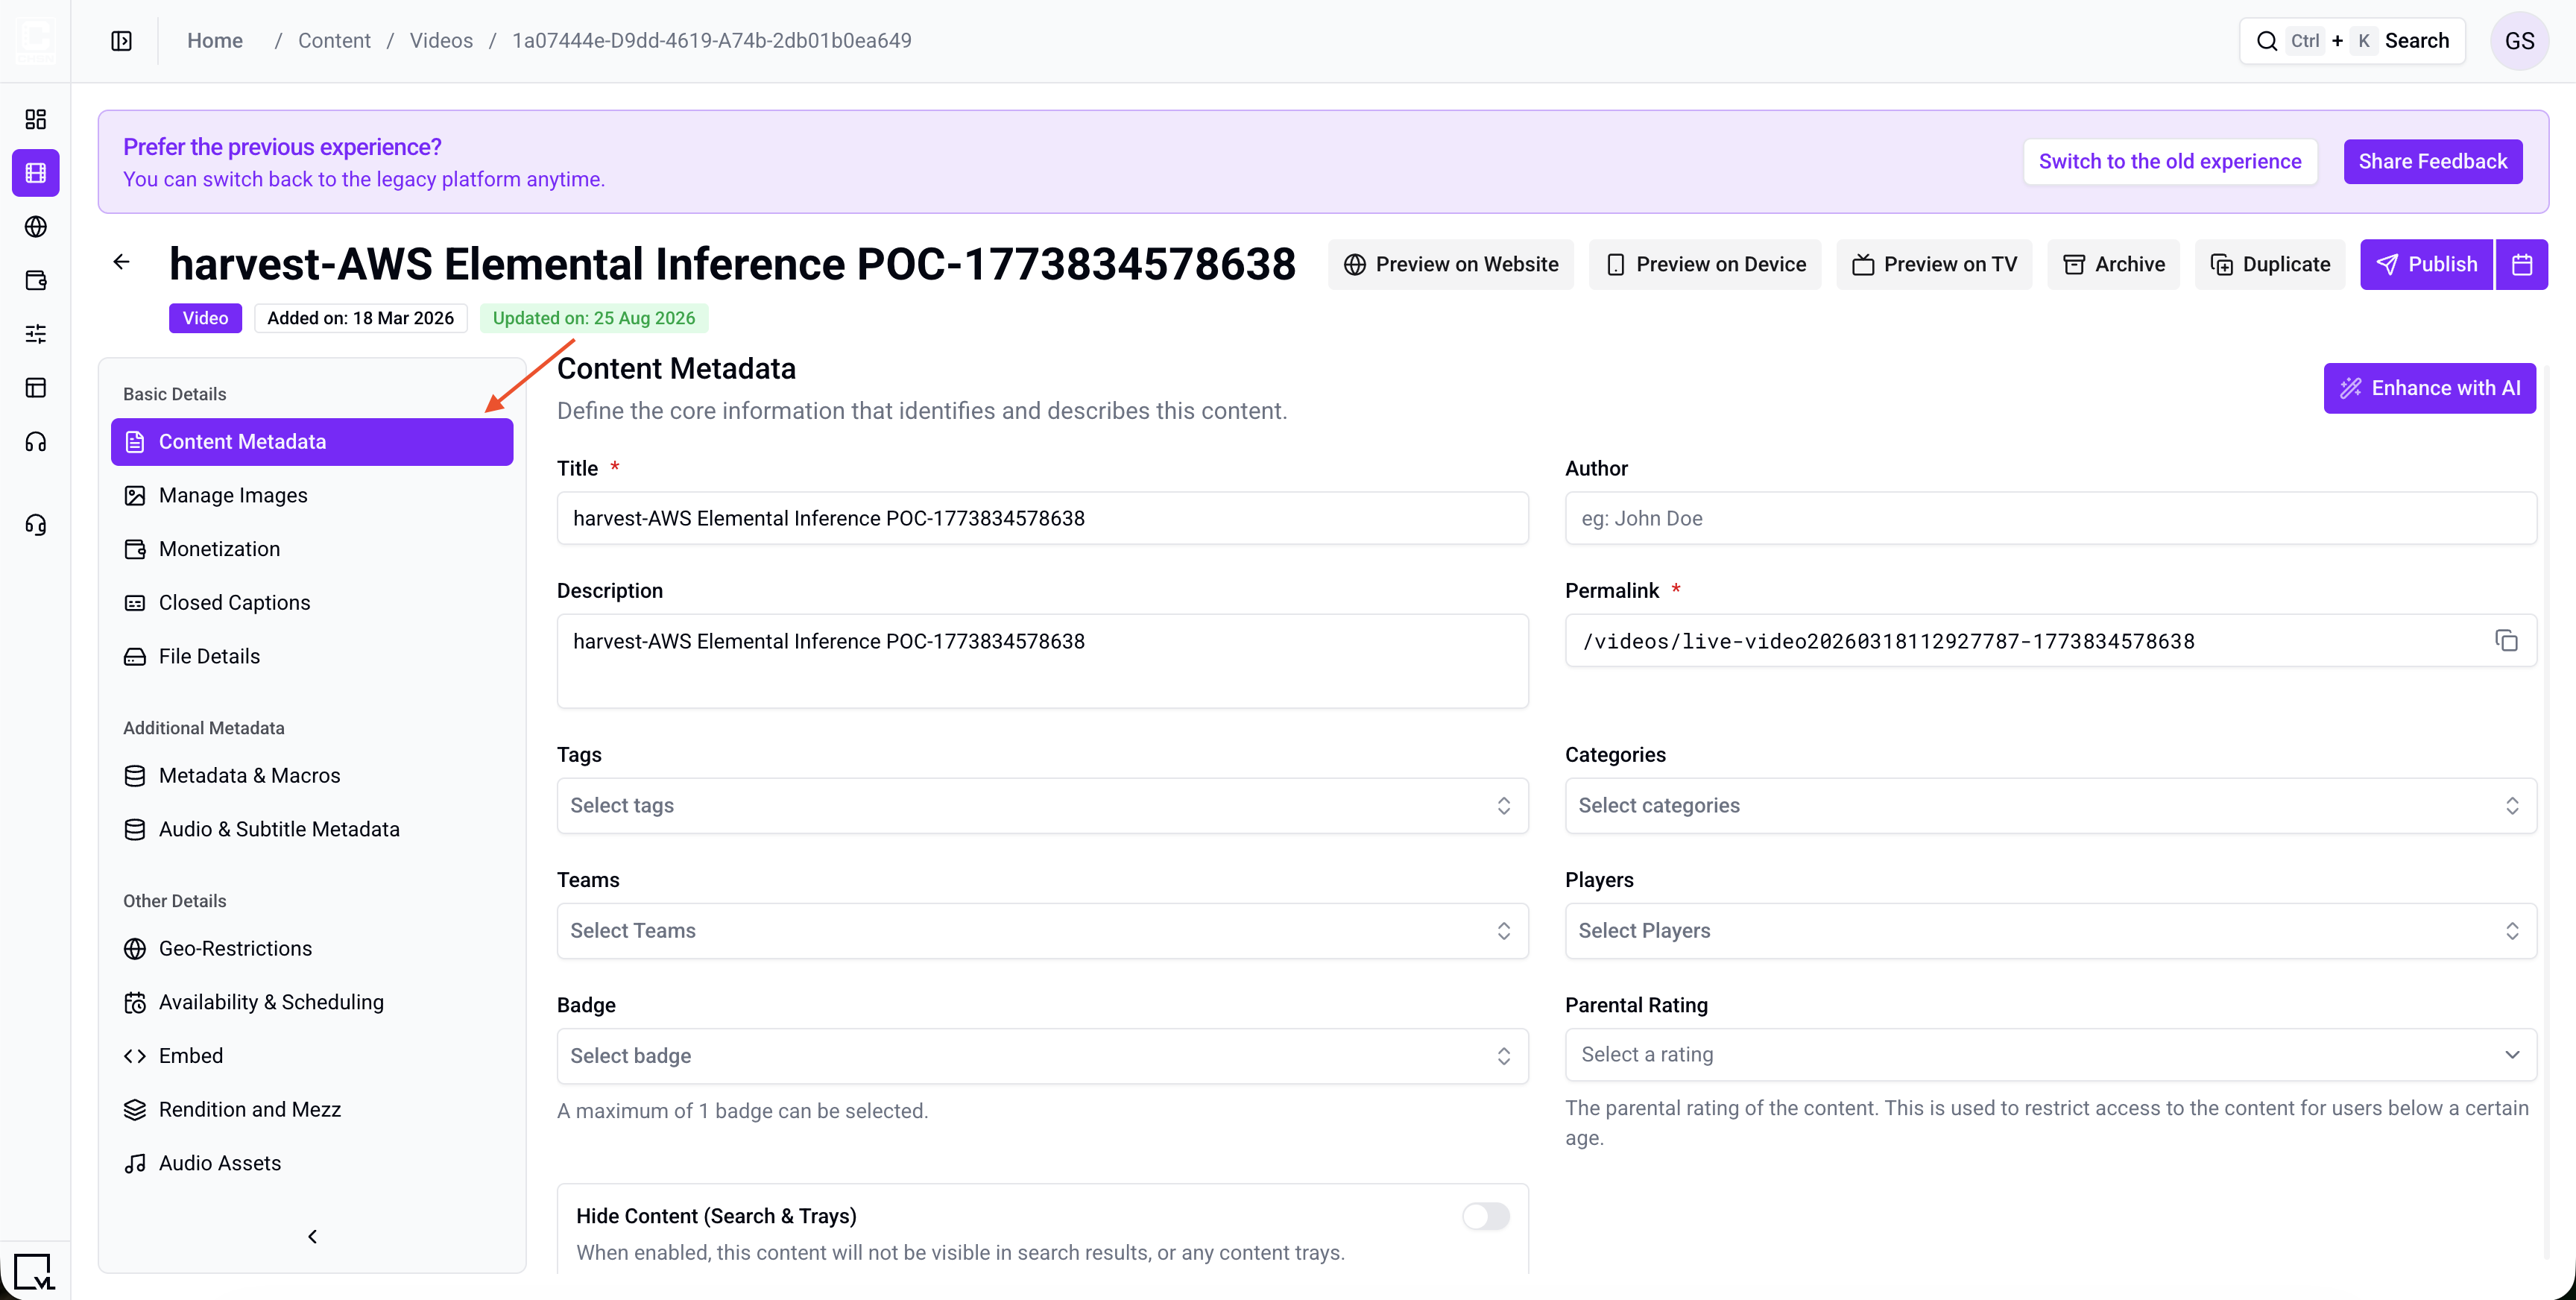
Figure 5. Video detail page, Content Metadata (under Basic Details). Required fields are Title and Permalink. The left sidebar groups Basic Details, Additional Metadata, and Other Details.
| Field | Required | Description | Example |
|---|---|---|---|
| Title | Yes | Customer-facing title. Replace any auto-generated file name with an editorial title. | Championship Final — Match Highlights |
| Permalink | Yes | The URL path for this video. See permalink guidelines below. | /championship-final-highlights |
| Description | No | Longer summary shown on the detail page and in discovery. | Relive the best moments from the championship final, including both goals and the winning penalty save. |
| Author | No | Attribution for the person or team that produced the video. | Sports Desk |
| Tags | No | Keywords for search and programmatic trays. Type to choose an existing tag or create a new one. | highlights, championship, football |
| Categories | No | Higher-level grouping (genre, show, sport). Used to drive trays and “See all” landing pages. | Sports Highlights |
| Teams | No | Links Team objects to the video (used mainly by sports services). | City United |
| Players | No | Links Person objects — talent, players, presenters. This is not a video player setting. | Alex Moore |
| Badge | No | One visual badge shown on the thumbnail. A maximum of one badge can be selected. | Featured |
| Parental Rating | No | Age rating used to restrict playback for younger viewers. | PG-13, TV-MA, U/A 13+ |
To link a team or a player, that object must already exist. Create it first with Create a Team Object or Create a Person Object
Permalink guidelines
Use the same rules as other content types:
-
Start with a slash (
/) -
Lower-case letters only
-
No spaces or special characters except dash (
-) or underscore (_); dashes are preferred -
No leading or trailing whitespace
-
Keep it SEO-friendly (about 59 characters)
-
Remove auto-generated numeric identifiers when you editorialize the path
-
Good:
/championship-final-highlights -
Avoid:
/Championship Final Highlights_2024_final_v3
You can change the permalink later if you need a better URL. To see who changed it and when, open the Version History tab.
Quick settings
| Setting | What it does |
|---|---|
| Hide Content (Search & Trays) | Keeps the video published and playable by direct link, but hides it from search results and from every content tray. Use this for videos that should only be reachable from a campaign link. |
| Enable Vertical Video | Marks the video as portrait (9:16) so it plays in the vertical player and can appear in vertical trays. This toggle only appears if vertical video is enabled for your site. |
Step 4: Manage Images
Open Manage Images.
The 16:9 Landscape image is required to publish. Recommended size: 1920 × 1080 px. Upload images already cropped to the correct aspect ratio. Tools does not crop for you.
| Image slot | Typical use | Recommended size |
|---|---|---|
| 16:9 Landscape (required) | Primary thumbnail on trays, search, and detail | 1920 × 1080 px |
| 1:1 Square | Square grids and some mobile layouts | 1200 × 1200 px |
| 32:9 Ultra-Wide (OTT) | Required if you use the 32:9 carousel | 3840 × 1080 px |
| 3:4 Portrait | Poster-style featured placements | 1200 × 1600 px |
| 9:16 Vertical | Mobile-first / vertical video experiences | 1080 × 1920 px |
| 4:3 Standard | Legacy and editorial layouts | 1600 × 1200 px |
| 2:3 Portrait | Compact posters and listings | 800 × 1200 px |
.png)
Figure 6. Manage Images. 16:9 Landscape is marked Required. Expand a ratio row to upload thumbnails, posters, or banners. Tools does not crop images.
After you publish the video and curate it onto a tray, these images appear on that tray and in search.
Step 5: Configure Additional Video Settings
These sections are optional for many sites, but complete the ones your service uses before you publish.
Monetization
Attach the subscription model, plans, or plan groups that should unlock this video. If no model is attached, playback follows your site’s default entitlement rules.
- Select Add Model and choose the monetization model, for example
SVODorTVOD. - Under Monetization Plans, select the plans or plan groups that unlock the video, for example
Premium MonthlyandPremium Annual. - Save your selection.
A viewer who does not hold one of the selected plans sees the paywall CTA instead of the player.
.png)
Figure 7.1. Monetization. Select Add Model, then attach the subscription model, plans, or plan groups that should unlock this video.
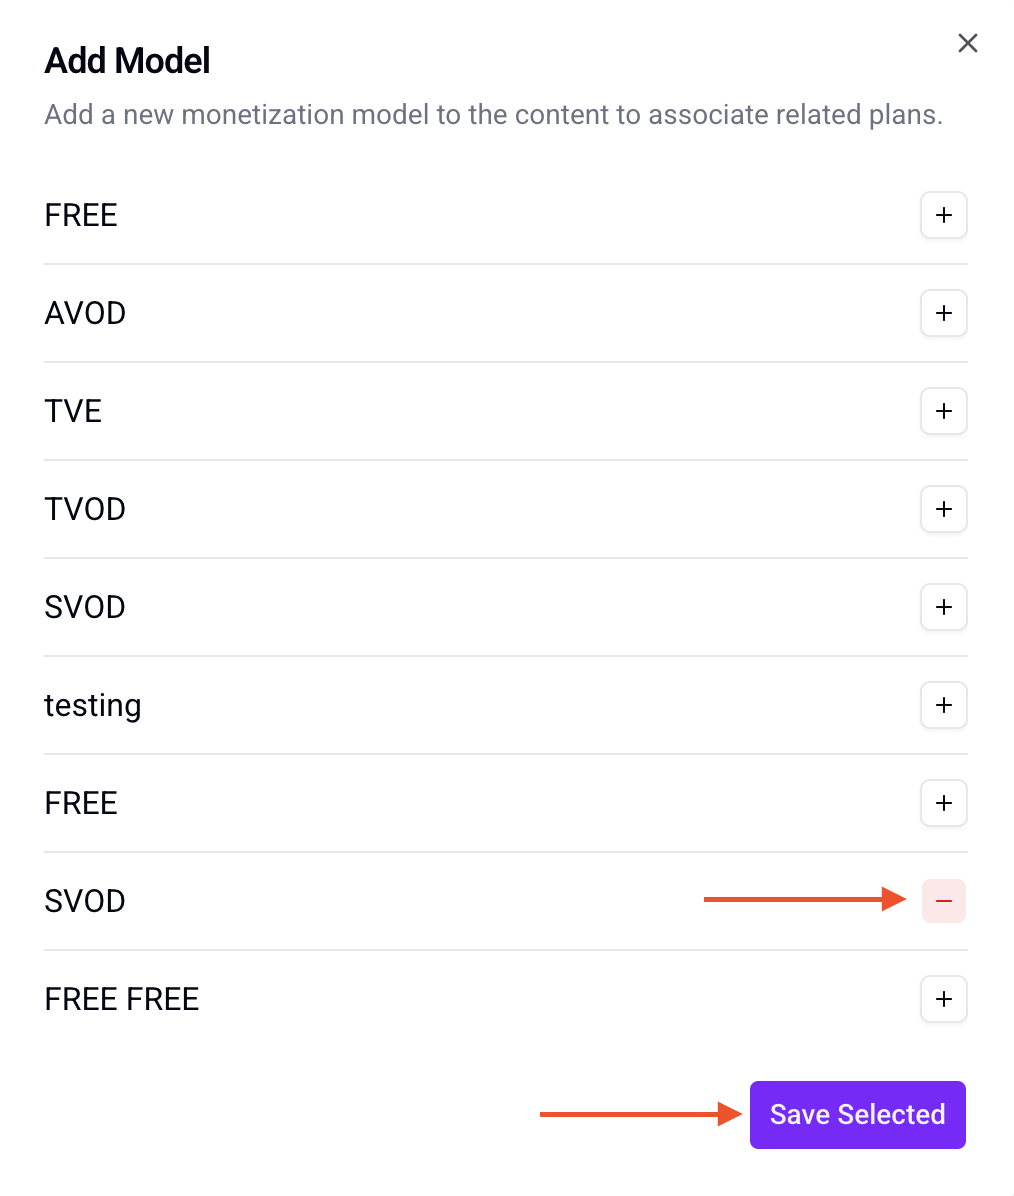
Figure 7.2. Monetization. Select a Monetization Model, after selection. Click on Save Selected button.
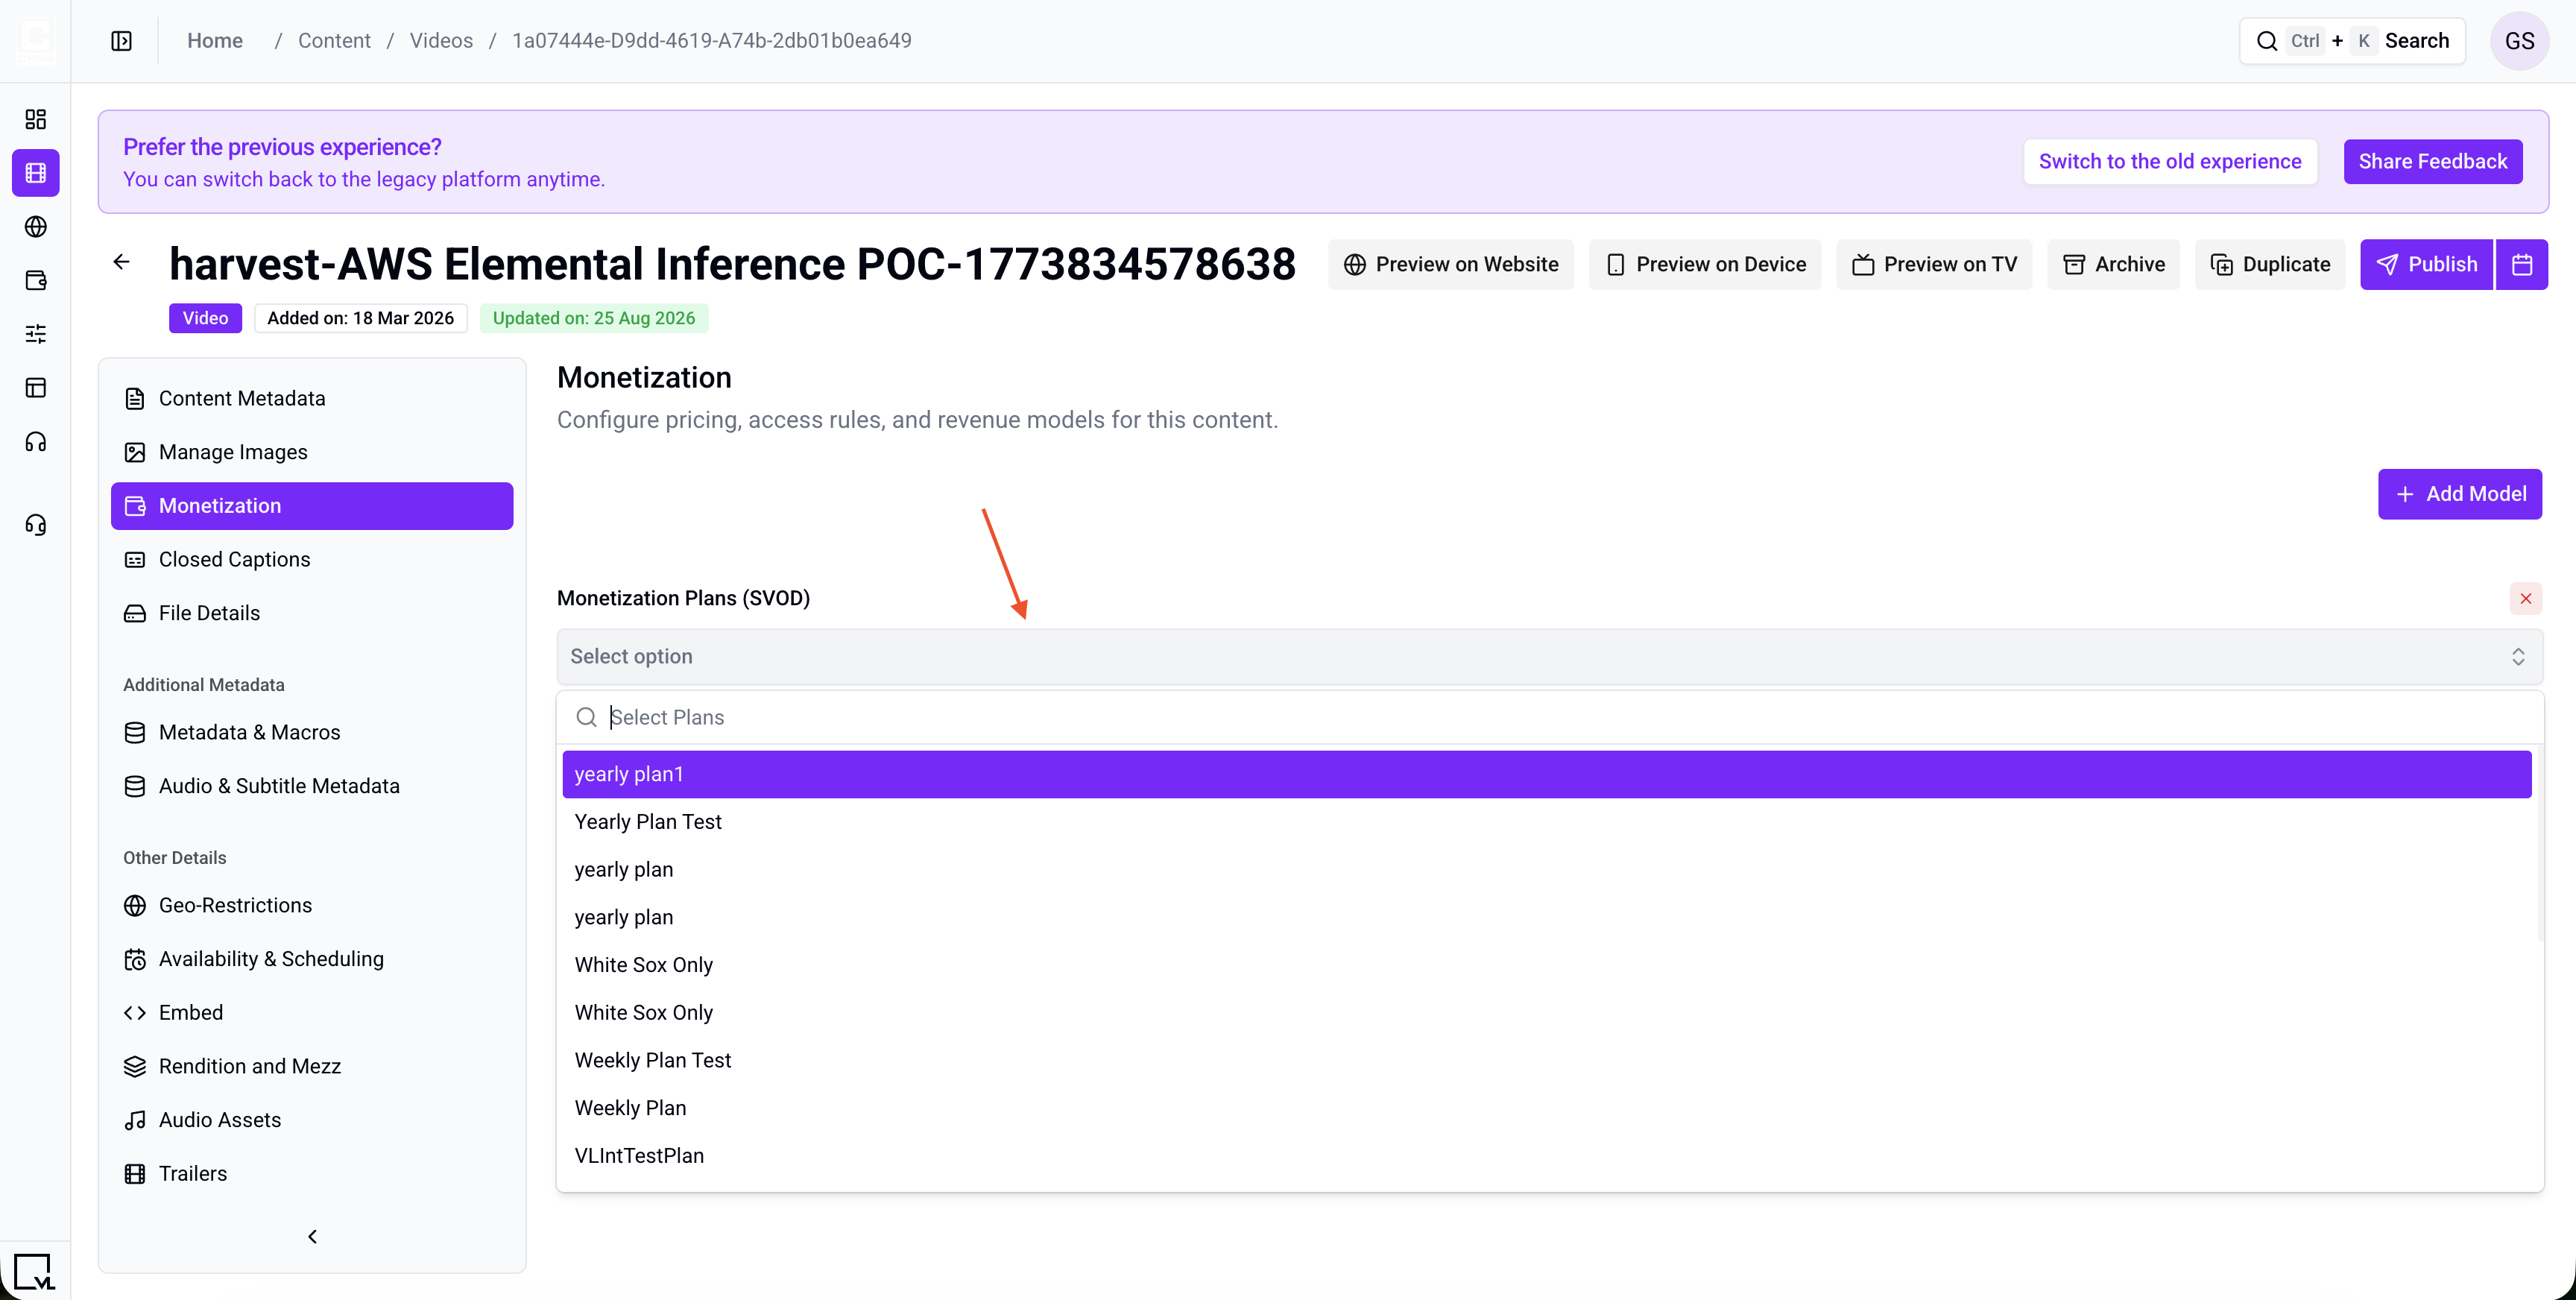
Figure 7.3. Monetization. Select a Monetization Plans from the dropdown.
Closed Captions
Upload .vtt or .srt files and set the language for each track. The language is required before the file will upload, so pick it in the same step.
Example: upload championship-final-highlights-en.vtt and set the language to English.
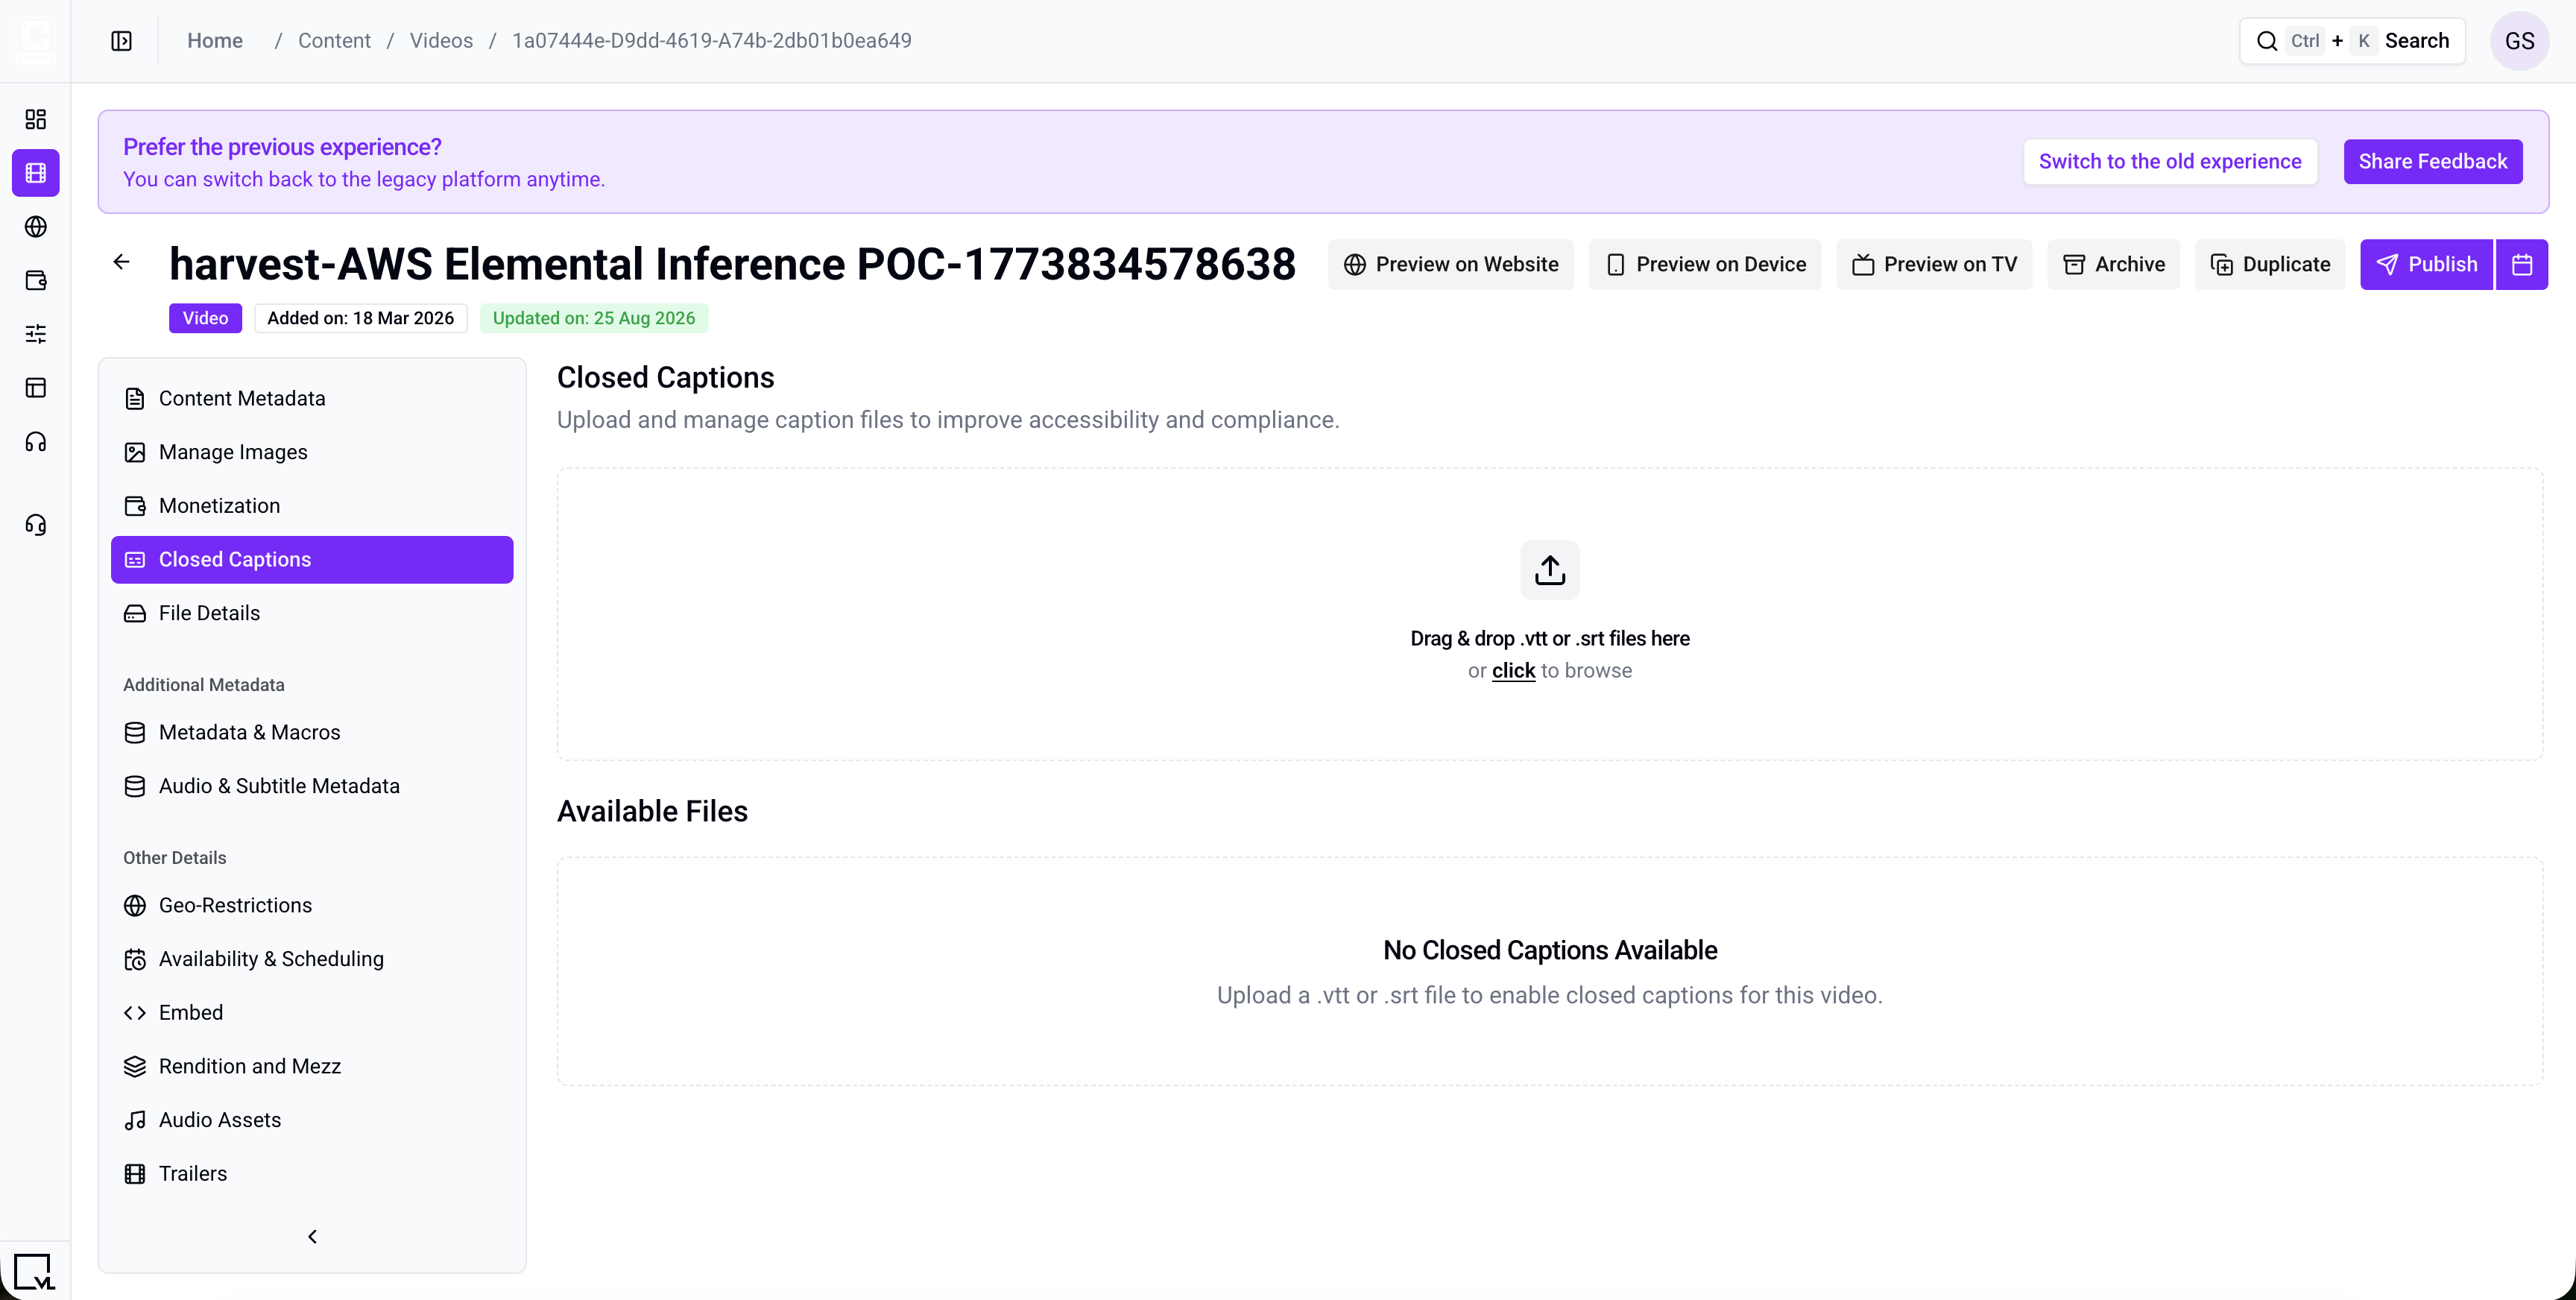
Figure 8. Closed Captions. Drag and drop .vtt or .srt files, then set the language for each track under Available Files.
File Details
File Details shows what Tools recorded about the source file. Most values are filled in automatically and cannot be edited.
| Field | Editable | Description | Example |
|---|---|---|---|
| Name | No | The file name of the ingested video | championship-final-highlights.mp4 |
| Size | No | Size of the source file | 300 MB |
| Year | No | Year taken from the source metadata | 2024 |
| Runtime | Yes | Duration of the video. Enter it as hh:mm:ss |
00:10:45 for 10 minutes 45 seconds |
| Uploaded On | No | Date and time the file was ingested | 15 Jun 2024, 08:00 |
| Uploaded By | No | The Tools user who ingested the file | jane.doe@example.com |
Rendition and Mezz
Review the transcoded outputs of the source file. Use this section to preview renditions, re-encode, or replace the mezzanine if encoding failed.
If the video was created with DRM enabled, you will see the protected renditions listed here:
- FairPlay — Apple DRM, used on iOS, iPadOS, tvOS, and Safari
- PlayReady — Microsoft DRM, used on Windows, Xbox, and many smart TVs
- Widevine — Google DRM, used on Android and Chrome
While status is Processing, wait until encoding finishes before you expect playback on the site.
Geo-Restrictions
Use this section when a video may only be watched in certain places.
- Licenses — apply a territorial rights license so the video plays only in the countries that license allows. Move a license from Available Licenses to Applied Licenses, then select Apply License Changes.
- Zipcode Groups — restrict the video to specific postal or ZIP code groups, which is common for regional sports blackouts. Example: apply a
Home Market Blackoutgroup so local viewers do not get the stream.
Licenses and zipcode groups must be created once in Tools before you can attach them to a video.
Availability & Scheduling
Set when the video becomes available to users:
| Field | Description | Example |
|---|---|---|
| Start Date & Time | Before this time, users cannot access the video. Must be a future date and time. | 15 Jun 2024, 08:00 |
| End Date & Time | After this time, the video becomes unavailable. Optional, and must also be a future date and time. | 31 Dec 2024, 23:59 |
| Timezone | Timezone the start and end times are read in. Always set this, otherwise the window can shift for your audience. | America/New_York (UTC−05:00) |
| AIR Date & Time | Editorial or broadcast air date. This is when the content originally aired, and it is separate from availability. | 15 Jun 2024 |
| Season AIR Date & Time | The season this video belongs to, for sports and episodic content. | 01 Oct 2024 |
Setting a start date does not publish the video for you. You still publish (or schedule) the object in Step 6 — the availability window then controls when viewers can actually open it.
Trailers, Cast & Crew, Related Videos
- Trailers — attach a promo or teaser. The trailer must already exist as its own video object, so upload it first. Example: attach
Championship Final — Trailer. - Cast & Crew — production credits. The fields are Cast and Director.
- Related Videos — videos to recommend from this title. Example: attach
Semi-Final — Match Highlightsso viewers keep watching.
Embed
Embed gives you a ready-made embed code for the video so it can be played on an external site or blog. The code is generated for you and is read-only — copy it and paste it into the destination page.
Audio Assets
Use Audio Assets to attach an alternate audio track, such as a second-language commentary. Select Add New and enter the Asset URL, which must be an HLS stream — for example https://cdn.example.com/championship-final/commentary-es.m3u8.
Metadata & Macros
Metadata & Macros stores extra key/value pairs that your site or apps can read. Use it for anything the standard fields do not cover.
Example: key sponsor, value Acme Sports. Select Add Metadata to add a row.
SEO (Search & Discovery)
| Field | Description | Example |
|---|---|---|
| Title | SEO title for search results and browser tabs | Championship Final Highlights 2024 | Top Plays |
| H1 Title | Main on-page heading | Championship Final — Match Highlights |
| H2 Title | Supporting heading | Every goal and the winning save |
| Description | Meta description. Aim for 150–160 characters | Watch every goal from the 2024 championship final, plus the penalty save that decided the title. |
| Keywords | Search terms for this video, separated by commas | championship final, football highlights, 2024 final |
| Redirect URL | Optional. Send anyone who opens this permalink to a different page | https://example.com/championship-final-2024 |
| Redirect Code | 301 for a permanent move, 302 for a temporary one |
301 |
Write the SEO title and description for a viewer searching on Google, not for your internal naming. Championship Final Highlights 2024 performs better than final_highlights_v3.
Version History
Open Version History to see who changed the video and when. Use it to check edits such as a permalink change, a title update, or who published the video.
Step 6: Publish the Video
Required before publish:
- Title
- Permalink
- 16:9 Landscape image
- Encoding complete (for File Upload and Cloud URL ingest). Do not publish while status is still Processing if you need the video to play immediately.
- When you are ready, select Publish to go live now.
- Or use Schedule to publish at a later date and time.
- After publish, use Update for further metadata changes, Unpublish to take it down, or Archive to retire it.
You can also Duplicate a video object when you need a similar title with new metadata.
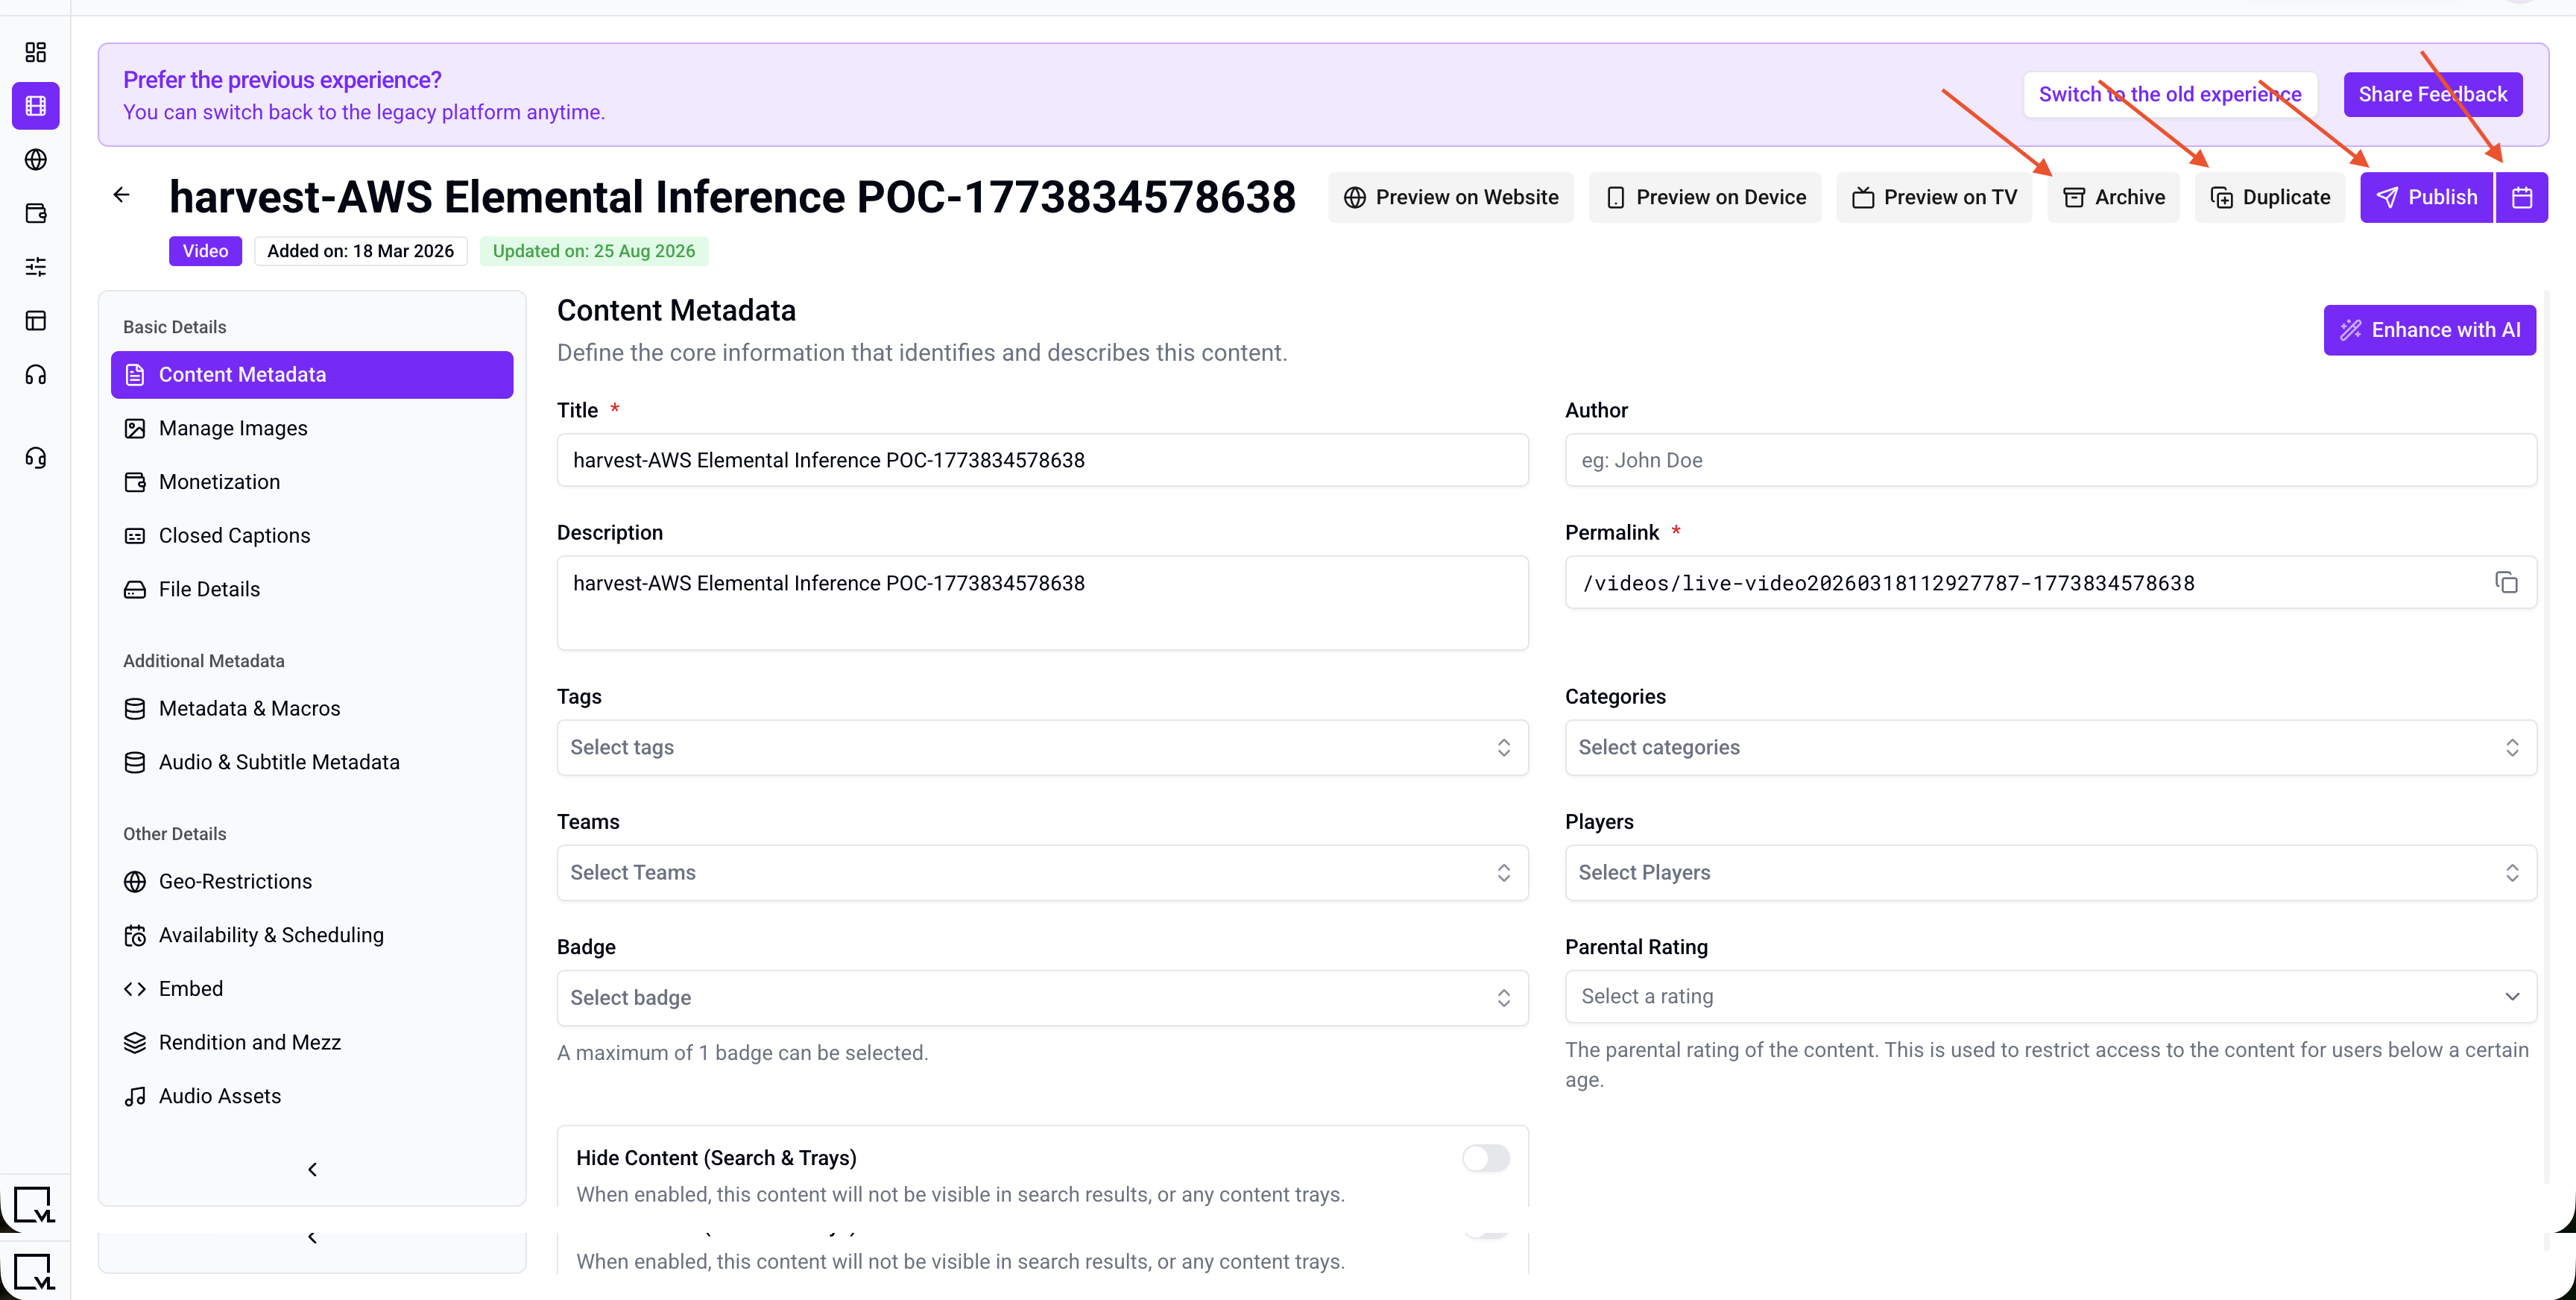
Figure 9. Video detail header. Use Publish (or Schedule) to go live. After publish, use Update, Unpublish, Archive, or Duplicate.
The new video is now in the CMS library. It does not appear on the website until you curate it onto a page or a user opens its permalink (which uses the Video Template Page).
Step 7: Curate the Video on a Template Builder Page
To show the video on Home (or any Modular Page):
- Open AppCMS → Edit Template Builder.
- Open Modular Pages and find the page (for example, Home).
- Add or select a tray module. Typical trays for videos:
- VL HighlightTray
- VL LandscapeTray
- VL Vertical Tray
- VL Live Preview Tray (for featured / autoplay previews)
- VL Vertical Video Tray (for vertical videos)
- Open module settings and set a tray title, for example
Championship Highlights. - Choose Content Selection:
- Manually Curate — search for the video and stack items in the order you want.
- Programmatically Generate — fill the tray from tags or categories. For example, generate from the tag
highlightsand every new video with that tag joins the tray automatically.
- In Thumbnail Type, choose the ratio that matches the images you uploaded. Template Builder writes these with an asterisk —
16*9,3*4,32*9,9*16,1*1,4*3. - Publish the Template Builder page.
Changes can take about 5–10 minutes to appear on the website because of caching. To verify sooner, use a private window, another browser, or clear cookies and cache.
Clicking a video thumbnail takes the user to that video’s detail page (the Video Template Page).
Step 8: Video Template Page
The layout for an individual video is defined by the Video Template Page.
- In Template Builder, open Template Pages.
- Open Video Template Page.
- The featured module is VL Video Detail (some sites also have VL Video Detail 02).
- Customize the page in that module:
- Player Config — set the Default Player Provider used for playback.
- Monetisation CTA — set the Primary CTA and Secondary CTA shown to a viewer who is not entitled to the video, for example
Subscribe nowandSign in. - Trays under the player, fonts, and on-page copy.
- Publish the template.
You can have more than one Video Template Page, but only one can be set as the default. Videos use the default template unless a custom template is assigned on the video object.
Troubleshooting
| Problem | What to check |
|---|---|
| The upload fails or never finishes | Check your internet connection and keep the browser tab open until the upload completes. Very large files can be rejected by the server — re-encode to a smaller mezzanine and try again, or use the S3 / GCS URL option instead of uploading from your computer. |
| The video stays on Processing | Encoding is still running. Larger and longer files take longer. If the status turns to an error, open Rendition and Mezz and re-encode or replace the source file. |
| Publish is greyed out or shows an error | A required field is missing. Confirm you have a Title, a Permalink, and a 16:9 Landscape image. |
| The video is published but viewers cannot find it | Check Hide Content (Search & Trays) is off, check the availability window has started, and confirm the video is curated onto a tray on a published page. |
| The thumbnail is missing or stretched on a tray | The tray’s Thumbnail Type must match a ratio you actually uploaded in Manage Images. A tray set to 32*9 shows nothing if you only uploaded a 16:9 image. |
| Playback is blocked for some viewers | Check Monetization (they may not hold the required plan) and Geo-Restrictions (their country or ZIP code may be excluded). |
Best Practices
- Write titles for viewers, not for files.
Championship Final — Match Highlightsworks far better in search and on trays thanfinal_hl_v3.mp4. - Tag consistently. Programmatic trays are built from tags and categories, so a misspelled tag means the video silently never appears.
- Upload images at the exact ratio. Tools does not crop for you, so a wrongly sized file will look wrong on every device.
- Set monetization before you publish. Publishing first can briefly expose paid content for free.
- Fill in SEO fields for any video you expect to be found through search engines.
FAQs
Q. Why is my new video stuck on Processing?
File Upload and Cloud URL ingest must transcode before the video is playable. Wait until encoding finishes. If it stays in Error, open Rendition and Mezz (or File Details) and re-encode or replace the source file.
Q. Can I publish without a 16:9 image?
No. Title, permalink, and a 16:9 Landscape image are required to publish.
Q. What is the difference between File Upload, Cloud URL, and HLS URL?
- File Upload — Tools uploads your file and encodes it.
- Cloud URL — Tools pulls a file already in S3 or GCS and encodes it.
- HLS URL — you provide a ready
.m3u8URL; Tools does not transcode a mezzanine.
Q. Is it possible to have two Video template pages?
Yes, but only one can be set as the default.
Q. I published the video but I do not see it on Home.
Publishing adds it to the library. You still need to curate it onto a tray (manually or by tag/category) and publish that Template Builder page. Allow a few minutes for cache.
Q. How do I hide a video from trays and search without unpublishing it?
Enable Hide Content (Search & Trays) in Quick Settings on the video object.
Q. Can I edit a video after publishing?
Yes. Open the video, change what you need, and select Update. You do not have to unpublish first.
Q. Does “Players” mean the video player?
No. Players links people — talent, athletes, presenters — to the video. The playback player is set in Template Builder, under Player Config on the video detail module.
Q. How many badges and tags can I add?
You can select one badge. Tags and categories have no fixed limit, but keep them to the terms you actually build trays from.
Q. What video formats can I upload?
Standard video files such as .mp4, .mov, and .m4v. MP4 is the safest choice. If your file is very large, put it in S3 or GCS and use the Cloud URL option.
Important Information
- Create the video object in Tools. Template Builder only places that object on pages and defines the detail layout.
- Upload images at the correct aspect ratio. Tools will not crop them.
- Do not publish while encoding is still Processing if users need to play the video immediately.
- Use the same permalink style as other content:
/lowercase-path-with-dashes. - Tray thumbnail type must match the image ratios you uploaded (especially 32:9 for ultra-wide carousels).
- Cache can delay frontend updates by 5–10 minutes.
Glossary
| Term | Definition |
|---|---|
| VOD | Video on demand. A video a viewer can start at any time, as opposed to a live stream. |
| Mezzanine | The high-quality source file you upload. Tools encodes it into the renditions viewers actually stream. |
| Rendition | One encoded version of the video at a particular quality or format. Players switch between renditions based on the viewer’s connection. |
| DRM | Digital Rights Management. Encrypts the video so it can only play on authorised devices. FairPlay, PlayReady, and Widevine are the three systems used. |
| HLS | HTTP Live Streaming. A streaming format that uses an .m3u8 playlist file. |
| Trickplay | The thumbnail previews a viewer sees when they hover over or drag the scrub bar. |
| Cue point | A timestamp in the video that marks where something should happen, most often an ad break. |
| Permalink | The permanent URL path for the video, for example /championship-final-highlights. |
| Closed captions | On-screen text of the dialogue and key sounds, used for accessibility and for sound-off viewing. |
| Tray | A horizontal row of content on a page in Template Builder. |
| Entitlement | Whether a given viewer is allowed to play the video, based on their subscription plan. |
| SEO | Search Engine Optimization. Fields that help search engines index and rank the video page. |
Contact Support
If you need help beyond this article, contact the ViewLift support team.
- Email: techsupport@viewlift.com
- Phone (US): +1-800-859-0420
- Phone (UK): +44-203-014-8921
Support hours: B2C requests are handled Monday to Friday. B2B support is available 24/7.
After the video is published in Tools, users can watch it on the site by permalink, or from a tray after you curate it in Template Builder. The detail layout is the Video Template Page.