Introduction
VL Create Profile is a System Screen module in Template Builder. It holds the copy, consents, and brand colors for a create profile screen — name, country, password, legal and promotional consent, and an email-verification modal.
This article explains how to create a Create Profile page in Template Builder, configure VL Create Profile, and publish it. It also explains how profile fields appear on the website (that experience is part of Authentication / Checkout, not this module).
Purpose
The purpose of this article is to help you:
- Create a Create Profile System Screen in Template Builder
- Add and configure the VL Create Profile module
- Edit Images, consent toggles, Labels, Errors, and Brand colors
- Understand how profile details are collected on the website
- Publish the Create Profile page for platforms that load this System Screen
Scope
This article covers:
- Creating a System Screen page for Create Profile in Template Builder
- Adding VL Create Profile to the page layout
- Module settings: Images, consent toggles, Brand, Localization (Labels and Errors)
- How profile fields relate to Authentication / Checkout on the website
It does not cover:
- VL Authentication 01 / VL Authentication 02 as the full sign-in page
- VL Forget Password
- VL Checkout 01 as the full payment page
- Creating users in AppCMS user management
Prerequisites
Before you begin, ensure you have:
- Access to Template Builder for your site
- Terms of Use and Privacy Policy pages (or the paths you will use)
- Copy ready: titles, field placeholders, Submit / Continue / Skip, consent text, email-verification modal
- Legal review of consent and age copy before you go live
Example used in this article
Throughout the steps below we use a page named Create Profile at path/create-profile. ReplaceCLIENT_NAMEin the default consent lines with your site name (for example City United).
Step 1: Open Template Builder
- Log into ViewLift Tools.
- Open AppCMS → Edit Template Builder (or open Template Builder for your site from your usual entry point).
- Confirm you are on the correct site and language (if localization is enabled, use the language selector on the Template Builder home screen before editing page copy).
.png)
Template Builder home. From here you create pages and open System Screens.
Step 2: Create the Create Profile System Screen
The Create Profile page must be a System Screen so that VL Create Profile is available in the module picker.
- In Template Builder, go to Pages.
- Select + ADD NEW (or Create a New Page).
- Enter New Page Name:
Create Profile(or your preferred name). - In New Page Type * Developers Only, select System Screen.
- Optionally set Target Language (If localized Page) if you are creating a language-specific page.
- Select CREATE.
Set the page path
- On Page Settings, set the page path to
/create-profileunless your site already uses another create-profile path. - Confirm the page type is System Screen.
- Save page settings if prompted.
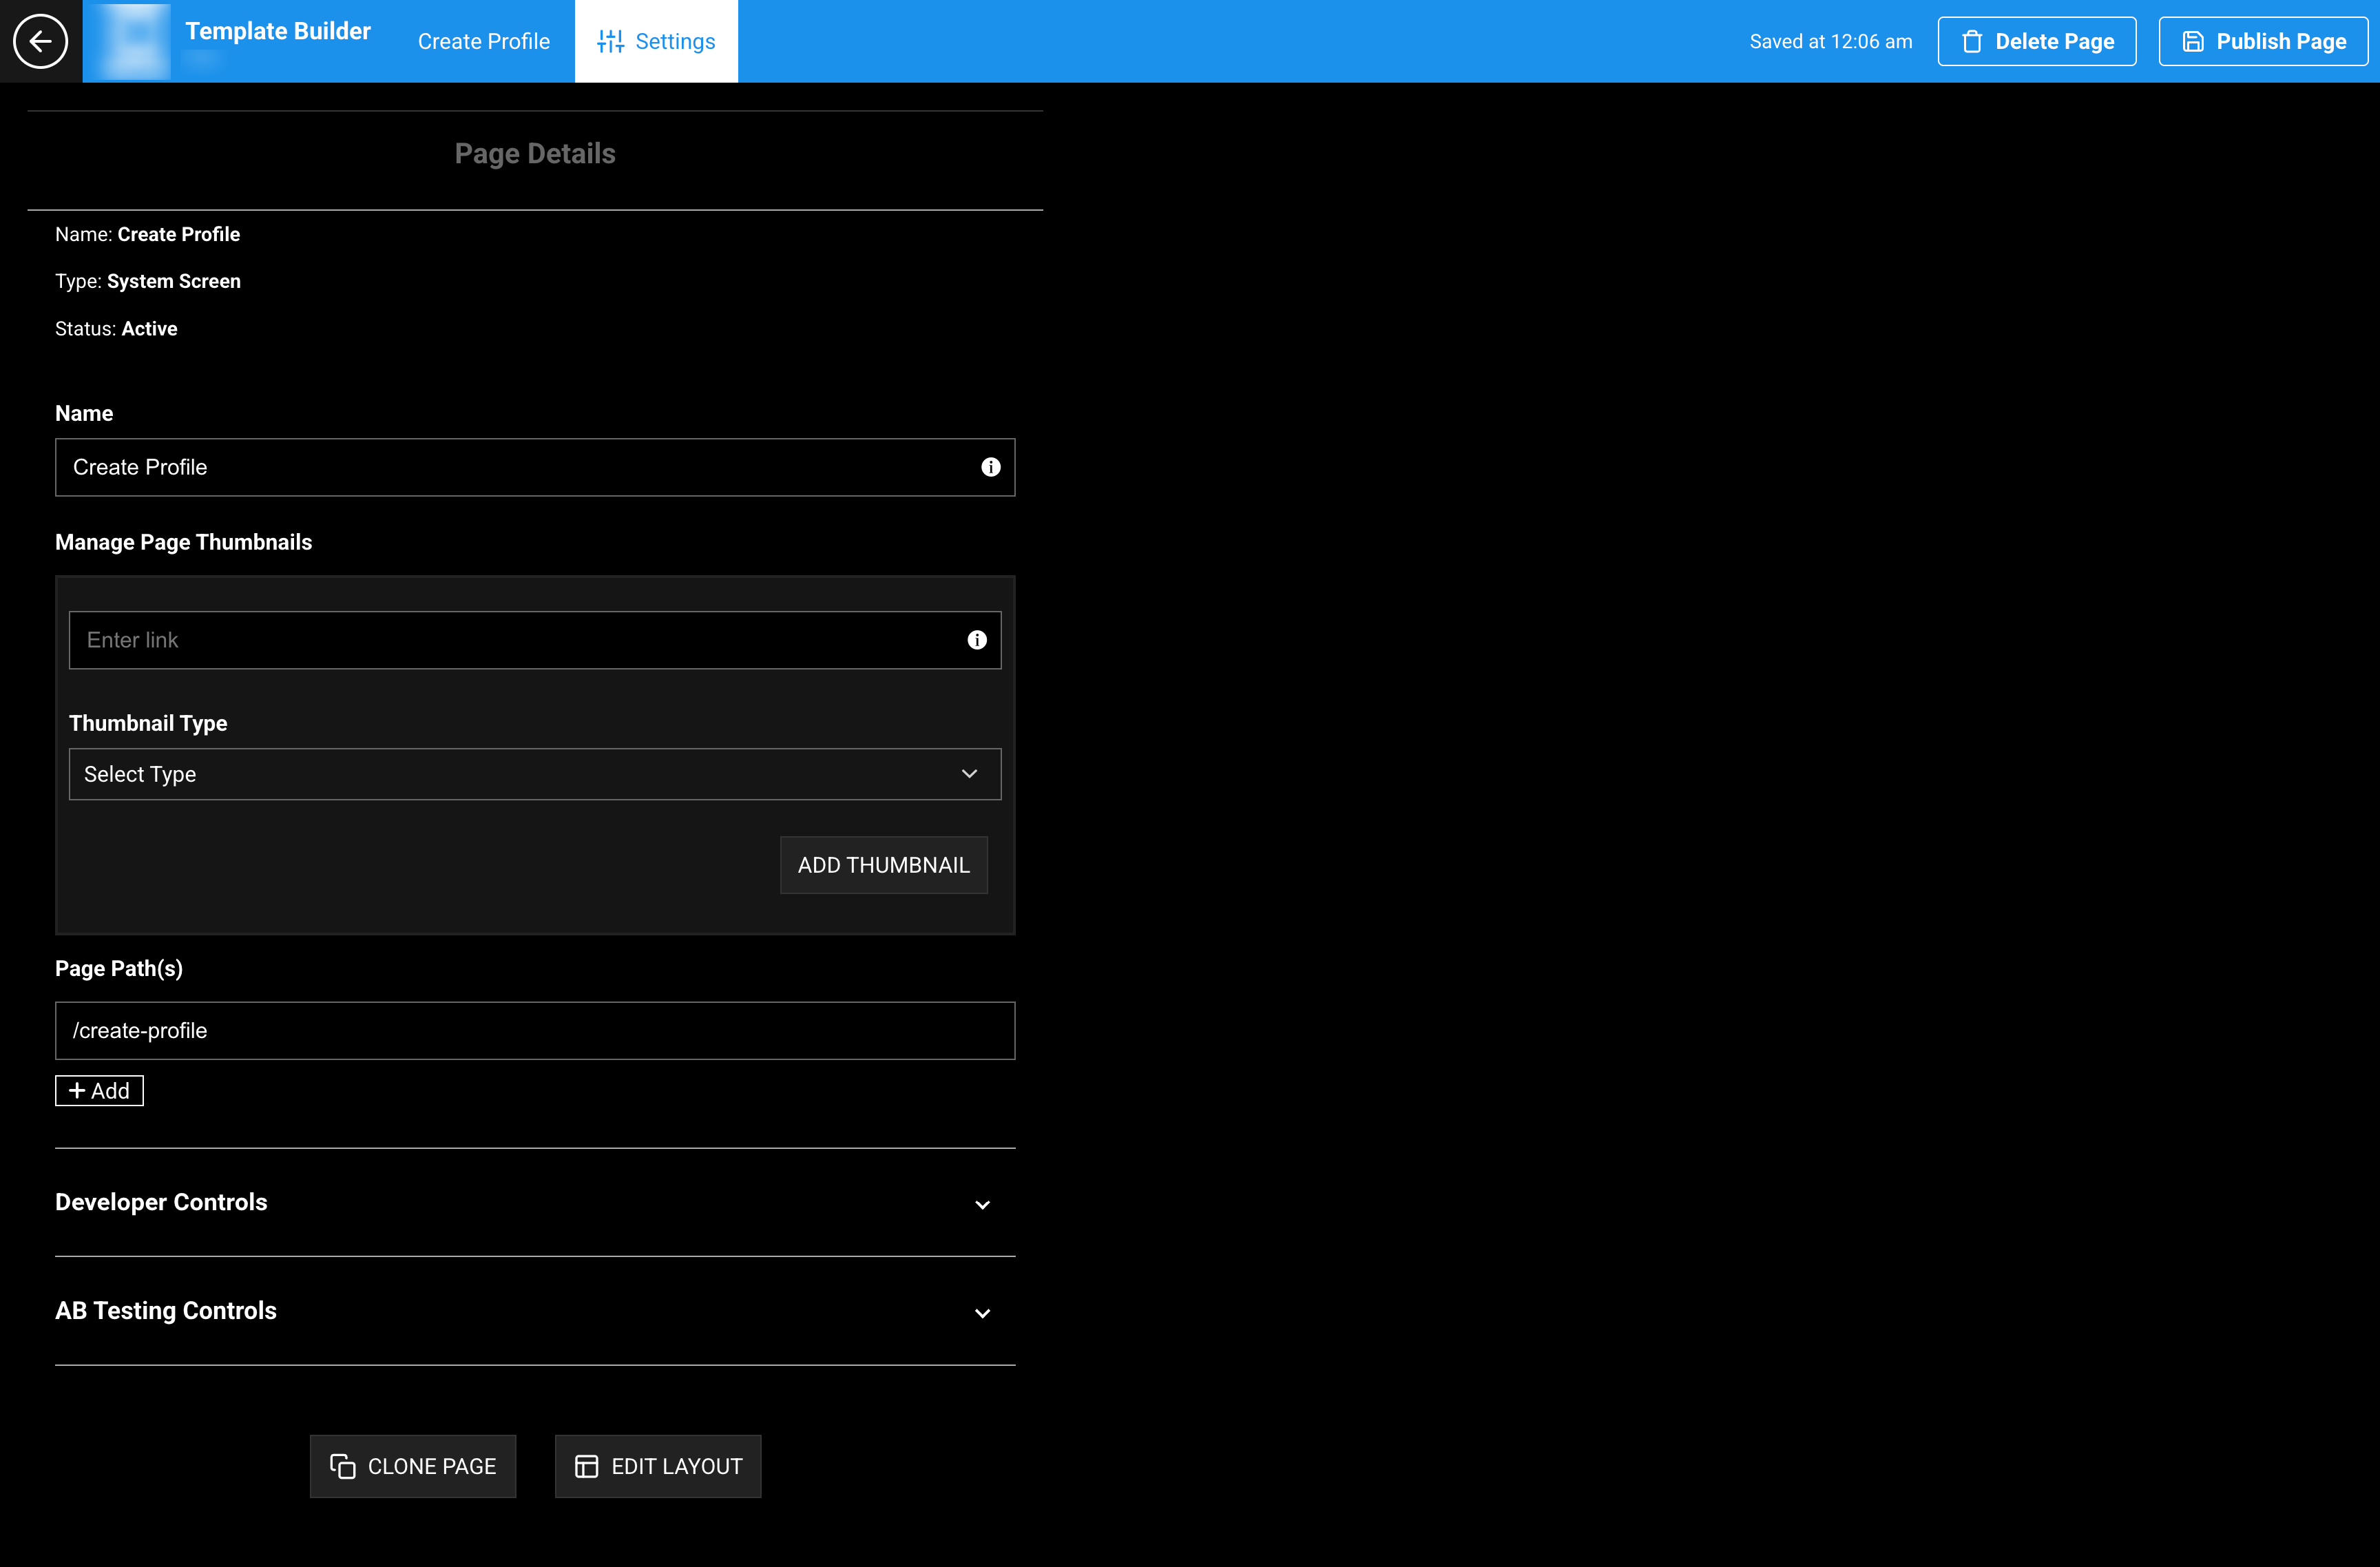
Page Settings. Set the path to /create-profile so it matches the default Create Profile Permalink on VL Authentication 01.
Tip: VL Authentication 01 includes Create Profile Permalink (default
/create-profile). Keep this page path the same as that permalink on platforms that send customers here after sign-in.
Step 3: Add VL Create Profile to the layout
- Open the Create Profile page.
- Select Edit Layout.
- Select Add a New Module.
- Because the page is a System Screen, the picker shows system modules.
- Search for or select VL Create Profile.
- Insert the module into the page layout.
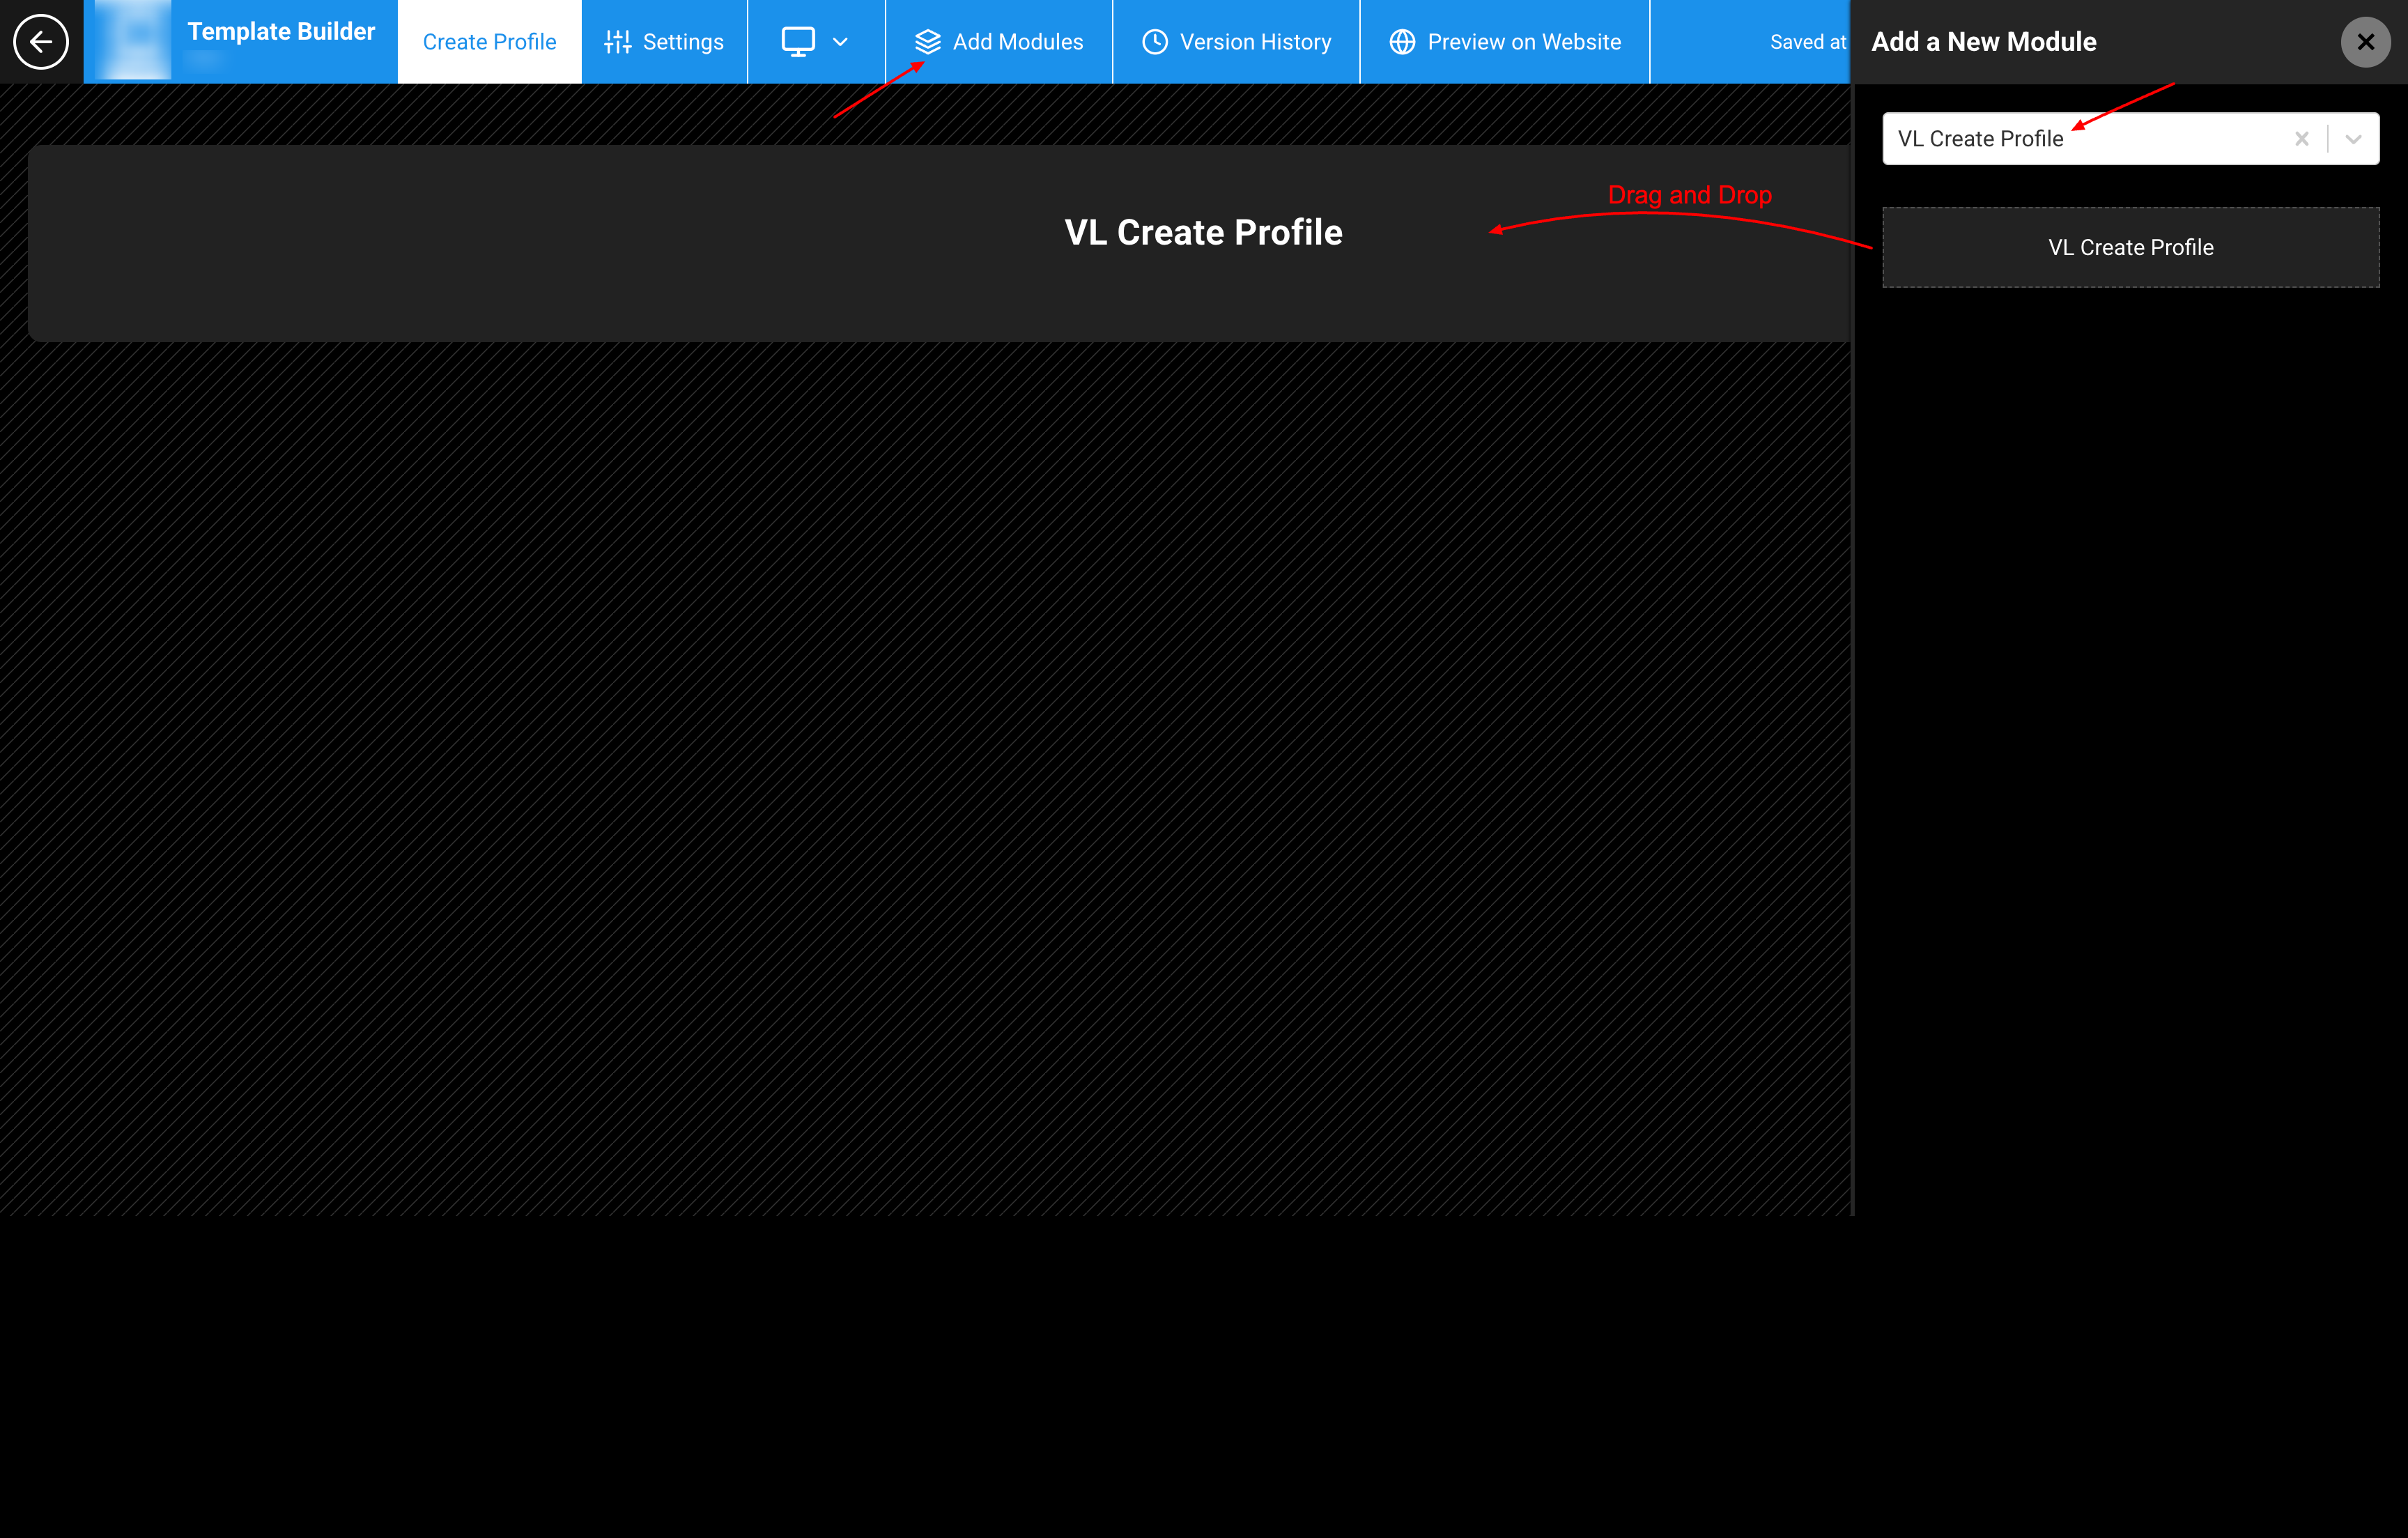
Edit Layout → Add a New Module. Search for and insert VL Create Profile.
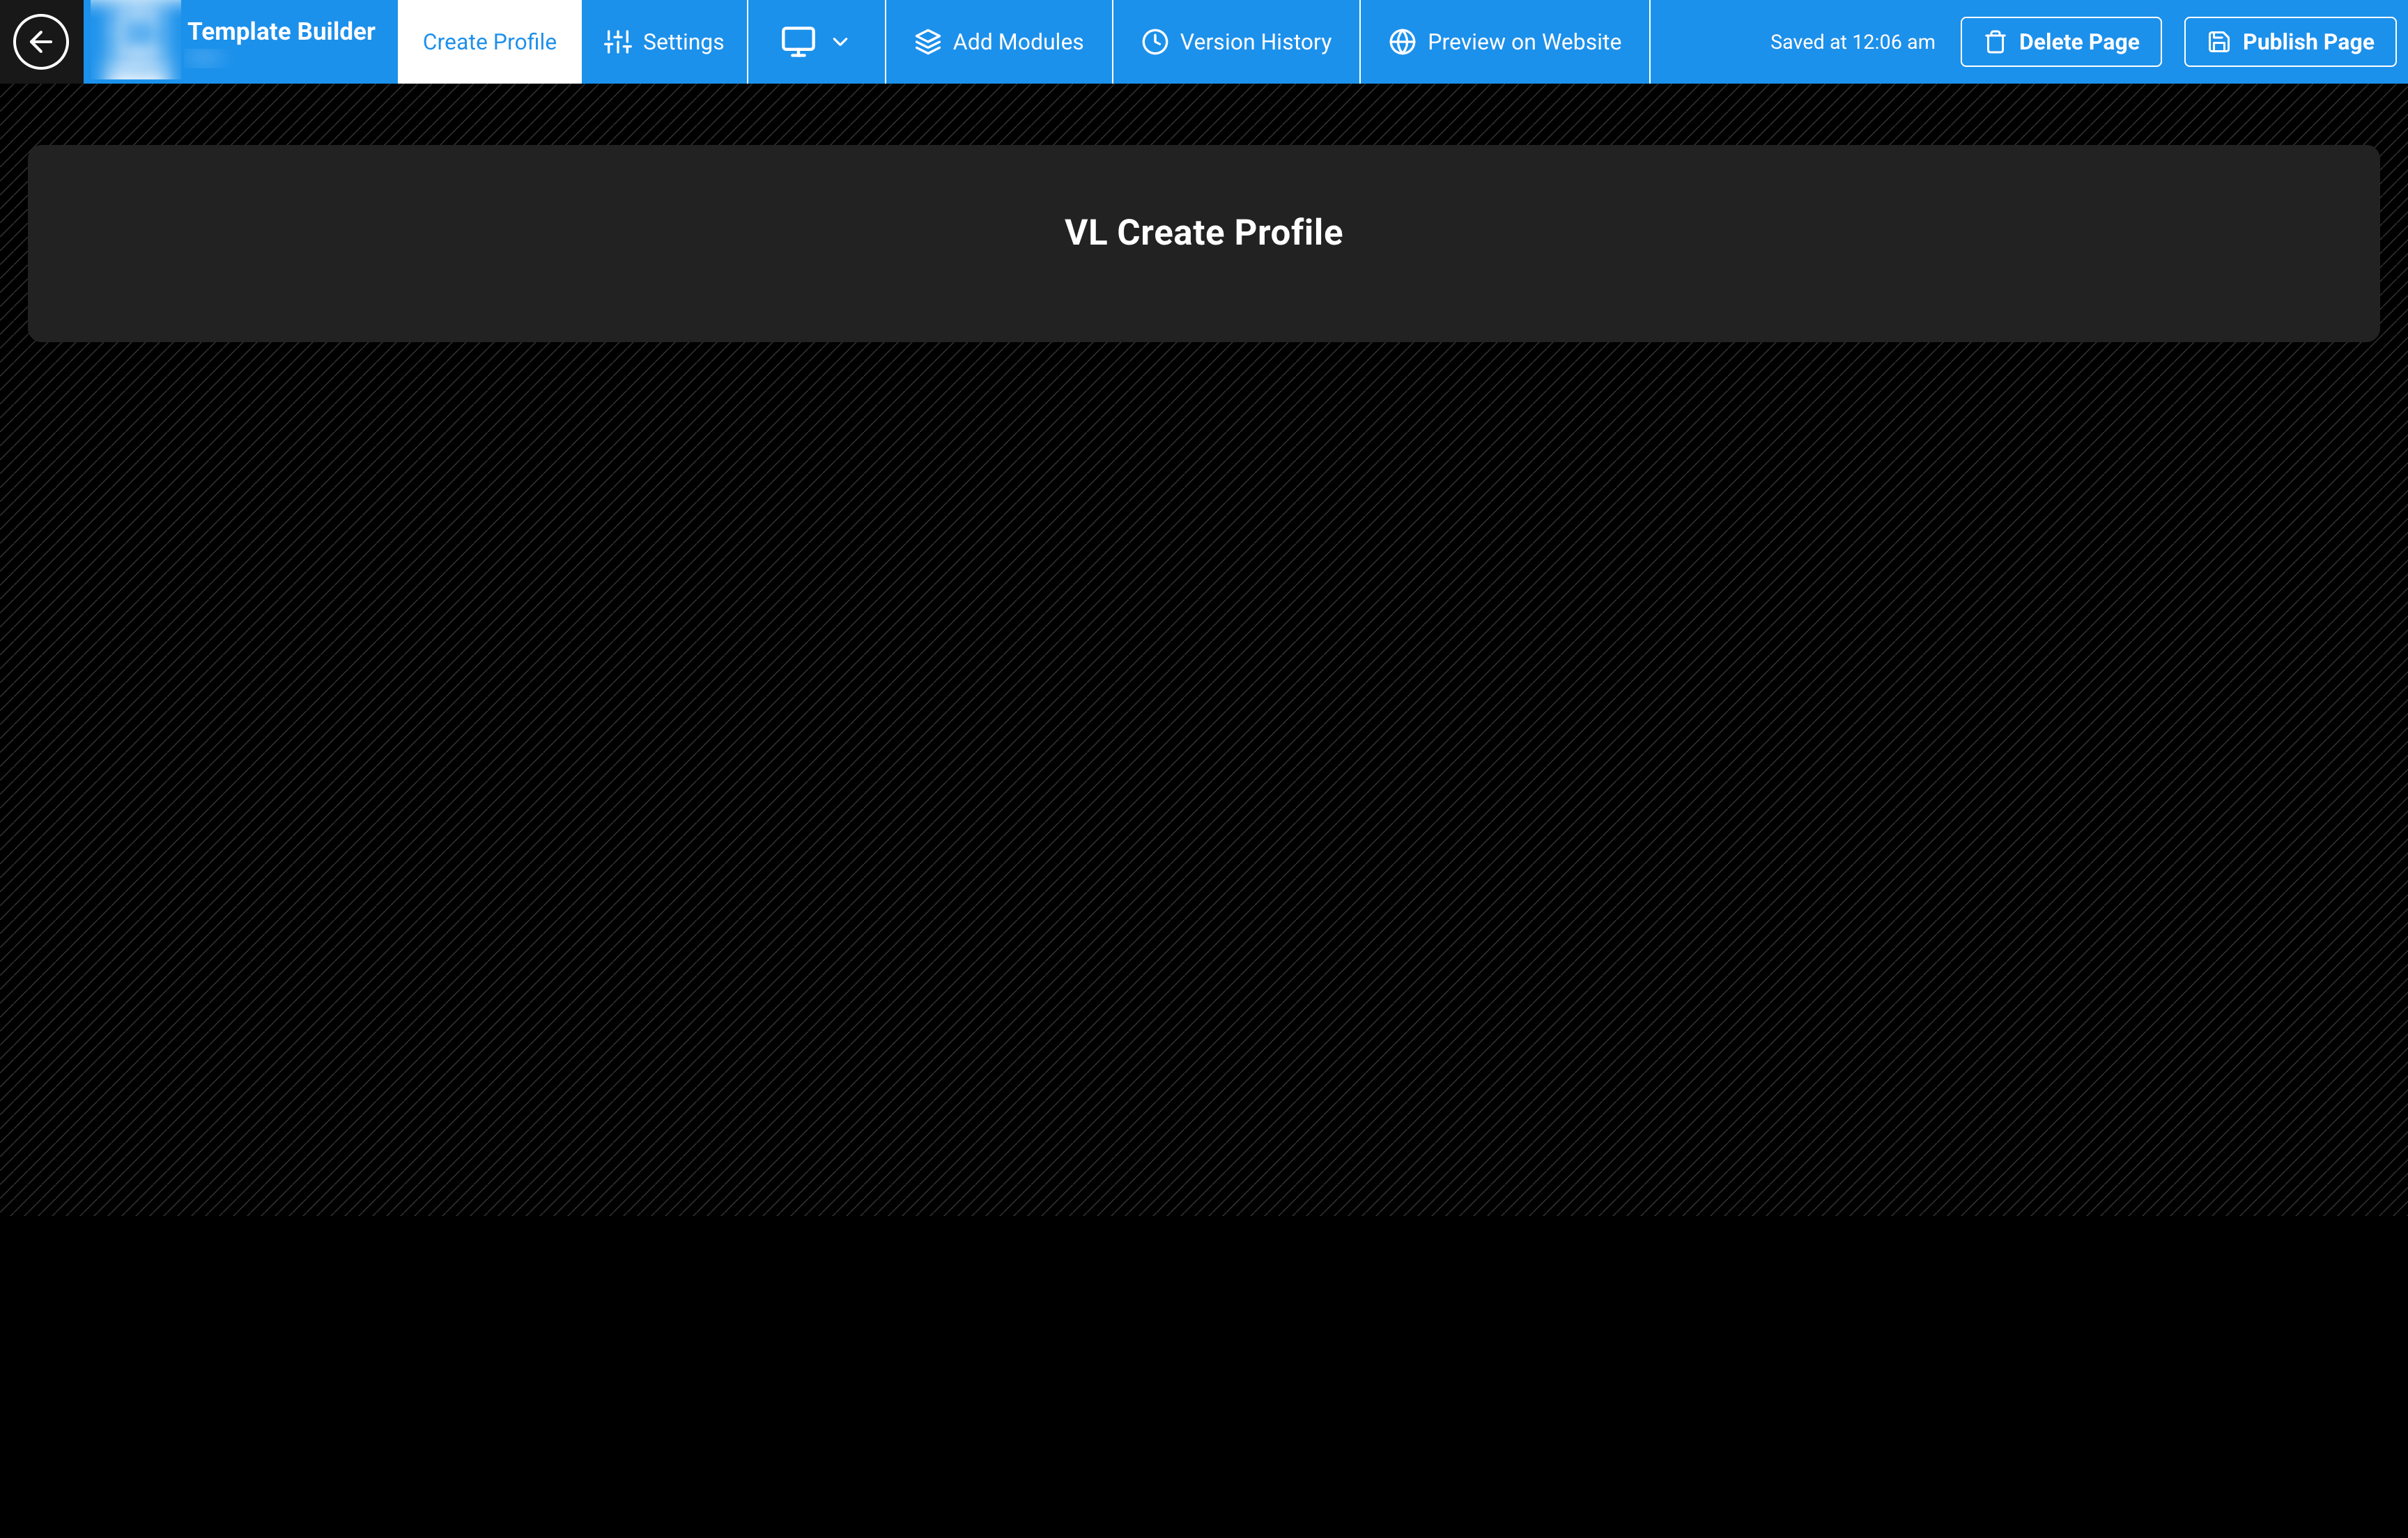
Create Profile System Screen layout with VL Create Profile placed on the page.
System Screens typically use a single primary system module. Avoid stacking unrelated content trays on this page.
Step 4: Configure Create Profile Options
Open the VL Create Profile module settings. Under Create Profile Options:
Images
Add one or more promotional slides.
| Field | Description |
|---|---|
| Title | Headline for the slide. |
| Sub Title | Supporting headline. |
| Description | Body copy for the slide. |
| Image URL | Image for the slide. |
Toggles and timer
| Field | Description | Default example |
|---|---|---|
| Show Legal Consent Message | Show the legal / age / Terms message on the form. | Off |
| Show Promotional Consent Message | Show the promotional-offers consent checkbox. | Off |
| Verify Email Timer | Seconds shown on the verify-email wait (for example before resend). | 30 |

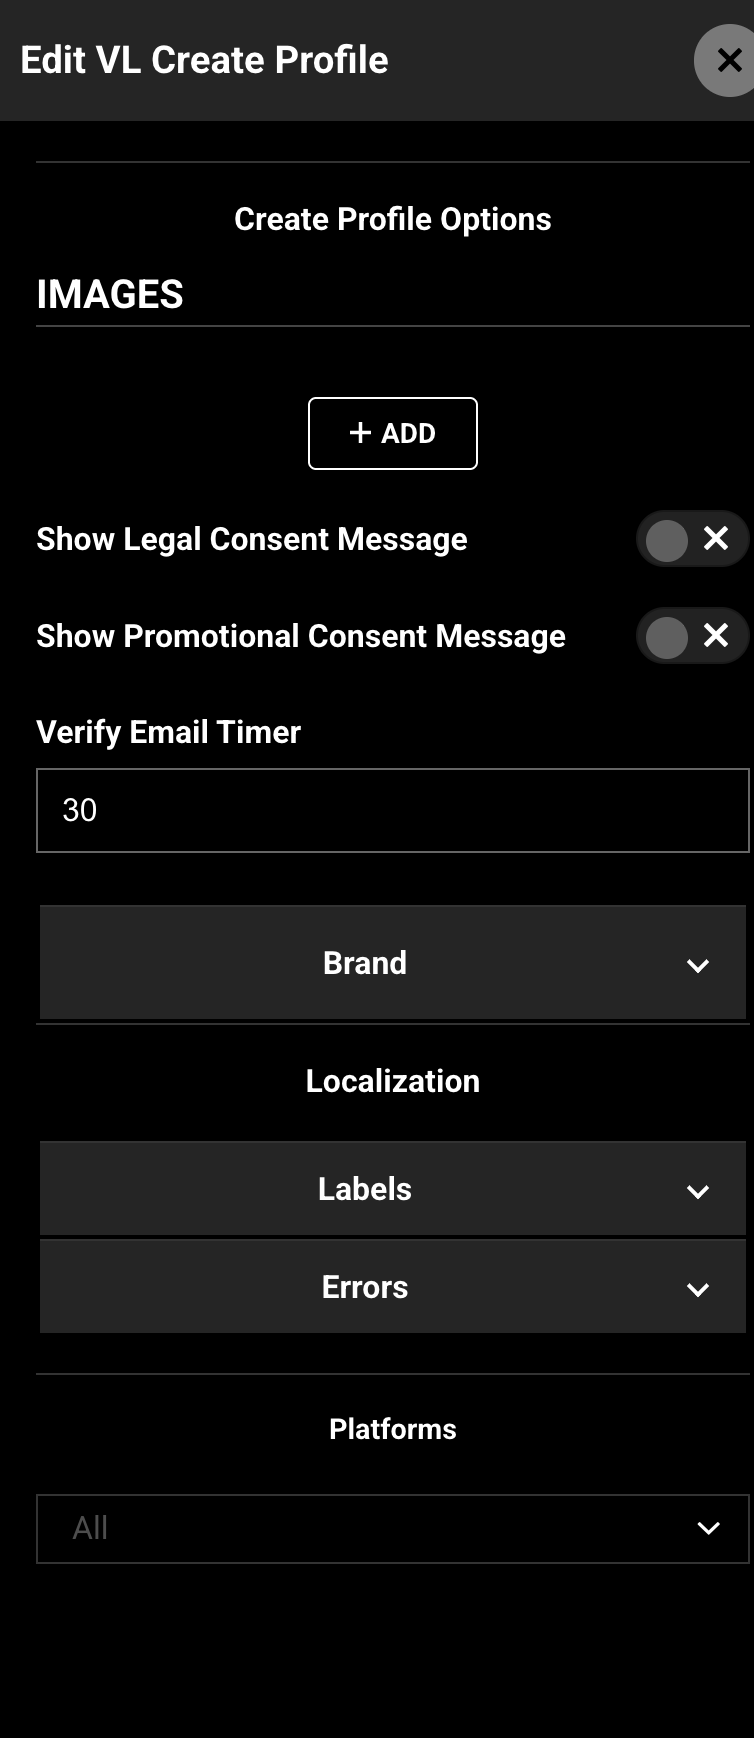
Images, Show Legal Consent Message, Show Promotional Consent Message, and Verify Email Timer.
Turn consent toggles on only when the matching label copy is reviewed and ready.
Step 5: Configure Localization — Labels
Expand Localization → Labels.
Profile form
| Label | What it controls | Default example |
|---|---|---|
| Create Profile Title | Page headline. | Create A Profile |
| Create Profile SubTitle | Supporting line under the title. | Complete your personal information |
| Personal Info Title | Profile-info section heading. | Profile Info |
| Create Password Title | Password section heading. | Create Password |
| First Name TextField PlaceHolder | First name field. | First Name |
| Last Name TextField PlaceHolder | Last name field. | Last Name |
| Country TextField PlaceHolder | Country field. | Country |
| Password TextField PlaceHolder | Password field. | Password |
| Retype Password TextField PlaceHolder | Confirm-password field. | Re-Type Password |
| Submit CTA Text | Primary submit button. | Submit |
| Continue CTA Text | Continue button. | Continue |
| Skip CTA | Skip control, when the flow allows it. | Skip |
| Password Validation Message | Shown when the password does not meet the rules. | Password must contain at least 12 characters and 4 of the following: An uppercase letter, a lowercase letter, a number, a special symbol |
| Password Mismatch Message | Shown when the two password fields do not match. | Password is not matching |
| Top Modal Image | Image URL for the top of the modal, when used. | (empty) |
Consent and legal
| Label | What it controls | Default example |
|---|---|---|
| Reward Consent Message | Loyalty / rewards opt-in. | I would like to join CLIENT_NAME to earn loyalty rewards points and receive exclusive offers, rewards and other information about CLIENT_NAME. I agree to the CLIENT_NAME Terms & Conditions. |
| Promotional Consent Message | News and offers opt-in. Shown when Show Promotional Consent Message is on. | I would like to receive the latest news, information and offers from CLIENT_NAME and its teams. |
| Legal Message | Age, Terms, and Privacy confirmation. Shown when Show Legal Consent Message is on. | By clicking 'Submit' you confirm you are 18 years old or over and you agree to CLIENT_NAME's Terms of Use and acknowledge that your personal information will be treated according to CLIENT_NAME's Privacy Policy |
| Terms Of Use Text | Terms link label. | Terms of Use |
| Privacy Policy Text | Privacy link label. | Privacy Policy |
| TOS Permalink | Path for Terms of Use. | /tos |
| Privacy Policy Permalink | Path for Privacy Policy. | /privacy |
Replace CLIENT_NAME with your site name before publish. Confirm TOS Permalink and Privacy Policy Permalink match live pages.
Email verification modal
| Label | What it controls | Default example |
|---|---|---|
| Email Modal Title | Modal headline. | Verify Your Email |
| Email Modal Sub Title | Modal description. $$$ is replaced with the customer’s email. |
We have just sent an email to “$$$" Can’t access this email? |
| Email Modal Resend Email PlaceHolder | Resend control. | Resend Email |
| Email Modal Primary CTA | Update-email action. | Update your email address |
| Email Modal Secondary CTA | Continue after verification. | Continue with Your Verified Account |
| Email Modal Info Text | Extra instructions under the modal. | Once you successfully verify your Email ID then please press "Continue with your Verified Account" for Login. |
Step 6: Configure Localization — Errors
Expand Localization → Errors.
| Label | When it is used | Default example |
|---|---|---|
| Default error | General processing failure. | There was an error processing your request. |
| First Name Error Text | First name is missing. | Please enter your first name as its a mandatory field to proceed |
| Last Name Error Text | Last name is missing. | Please enter your last name as its a mandatory field to proceed |
| Country Name Error Text | Country is not selected. | Please select your Country as its a mandatory field to proceed |
| Consent Error Text | Required consent is not given. | Please provide your consent as its mandatory |
Step 7: Configure Brand
Expand Brand.
| Setting | Default (example) | Purpose |
|---|---|---|
| Module Background Color | #000000 |
Background behind the profile panel. |
| Modal Background Color | #212121 |
Background of the form card and email modal. |
| Active CTA Color | #BDFC69 |
Submit / Continue when available. |
| Disabled CTA Color | #838996 |
Buttons when they are not available. |
| Input Background Color | #535353 |
Field background. |
| Input Text Color | #FFF |
Text typed in the fields. |
| Text Color | #FFF |
Titles and supporting text. |
| Error Color | #FF0000 |
Validation and error text. |
Match these colors to Authentication so sign-in and create profile feel like one product.
Step 8: Save and publish the Create Profile page
- Save the module settings.
- Review the page layout once more.
- Publish the Create Profile System Screen.
Until the page is published, apps and other experiences that load this System Screen will not show your latest copy and colors.
Changes can take several minutes to appear because of caching. To verify sooner, use a private window, another browser, or clear cookies and cache.
Also publish Authentication (see VL Authentication 01 / VL Authentication 02) and confirm Create Profile Permalink on VL Authentication 01 matches this page path.
Step 9: How profile details work on the website
The current website does not load VL Create Profile as a standalone /create-profile form.
On the website, extra profile fields (for example name or zip) appear on Authentication or Checkout when those options are enabled on those modules — not from this System Screen.
| Item | Where you edit it | What customers see |
|---|---|---|
| Sign-in / sign-up | VL Authentication 01 / VL Authentication 02 | /authentication (and checkout sign-in) |
| Create Profile Permalink | VL Authentication 01 | Default /create-profile — keep this page at the same path for platforms that use it |
| Name, country, password, consents on this module | VL Create Profile Labels and toggles | Create-profile form on experiences that load this System Screen |
Do not expect https://www.example.com/create-profile to show this module’s form on the current website unless your site is built to load that page.
Verification checklist
- Create Profile page exists as a System Screen
- Page path is
/create-profile(or the path set in Create Profile Permalink) - VL Create Profile is on the layout
CLIENT_NAMEis replaced in consent and legal copy- Terms and Privacy permalinks point to live pages
- Legal and promotional toggles match the copy you intend to show
- Labels, email-modal copy, and Errors are reviewed
- Brand colors match Authentication
- Optional Images are configured when used
- Page is published
- VL Authentication 01 Create Profile Permalink matches this path
Troubleshooting
| Problem | What to check |
|---|---|
| VL Create Profile is not in the module list | Confirm the page type is System Screen. |
Website /create-profile is blank or shows no form |
The current website does not load this module as a standalone page. Profile fields on web are on Authentication / Checkout. |
| Consent text still says CLIENT_NAME | Edit Reward Consent Message, Promotional Consent Message, and Legal Message, then publish. |
| Legal or promotional copy does not appear | Turn on Show Legal Consent Message and / or Show Promotional Consent Message. |
| Terms or Privacy link is wrong | Update TOS Permalink and Privacy Policy Permalink, and publish those pages. |
| Customers never reach this page after sign-in | Confirm the path matches Create Profile Permalink on VL Authentication 01, and that the destination platform uses that permalink. |
| Labels do not change on apps or other platforms | Save module settings, publish the page, and allow cache to clear. For localization, edit labels in the correct language. |
Best Practices
- Use one Create Profile System Screen at
/create-profile. - Replace CLIENT_NAME and have legal review consent and age copy before launch.
- Align permalinks with live Terms and Privacy pages.
- Turn consent toggles on only after the matching labels are ready.
- Match Brand colors to Authentication.
- Localize titles, placeholders, consents, and errors when the site has multiple live languages.
- Publish after every meaningful change — draft System Screens do not update production.
FAQs
Q. What page type should I use for VL Create Profile?
System Screen. Set the path to /create-profile unless your Authentication permalink uses a different path.
Q. What is the module name in the picker?
VL Create Profile.
Q. Does the website open this module after sign-up?
No. The current website does not load this module as a standalone create-profile page. Website profile fields are configured on Authentication / Checkout.
Q. Where is Create Profile Permalink?
On VL Authentication 01. The default is /create-profile.
Q. How is this different from VL Forget Password?
VL Create Profile collects name, country, a new password, and consents for a new profile. VL Forget Password is only for resetting a password.
Q. What does CLIENT_NAME mean?
It is placeholder text in the default consent lines. Replace it with your site or team name.
Important Information
- VL Create Profile must be placed on a System Screen.
- The current website does not use this module as the
/create-profileform. - Keep the page path aligned with Create Profile Permalink on VL Authentication 01.
- Replace
CLIENT_NAMEand confirm Terms / Privacy links before publish. - Create the page, add the module, configure copy and colors, then publish.
- Cache can delay frontend updates by several minutes.
Glossary
| Term | Definition |
|---|---|
| VL Create Profile | System Screen module for name, country, password, consents, and email-verification copy. |
| Create Profile Permalink | Path on VL Authentication 01 that should match this page (default /create-profile). |
| System Screen | Template Builder page type used for sign-in, create profile, checkout, and other system flows. |
| Legal consent | Age, Terms, and Privacy confirmation shown when the legal toggle is on. |
| Promotional consent | Opt-in for news and offers, shown when the promotional toggle is on. |
Contact Support
If you need help beyond this article, contact the ViewLift support team.
- Email: techsupport@viewlift.com
- Phone (US): +1-800-859-0420
- Phone (UK): +44-203-014-8921
Support hours: B2C requests are handled Monday to Friday. B2B support is available 24/7.