Introduction
VL Checkout 01 is a System Screen module in Template Builder. It powers the unified checkout experience on your website and connected apps — where customers create an account or sign in, choose a subscription or purchase option, and complete payment in one flow.
On the website, checkout typically lives at /checkout. Customers see available plans, complete account creation with email or phone, then enter payment details when a paid plan is selected. Existing customers may verify with a one-time code after selecting Sign In. TV provider sign-in and location verification can also appear when those services are enabled for your site.
This article explains how to create the Checkout page in Template Builder, configure VL Checkout 01, publish it, and verify the experience on the web.
Purpose
The purpose of this article is to help you:
- Create a Checkout System Screen in Template Builder
- Add and configure the VL Checkout 01 module
- Control account fields, plan display, payment copy, and branding
- Understand what customers see during checkout on the website
- Publish and verify the live Checkout page
Scope
This article covers:
- Creating a System Screen page for checkout in Template Builder
- Adding VL Checkout 01 to the page layout
- Module settings: display toggles, Monetisation CTA, Linked to Page, Brand, Font Settings, Localization (Labels)
- How checkout appears on the website, including plan selection, account creation, payment, and TV provider options
- An overview of the checkout flow on web (flowchart)
It does not cover:
- Configuring subscription plans, pricing, or payment providers in AppCMS (Stripe and related site settings)
- VL ViewPlans 01 / VL ViewPlans 02 (standalone plan pages that route into checkout)
- VL Subscription 01 (legacy standalone payment page at
/subscription) - VL Authentication 01 / VL Authentication 02 as separate sign-in pages (checkout includes its own account step)
- Gift card redemption (VL Redeem) or account billing history (VL Billing)
Prerequisites
Before you begin, ensure you have:
- Access to Template Builder for your site
- Access to ViewLift Tools / AppCMS to confirm SVOD, TVOD, and/or TVE services and payment providers are configured
- At least one active subscription or purchase plan for customers to buy
- Stripe (or your configured payment provider) set up at the site level for web payments
- Brand colors and copy ready: section titles, button labels, Terms of Service, Privacy Policy, and Subscriber Policy links
Example used in this article
Throughout the steps below we use a Checkout page named Checkout at path/checkout. Replace the sample values with your own.
Checkout flow overview (website)
The flowchart below shows the typical customer journey on the website when VL Checkout 01 is published on your Checkout page.
.png)
Notes
- Checkout can also appear embedded on a video, show, or game detail page when the customer hits a paywall. The same steps apply; the customer may return to that content after a successful purchase.
- A plan can be pre-selected when the customer arrives with a plan identifier in the URL (for example
?planId=your-plan-id) or after choosing a plan on a View Plans page. - The Create Account step is skipped when the customer is already signed in.
- Unlike the Authentication page, checkout does not show a Get Verification Code button. New customers validate their email or phone by leaving the field (or pressing Enter); the account is created when they complete payment (or Continue Without Subscription).
- A one-time verification code (OTP) popup appears on checkout when an existing customer selects Sign In from the “account already exists” message (and on some free sign-up paths).
- Password fields can appear during account creation when password sign-in is enabled for your site at the service level (same rule as on your Authentication page).
- Google and Apple sign-in button labels can be customized under Localization → Labels. Whether those buttons appear on checkout depends on your site’s sign-in configuration.
- Location verification (home-based authentication) runs during checkout unless Disable HBA (Location) is turned on in module settings.
- Offer code banners on checkout come from site-level checkout offer configuration, not from this module alone.
Step 1: Open Template Builder
- Log into ViewLift Tools.
- Open AppCMS → Edit Template Builder (or open Template Builder for your site from your usual entry point).
- Confirm you are on the correct site and language (if localization is enabled, use the language selector on the Template Builder home screen before editing page copy).
.png)
Figure 1. Template Builder home. From here you create pages and open System Screens.
Step 2: Create the Checkout System Screen
The Checkout page must be a System Screen so that system modules (including VL Checkout 01) are available in the module picker.
- In Template Builder, go to Pages.
- Select + ADD NEW (or Create a New Page).
- Enter New Page Name:
Checkout(or your preferred name). - In New Page Type * Developers Only, select System Screen.
- Optionally set Target Language (If localized Page) if you are creating a language-specific Checkout page.
- Select CREATE.
.png)
Figure 2.1. Create a New Page - Click on + ADD NEW
.png)
Figure 2.2. Create a New Page. Set New Page Name to Checkout, set New Page Type * Developers Only to System Screen, then select CREATE.
Set the page path
- On Page Settings, set the page path to
/checkout(recommended) unless your site already uses a different checkout path. - Confirm the page type is System Screen.
- Save page settings if prompted.
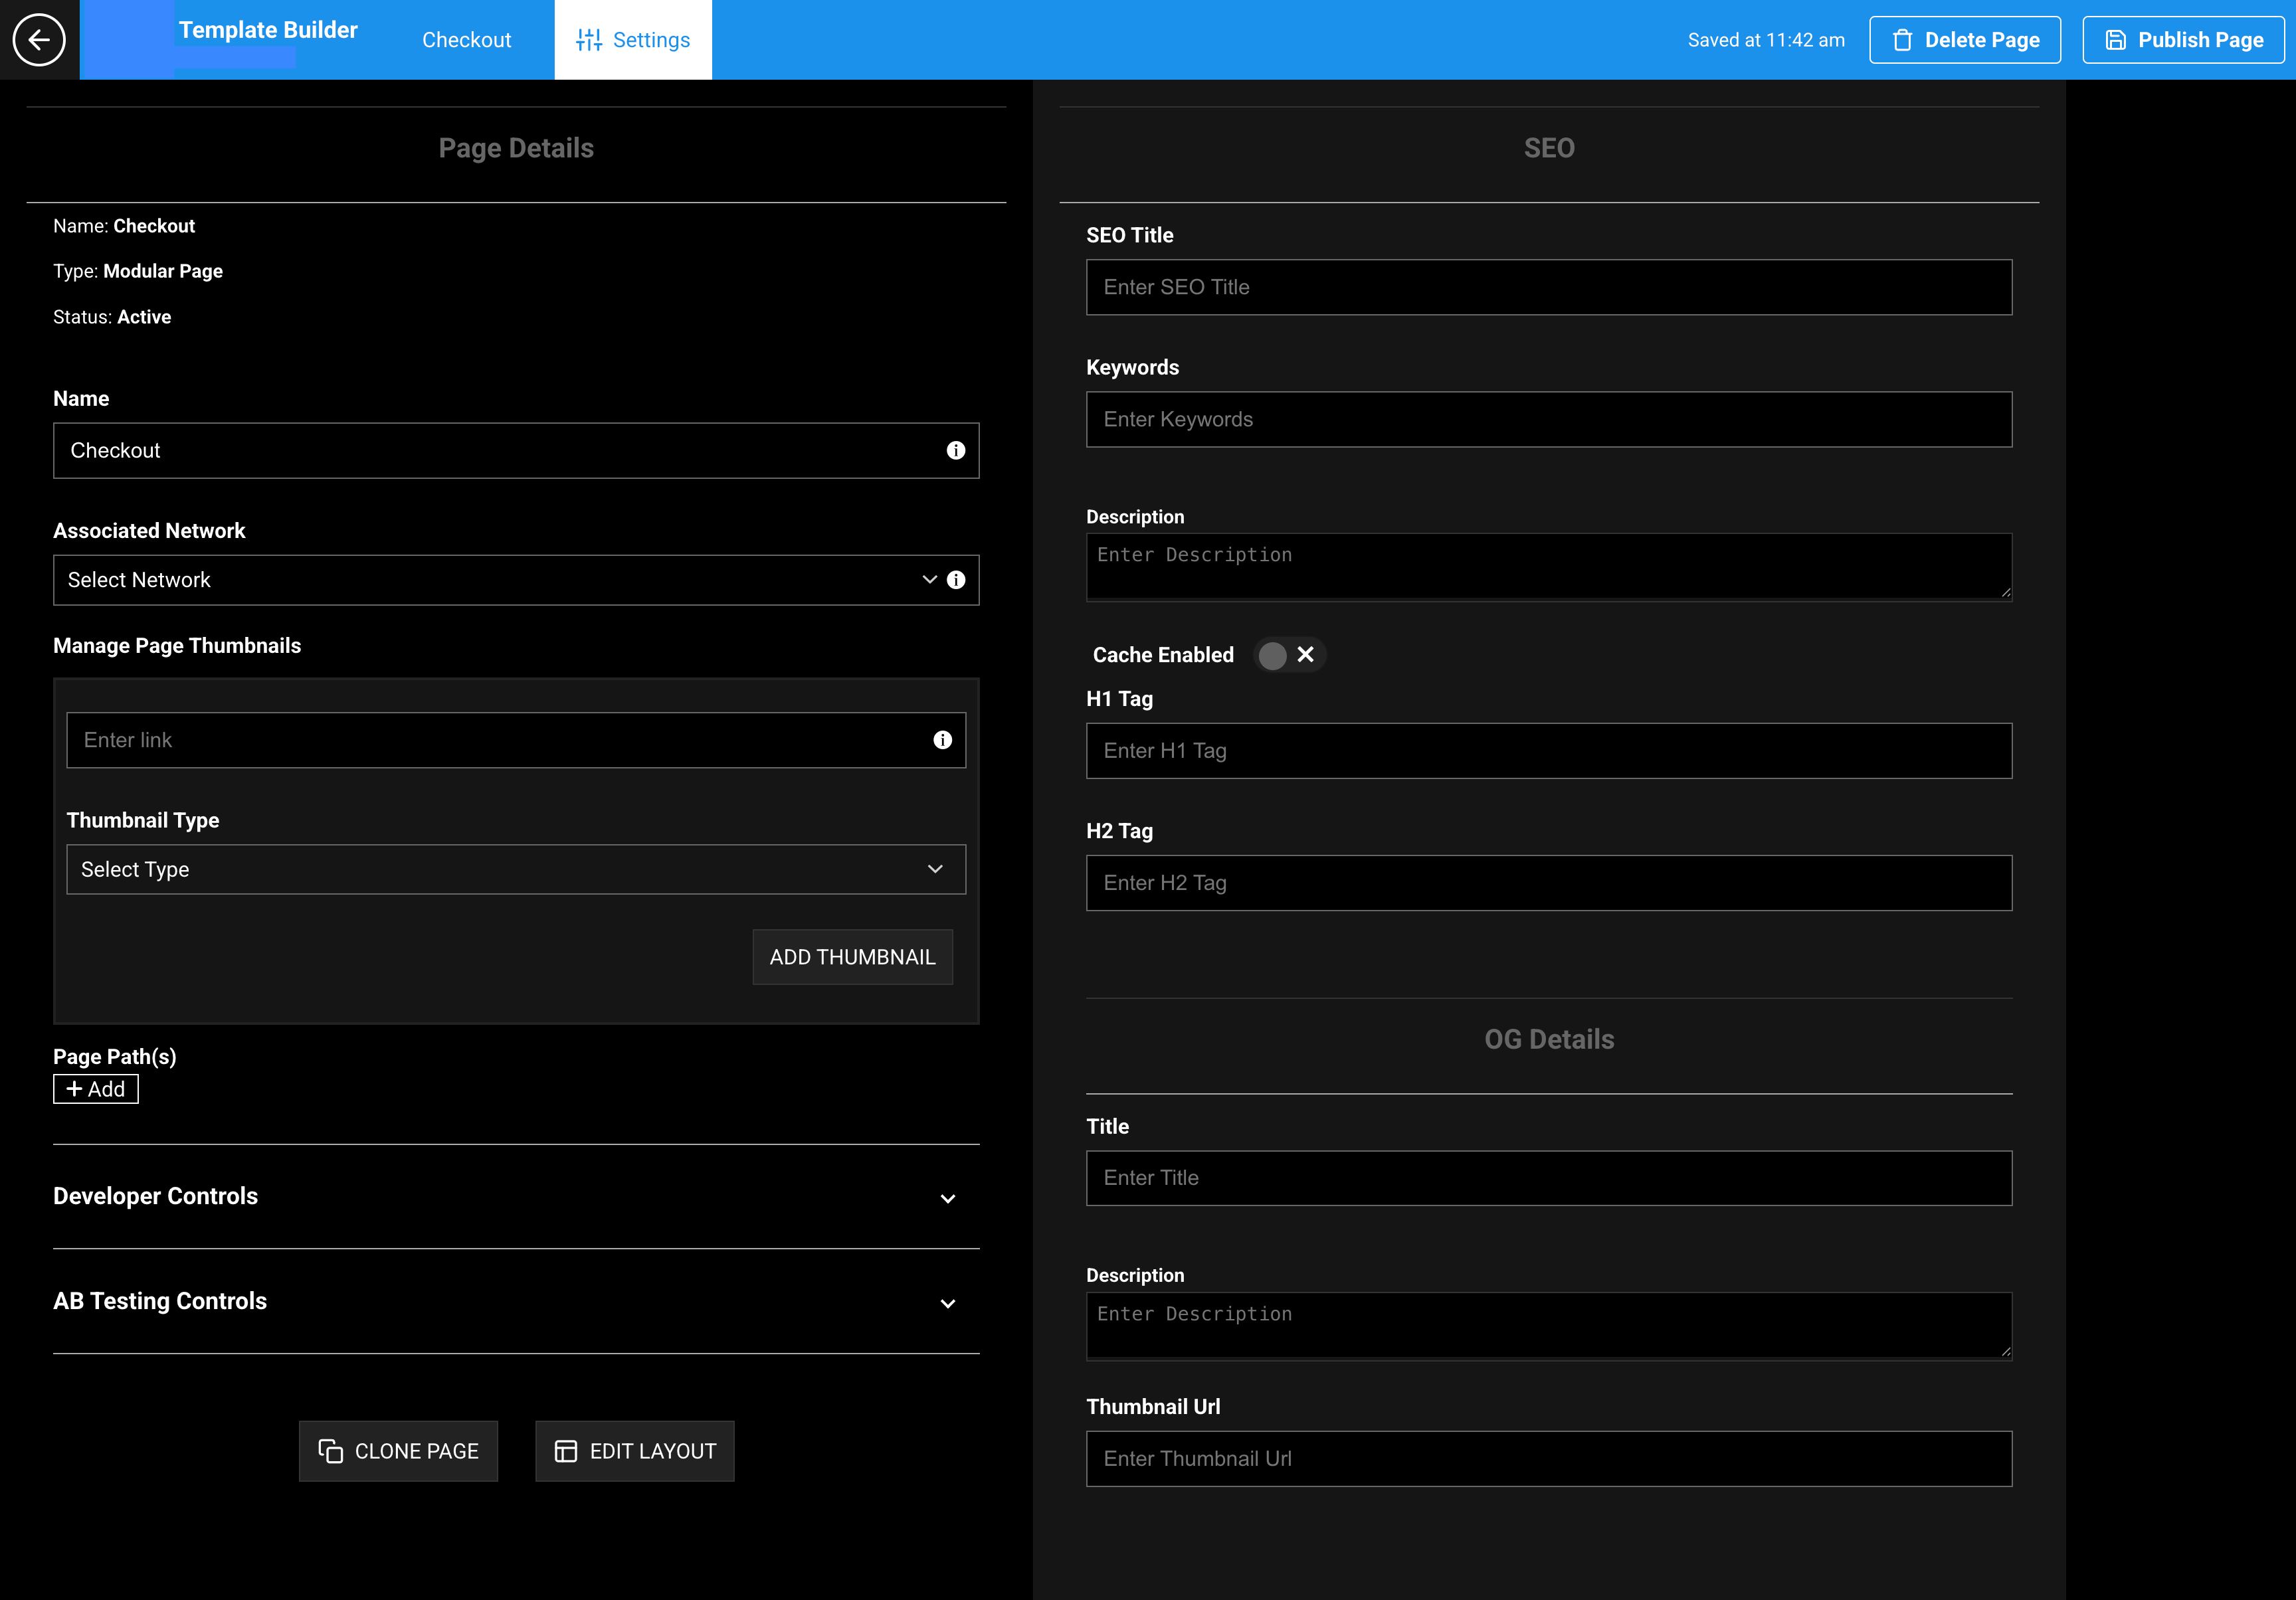
Figure 3. Page Settings. Set the path to /checkout so Subscribe, Sign Up, and plan CTAs across your site resolve correctly.
Step 3: Add VL Checkout 01 to the layout
- Open the Checkout page.
- Select Edit Layout.
- Select Add a New Module.
- Search for or select VL Checkout 01.
- Insert the module into the page layout.
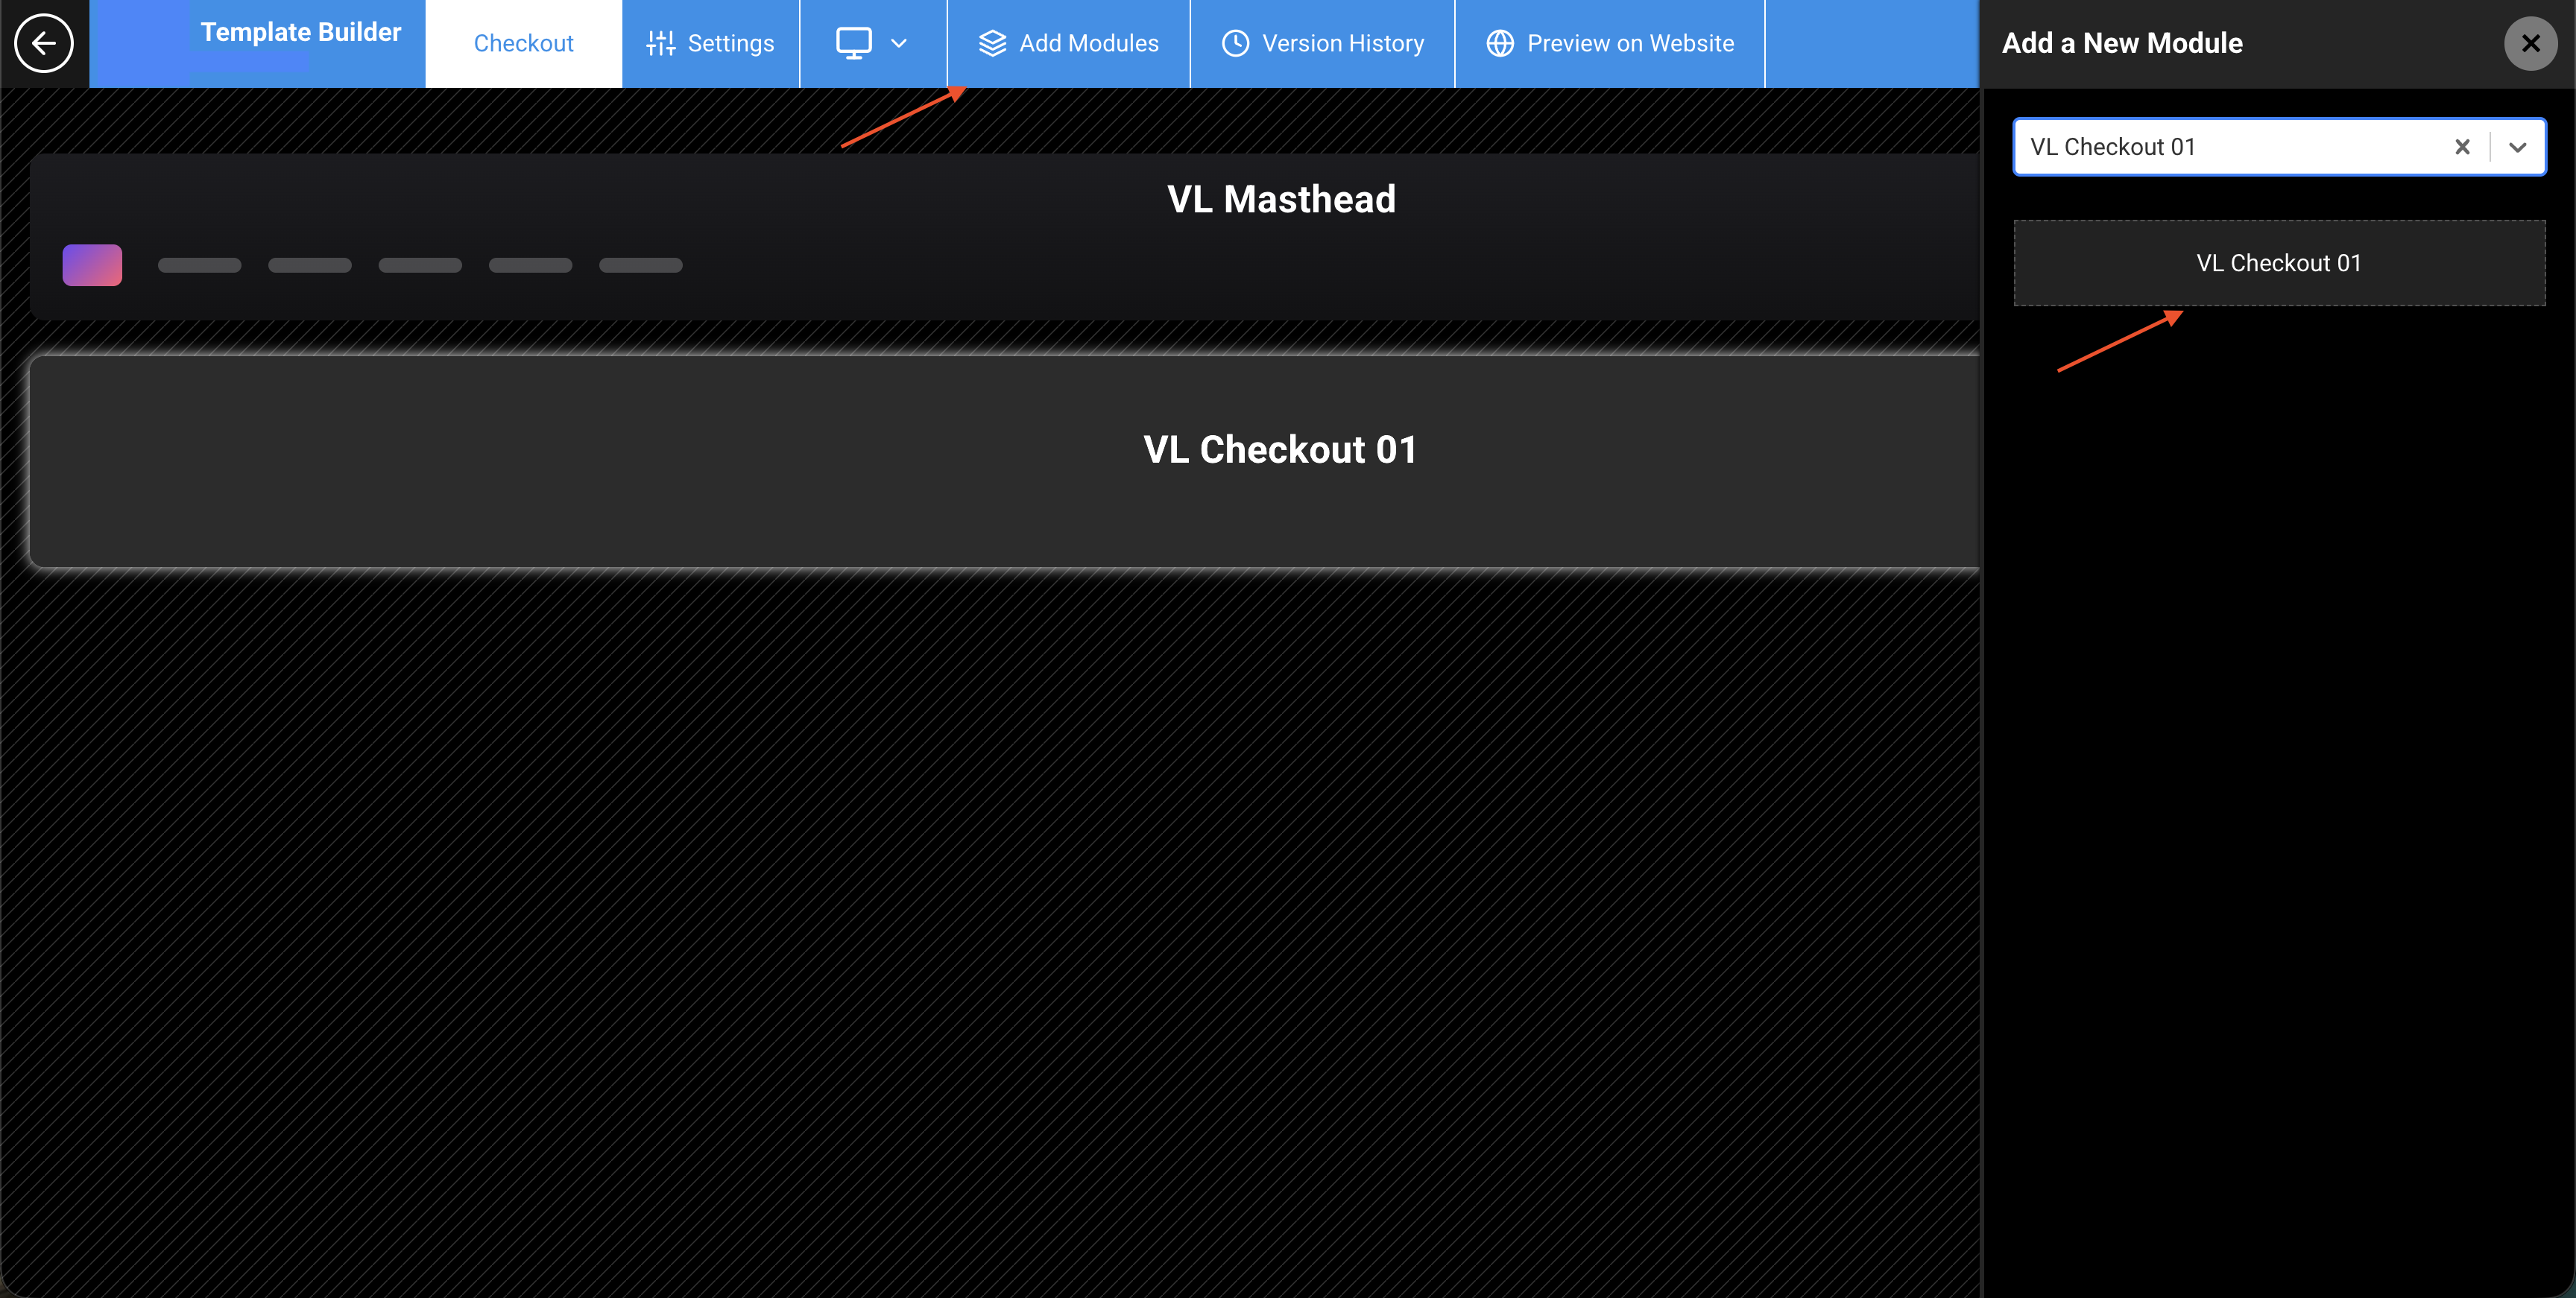
Figure 4. Edit Layout → Add a New Module. Search for and insert VL Checkout 01.
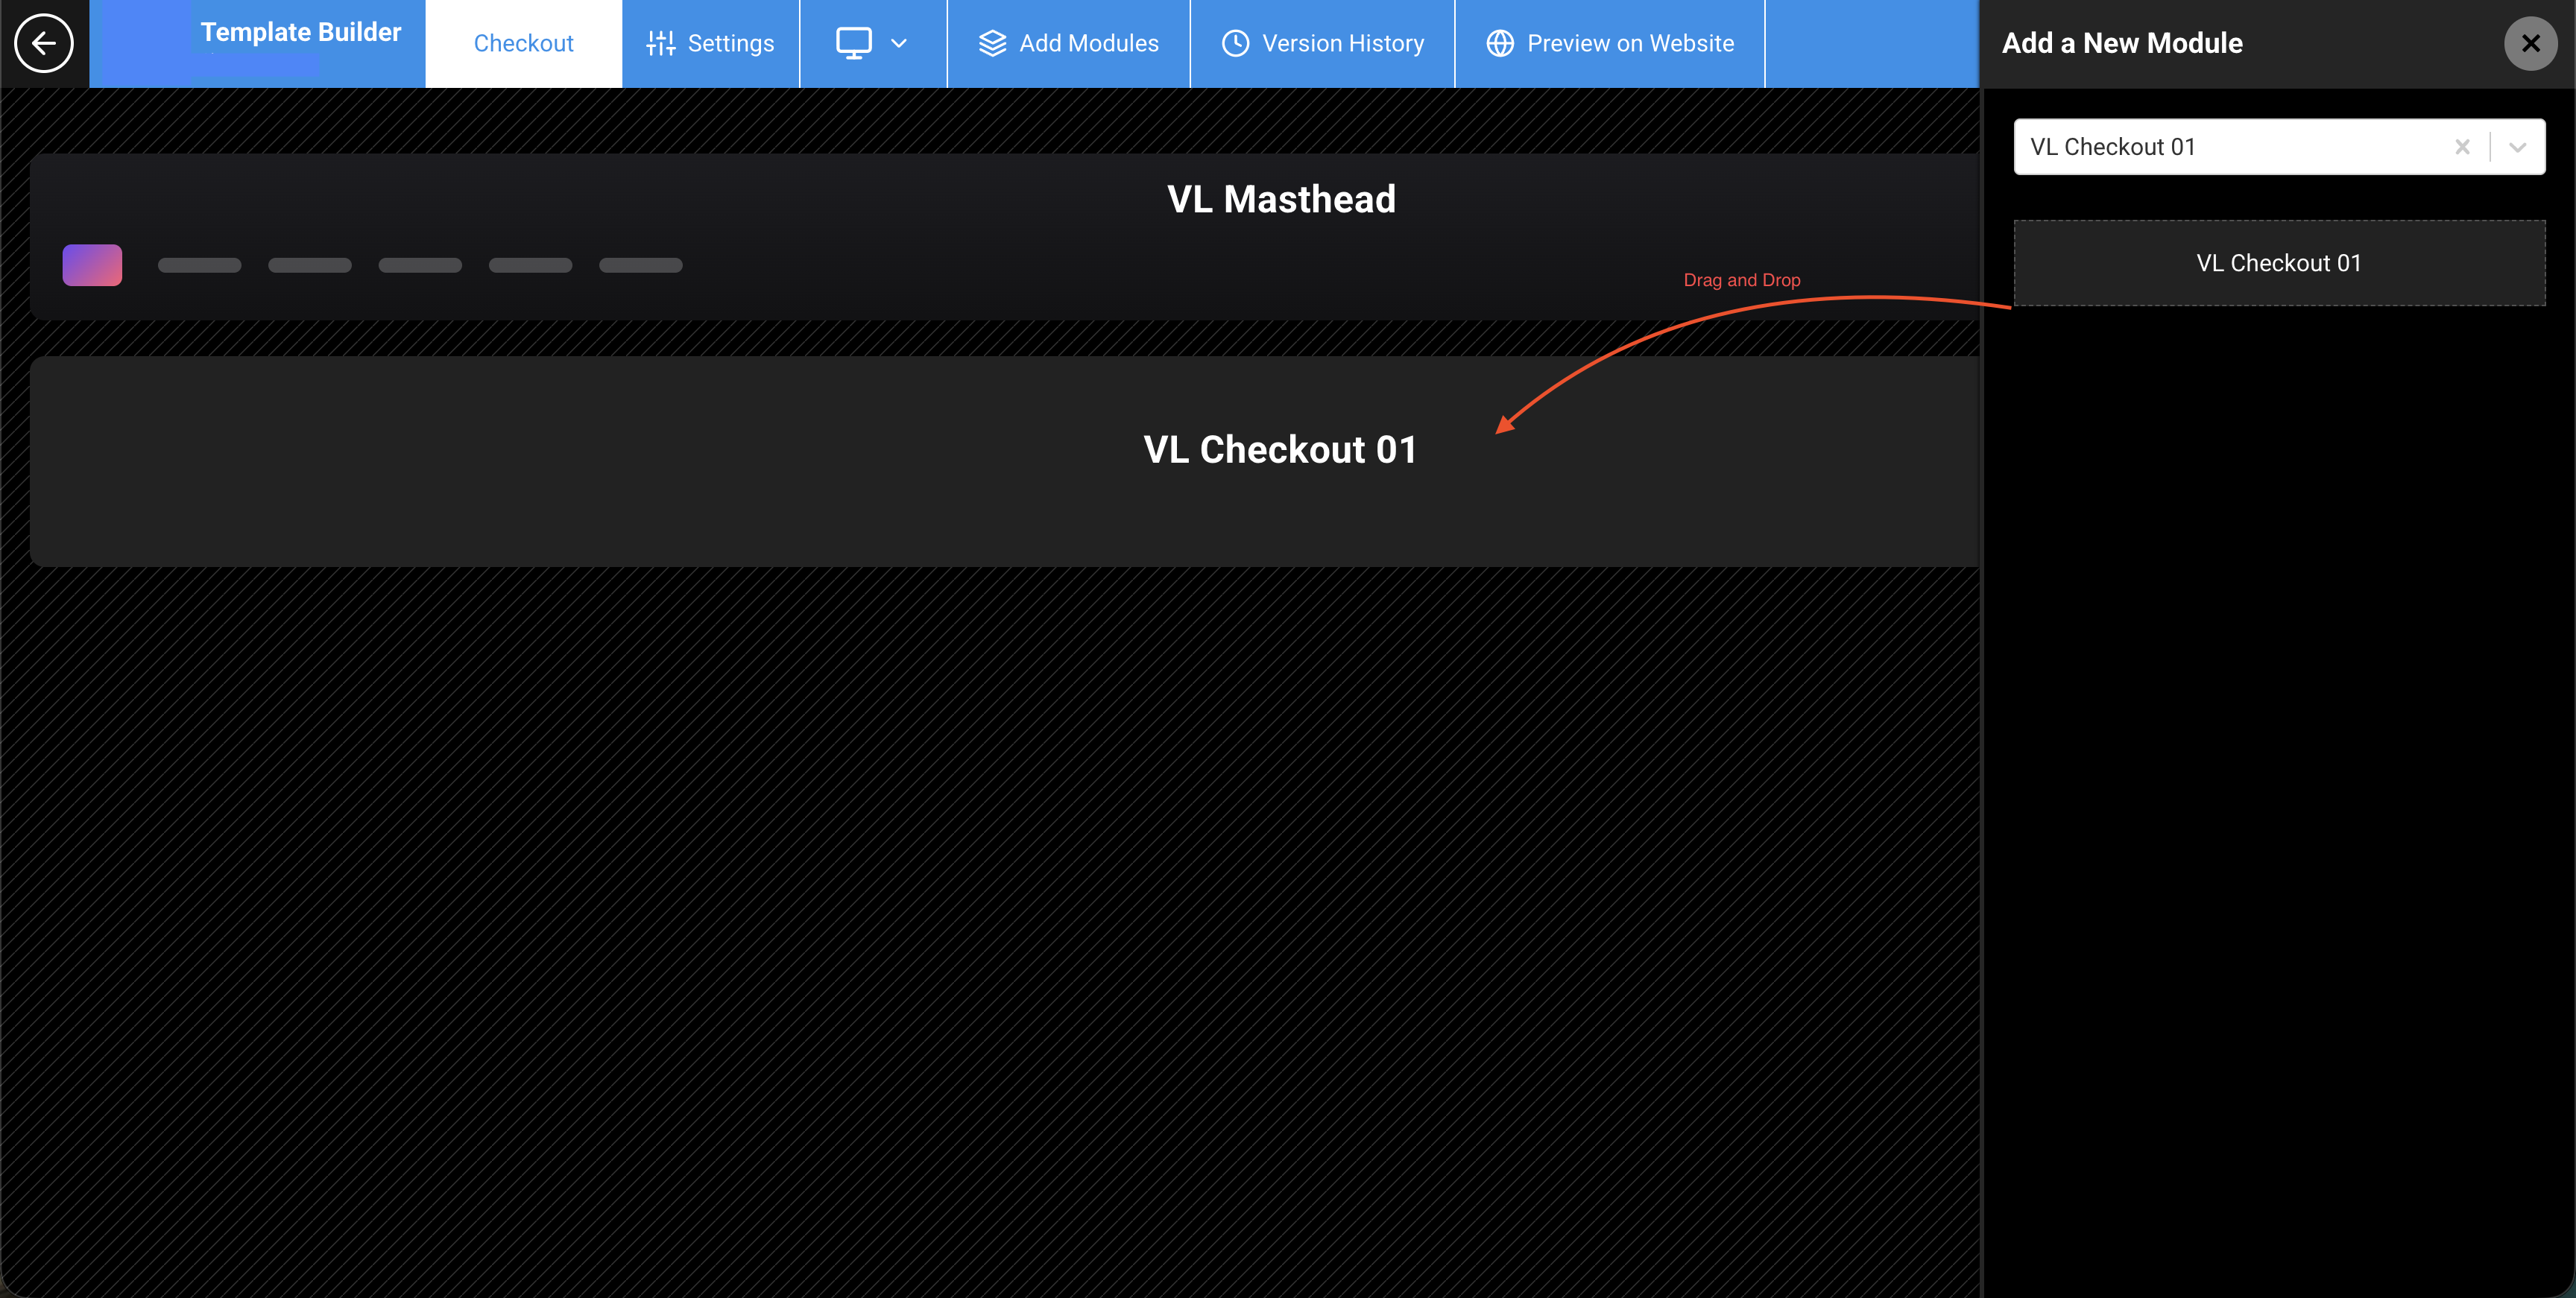
Figure 5. Checkout System Screen layout with VL Checkout 01 placed on the page.
Step 4: Configure display toggles and form settings
Open the VL Checkout 01 module settings. The top section contains switches and dropdowns that control what customers see during checkout.
Location, layout, and TV provider
| Setting | Description |
|---|---|
| Disable HBA (Location) | When off (default), customers may be asked to verify location during checkout if home-based authentication is enabled for your site. Turn on to skip the location step in checkout. |
| Hide TV Provider CTA | Hides the Continue to TV Providers button on the Create Account step when TV provider access is available. |
| Merge Checkout Form | Combines checkout sections into a merged layout instead of numbered steps (1., 2.). |
Account fields
| Setting | Description |
|---|---|
| is Email Required | Makes the email field required when shown. |
| is Mobile Required | Makes the mobile number field required when shown. |
| Hide Mobile Number | Hides mobile-number entry (cannot be on if Hide Email is already on). |
| Hide Email | Hides email entry (cannot be on if Hide Mobile Number is already on). |
| Show Name | Shows a full name field during account creation. |
| Is Name Required? | Makes the name field required when shown. |
| Show Date of Birth | Shows a date-of-birth field. |
| Show Zip Code | Shows a zip code field. |
| Is Date Of Birth Required? | Makes date of birth required when shown. |
| Is Zip Code Required? | Makes zip code required when shown. |
| Show Secondary Field | Shows an additional profile field when configured for your site. |
| Is Secondary Field Required | Makes the secondary field required when shown. |
| Primary Field | Sets whether customers start with Email, Mobile, or Both as the primary sign-up field. |
| Show Teams Dropdown | Shows a local team selector when enabled (teams are based on customer location). |
Checkout behavior
| Setting | Description |
|---|---|
| Enable Continue Without Subscription | Shows a Continue Without Subscription option so customers can create a free account without completing payment. Customize the button label under Localization → Labels when this is enabled. |
| Show Create Account | Controls create-account messaging in plan-related UI where applicable. |
| Show No Plans Cta | Controls a call-to-action when no plans are available in the customer’s region. |
| Show Compare Plan CTA? | Shows a Compare Plans link. When enabled, set Compare Plan Page Path to the page customers should open (for example your View Plans page). |
The module may also include configurable checkboxes (consent options) that appear on the account creation form.
.png)
Figure 6.1. Open Module settings.
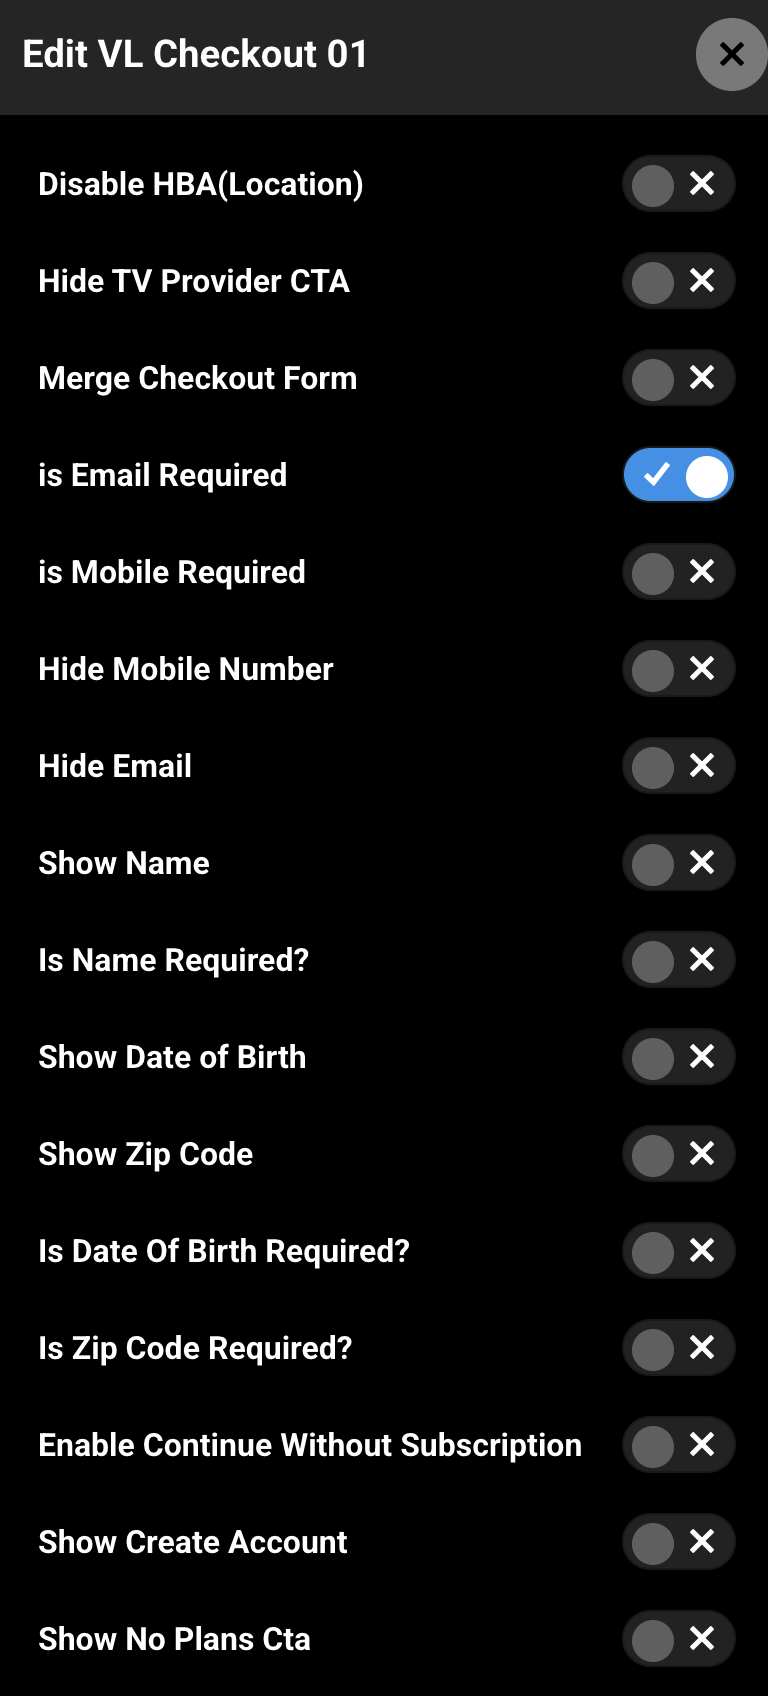
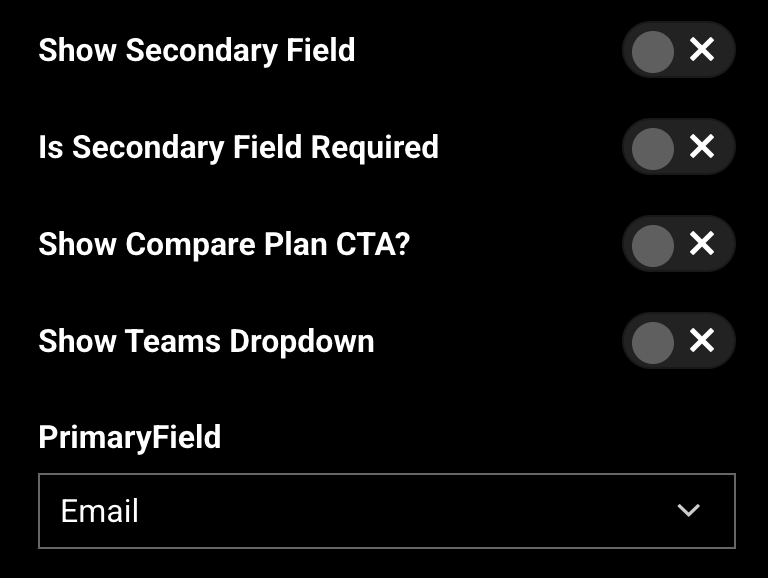
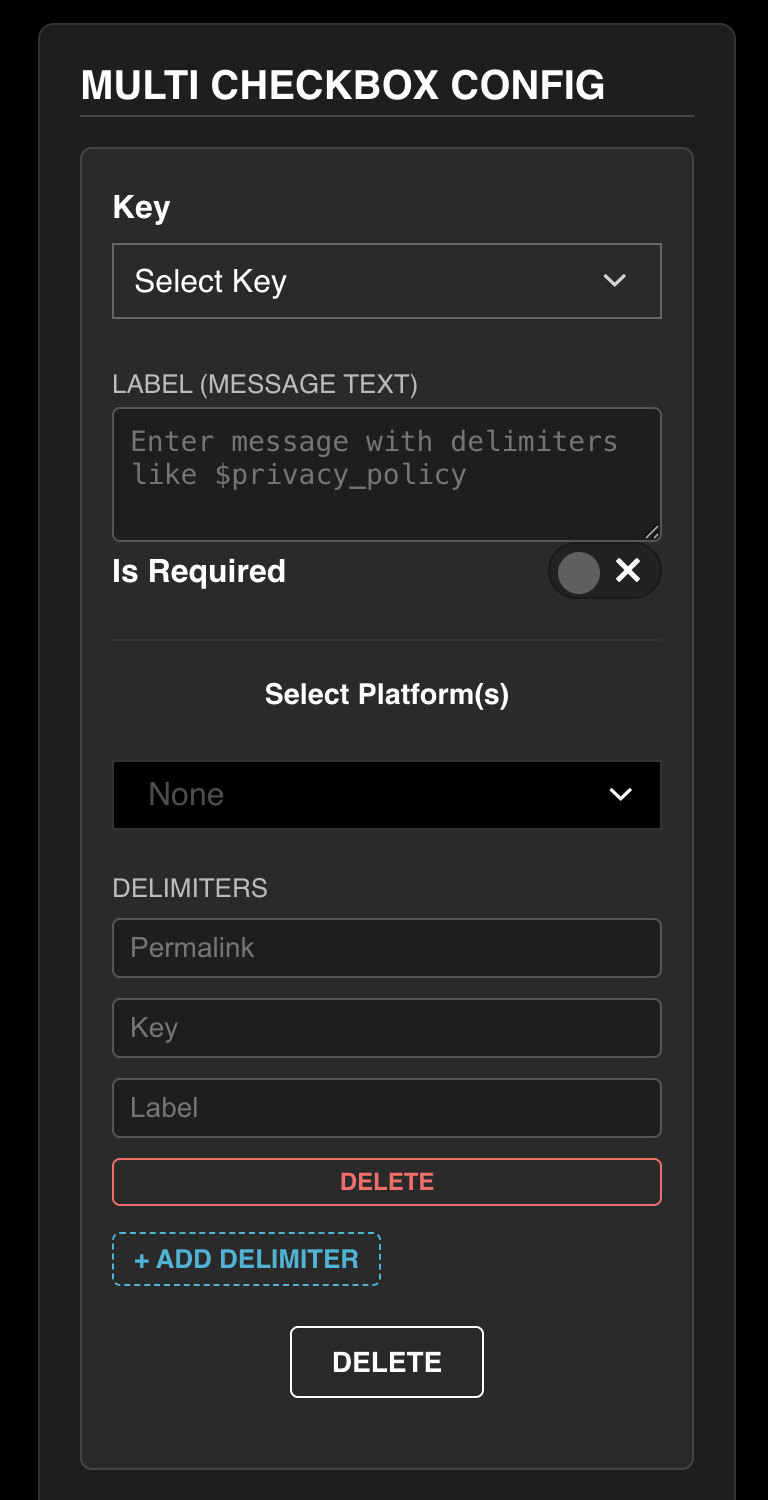
Figure 6.2. Module settings — display toggles, Primary Field, and checkout behavior switches.
Step 5: Configure Monetisation CTA and Linked to Page
Monetisation CTA
Use Monetisation CTA to define which purchase types appear as primary and secondary calls-to-action in plan-related UI (for example on detail pages that link into checkout).
| Field | Description |
|---|---|
| Primary CTA | Main purchase type: SVOD, Buy, TVE, Rent, or FREE. |
| Number of Secondary CTAs | How many secondary buttons to show (1–3). |
| Secondary CTA 1 / 2 / 3 | Additional purchase types shown alongside the primary CTA. |
Linked to Page
Linked to Page connects monetisation steps to other System Screen pages on your site. Select one or more step types, then choose the target page for each:
| Step type | Typical page |
|---|---|
| View Plan | Your View Plans page (for example /viewplans) |
| Authentication | Your sign-in page (for example /authentication) |
| Subscription | Legacy subscription payment page (for example /subscription) if your site uses it |
| Location | Your location page if applicable |
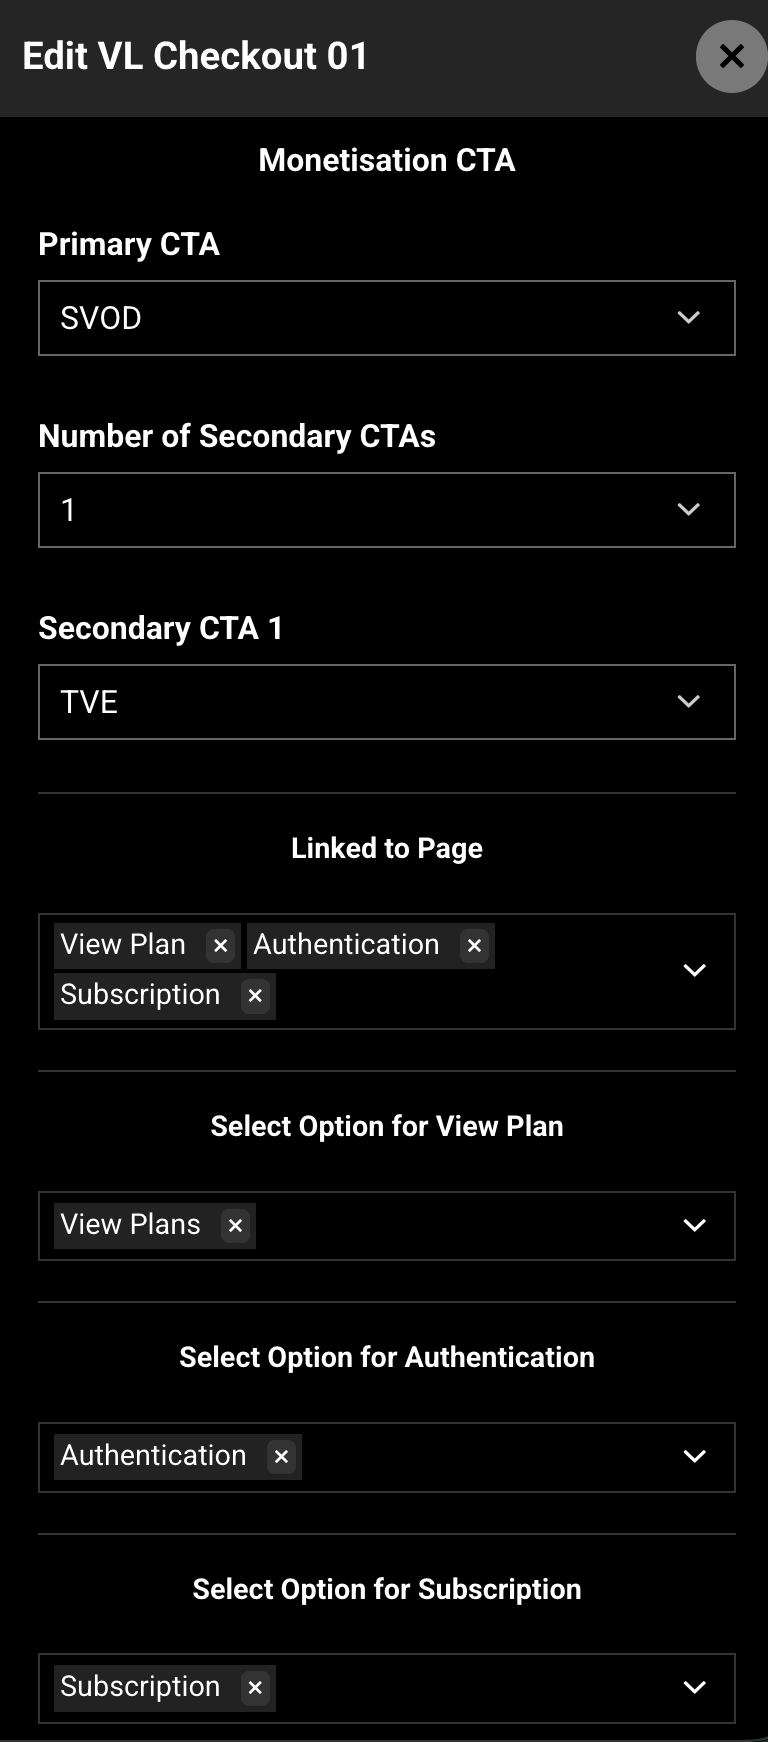
Figure 7. Monetisation CTA and Linked to Page settings on VL Checkout 01.
Step 6: Configure Brand and Font Settings
Expand Localization → Brand (or the Brand section in the module form) to set checkout colors and typography.
Brand colors
| Setting | Description | Default (example) |
|---|---|---|
| Feature Active Color | Active plan feature indicator | #FFFFFF |
| Feature Inactive Color | Inactive plan feature indicator | #838996 |
| Section Text Color | Numbered section headings (1. Create Account, 2. Payment) | #000000 |
| Module Secondary Background Color | Background behind checkout form sections | #EDF0F2 |
| Plan Box Primary Background Color | Primary plan card background | #CF0A2C |
| Plan Box Secondary Background Color | Secondary plan card background | #FFFFFF |
| Plan Box Selected Color | Selected plan highlight | #FFFFFF |
| Plan Box Selected Border Color | Border on selected plan | #FFFFFF |
| Plan Box Cta BgColor | Plan selection button background | #CF0A2C |
| Social Login CTA BgColor | Google / Apple button background | #FFFFFF |
| Social Login CTA Text Color | Google / Apple button text | #FFFFFF |
| Feature Active Text Color | Active feature text | #FFFFFF |
| Feature Inactive Text Color | Inactive feature text | #838996 |
| Discount Badge Background Color | Offer / discount badge background | #03A775 |
| Discount Badge Text Color | Offer / discount badge text | #FFFFFF |
| Input Box Border Color | Input field borders on checkout | (site default) |
For Apps Alternate Billing Page — additional colors are available for payment popup and payment option styling on supported app alternate-billing experiences.
Paths and promotional image
| Setting | Description |
|---|---|
| Promotional Image URL | Optional promotional image shown in checkout-related UI |
| Subscriber Policy Label / Subscriber Policy Page Path | Label and path for your Subscriber Policy link at payment |
| Terms of Service Label / Terms of Service Page Path | Terms link shown during account creation |
| Privacy Policy Label / Privacy Policy Page Path | Privacy link shown during account creation |
| Other Links Label / Other Links PagePath | Optional additional legal or info link |
| Secondary Link Label / Secondary Link PagePath | Optional second link |
| Email Consent Link Text / Email Consent Link Permalink | Marketing email consent link when email consent is enabled for your site |
Font Settings
Font Settings let you customize typography for checkout UI elements:
| Font setting | What it styles |
|---|---|
| Section Heading | Numbered section titles (Create Account, Payment, etc.) |
| Cta Heading | Call-to-action headings in plan areas |
| Feature Item | Plan feature list text |
| Offer Code Banner Title / Description / Plan Title / Plan Off / CTA / Amount | Checkout offer banner when site offers are active |
| Snackbar Title / Description | Inline notification messages during checkout |
| Monetization Cta Heading / Sub Title / Price | Monetisation CTA on detail pages |
| Label Title | General label typography |
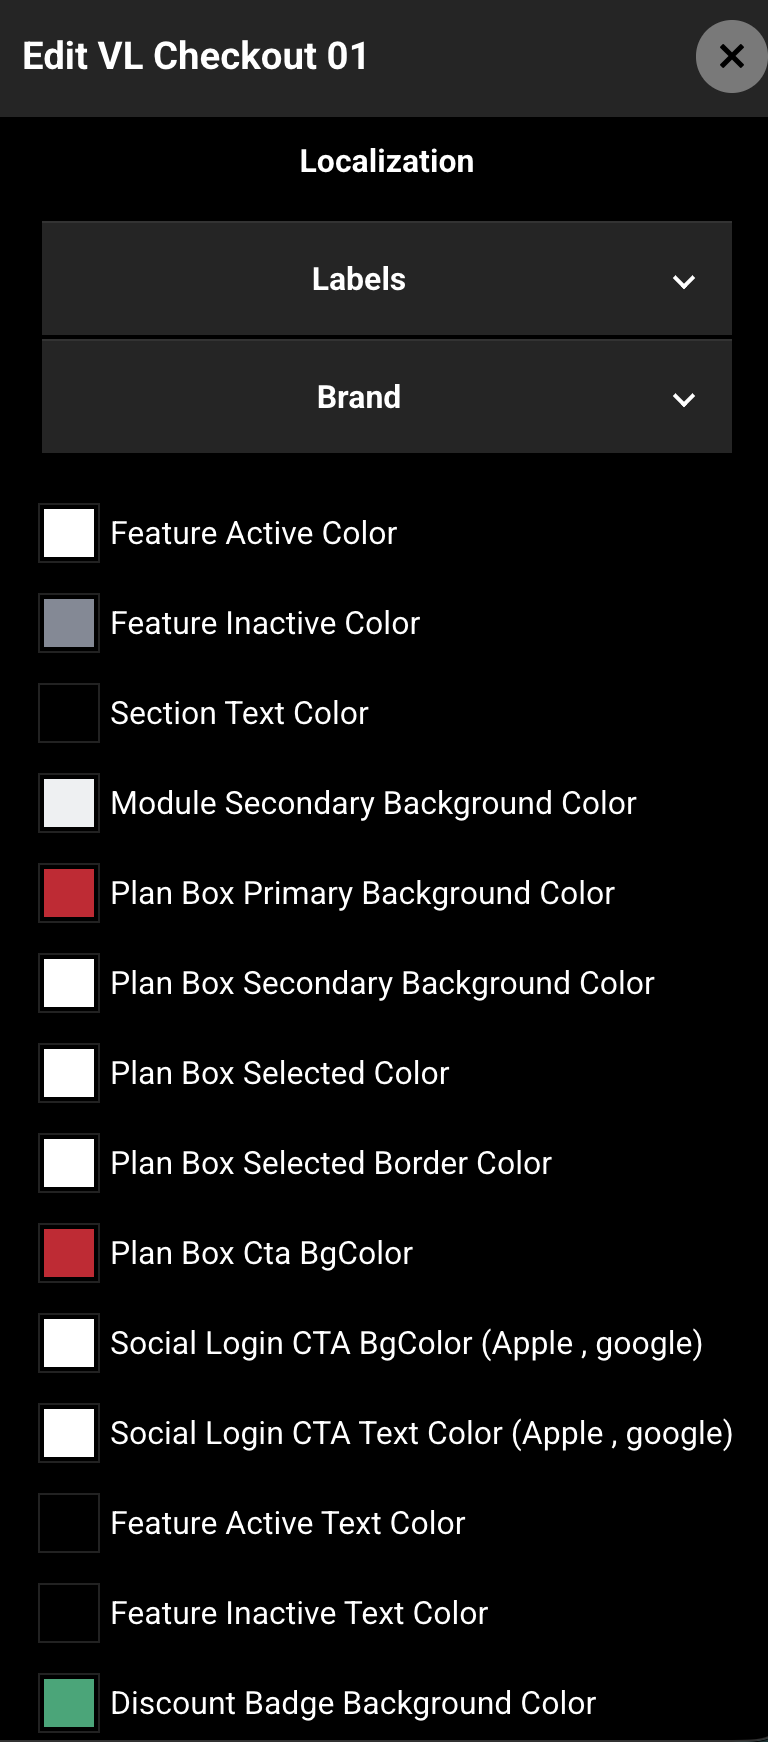
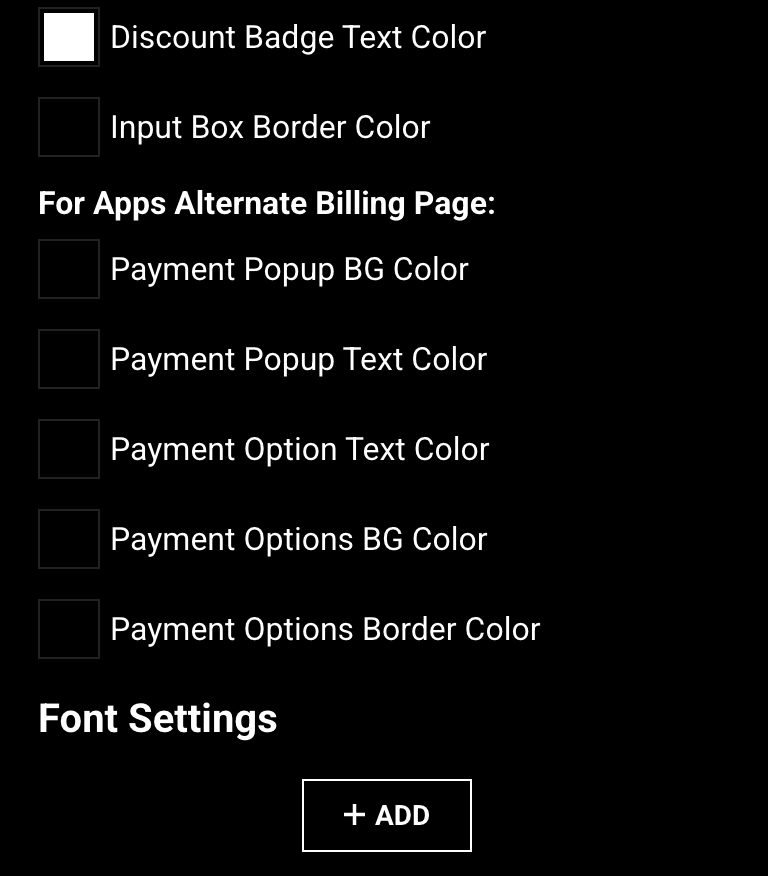
Figure 8. Brand colors, policy paths, and Font Settings on VL Checkout 01.
Step 7: Configure Localization — Labels
Expand Localization → Labels to edit customer-facing copy. All strings are editable and can be localized per language when site localization is enabled.
Checkout sections
| Label | What it controls | Default example |
|---|---|---|
| Create Account Title | Heading for step 1 — account creation | Create Account |
| Choose Provider Title | Heading for TV provider step | Choose a provider |
| Payment Title | Heading for payment step | Payment |
| Add Address Title | Address section heading when address collection is enabled | Address |
| Get Access Text | Primary access CTA copy | Get Access |
| Subscribe Cta Text | Payment submit button | Subscribe & Pay |
Account and sign-in copy
| Label | What it controls | Default example |
|---|---|---|
| Email Field Text | Email / phone input placeholder | Enter your email or phone number |
| Have An Account Text | Copy for existing customers | Have an account ? |
| Login Text | Sign-in link text | Login |
| Apple Sign In Button Title | Apple button label | Continue with Apple |
| Google Sign In Button Title | Google button label | Continue with Google |
| Log in TVE Provide Title | TV provider CTA on account step | Continue to TV Providers |
| Terms of Service Text | Agreement line during sign-up | By signing up, you agree to… |
| Email Consent Text | Marketing email opt-in copy | Please send me email and other marketing… |
| Free Signup Cta Text | Free account button when only a free plan is offered | Sign Up For Free |
| Continue without Subscription CTA Label | Shown when Enable Continue Without Subscription is on | Continue without subscription |
Profile field labels
| Label | Default example |
|---|---|
| Full Name / Name Label Text | Full Name |
| DOB Label Text | DOB |
| Zip Code Label Text | Zip Code |
| Email Label Text / Phone Label Text | Email / Phone |
| Password Label Text / Password Info Text | Password / min length hint |
| Password Minimum Length / Password Maximum Length | Min and max password length when password sign-in is enabled for your site |
| Local Team Label Text | Local Team |
Payment, offers, and upgrade
| Label | What it controls |
|---|---|
| Subscriber Policy Disclaimer | Checkbox text before payment |
| Compare Plans Text | Compare plans link |
| Offer Code Applied Text / Offer Code Billing Description | Offer code confirmation messaging |
| Claim Offer Text | Offer claim CTA |
| Offer Plan Mismatch | When an offer does not apply to the selected plan |
| Cancel Cta Text / Retry Payment Button CTA | Payment popup actions |
| Go Back to App CTA | Return to app after checkout from a webview |
| Upgrade Subscription Popup Title / Upgrade Description Text | Upgrade confirmation when a subscribed customer picks a different plan |
| Success Text / Upgrade Success Message | Upgrade success messaging |
| Restore Purchase Text / Restore Purchase Bottom Text | Restore purchase copy (supported platforms) |
No plans and errors (labels section)
| Label | Default example |
|---|---|
| No Plans Heading / No Plans Body | No Plans / No plans are available at the moment |
| No Plans Continue Text | Continue |
| Account Login Required Title / Description | Shown when TV provider email does not match signed-in account |
| Not Authorize TVE Text | TV provider not authorized for content |
The Labels section also includes copy for iTunes subscription disclaimers (apps), location messages, and password validation. Edit the labels that apply to your live platforms.
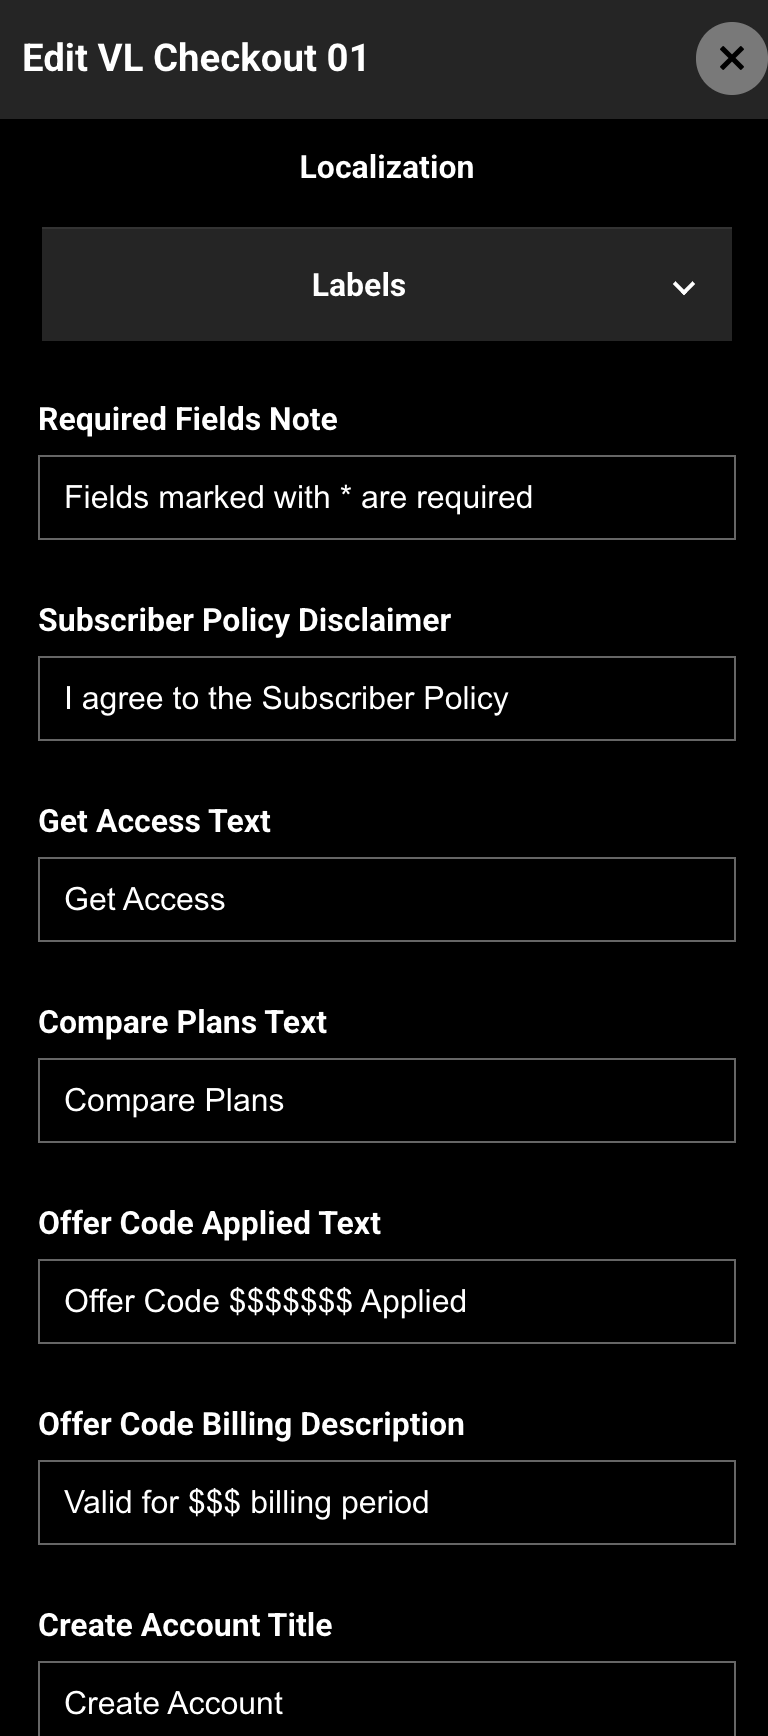
Figure 9. Localization → Labels. Edit section titles, CTAs, field labels, payment copy, and upgrade messages.
Step 8: Save and publish the Checkout page
- Save the module settings.
- Review the page layout once more.
- Publish the Checkout System Screen.
Until the page is published, apps and web will not show your latest Checkout configuration.
.png)
Figure 10. Publish the Checkout page after you finish module configuration.
Changes can take several minutes to appear because of caching. To verify sooner, use a private window, another browser, or clear cookies and cache.
Step 9: How it looks on the website
After publish, open your site’s Checkout URL, for example:
https://www.example.com/checkout
Typical website layout (desktop)
On a standard checkout page, customers usually see:
Left column (main flow)
- 1. Create Account — email or phone, optional profile fields, optional TV provider / continue-without-subscription buttons
- 2. Choose a provider — when the selected plan or content requires TV provider authentication (TVE)
- 2. Payment — card entry, optional billing address, Subscriber Policy checkbox, Subscribe & Pay
Right column (desktop, wide screens)
- Plan cards with features, pricing, and selection state
- Compare Plans link when enabled
On narrow screens (mobile/tablet), plan cards move above the account and payment sections.
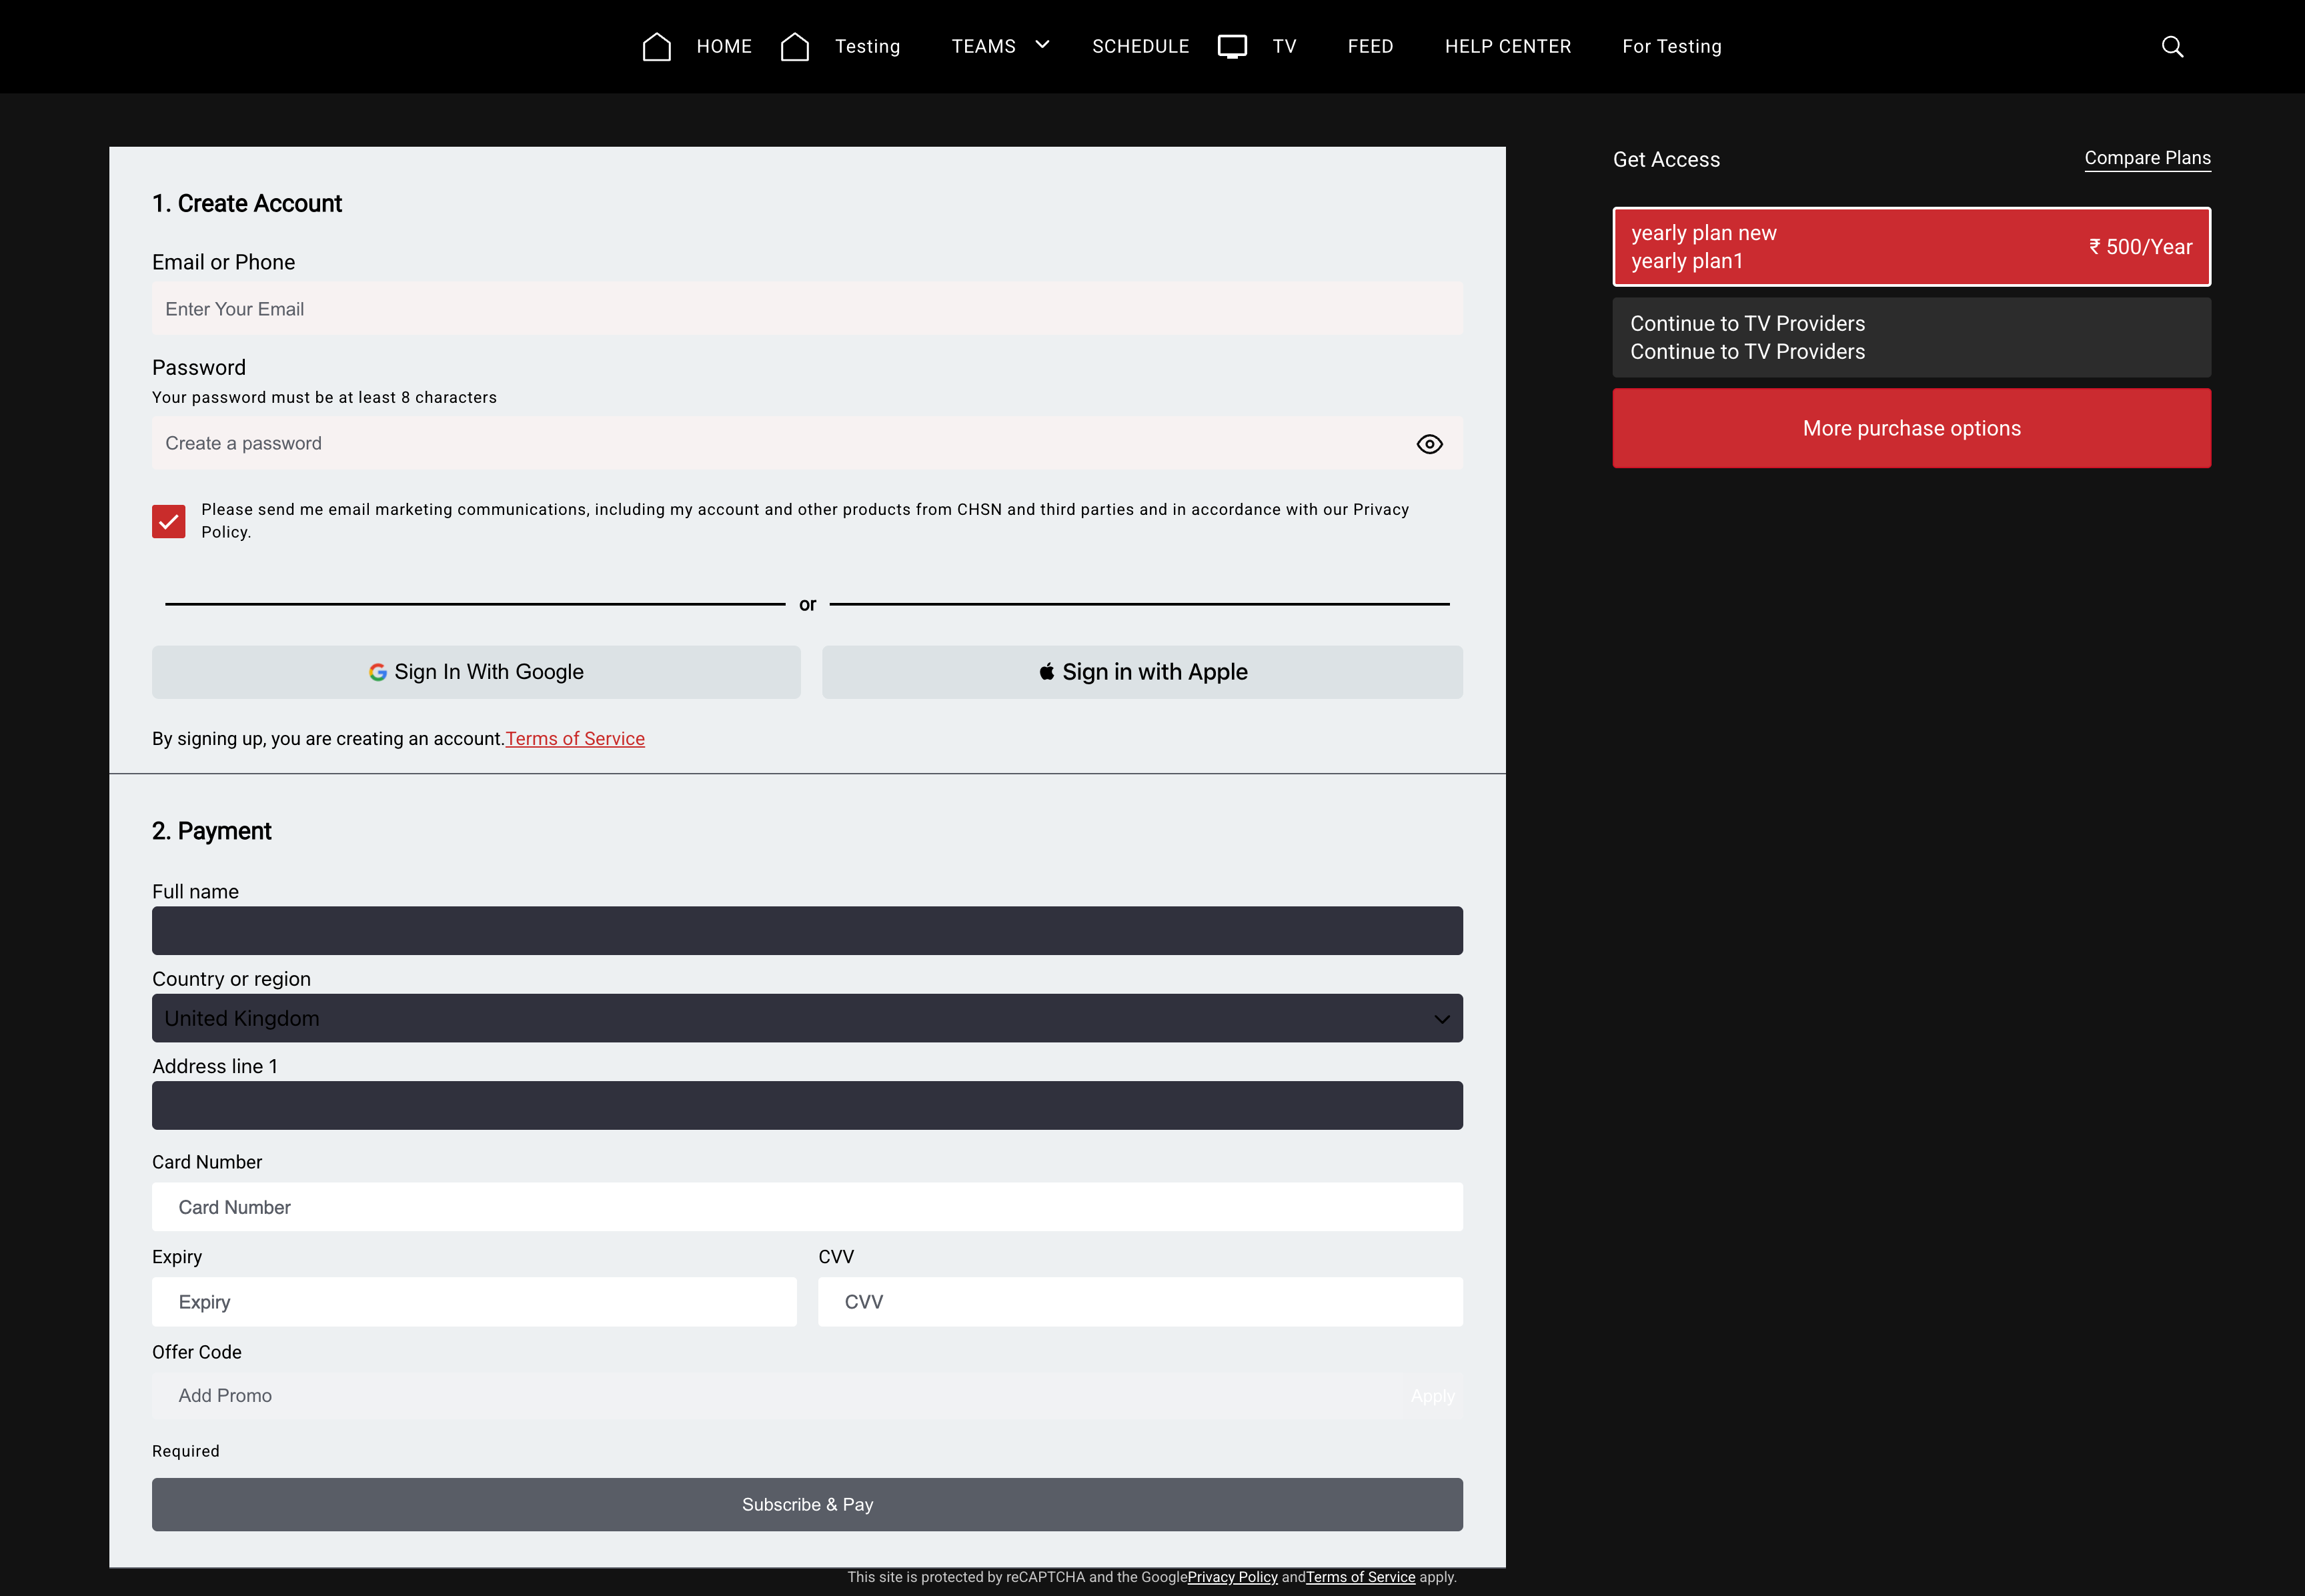
Figure 11. Website checkout (/checkout). Account and payment steps on the left; plan selection on the right (desktop).
Account creation on checkout
When the customer is not signed in, checkout shows a Create Account step. Unlike the Authentication page, there is no Get Verification Code button on checkout.
New customer (email or phone not already registered)
- They enter an email or phone number (based on Primary Field and hide/show toggles).
- Optional fields appear when enabled: name, date of birth, zip code, local team, password (when password sign-in is enabled for your site).
- When they leave the email/phone field (or press Enter), the system checks whether the account is available.
- If the address or number is new, the details are saved for checkout and the customer continues to select a plan and enter payment.
- When they select Subscribe & Pay (or Continue Without Subscription, if enabled), the account is created and the flow continues (payment or free-account path).
Existing customer (email or phone already registered)
- After they leave the email/phone field (or press Enter), they see an account already exists message with a Sign In link.
- Selecting Sign In opens a popup for the 6-digit one-time verification code.
- After a successful code, the page refreshes so they can continue checkout (unless they are already a subscriber — then they may be sent to the homepage).
Other CTAs that may appear on Create Account
| CTA | When it appears |
|---|---|
| Continue to TV Providers | TVE is enabled for the site/content and Hide TV Provider CTA is off |
| Continue Without Subscription | Enable Continue Without Subscription is on |
| Sign Up For Free | Only a free-account option is available (no paid plan payment step) |
| Google / Apple | When those options are enabled in your site’s sign-in configuration |
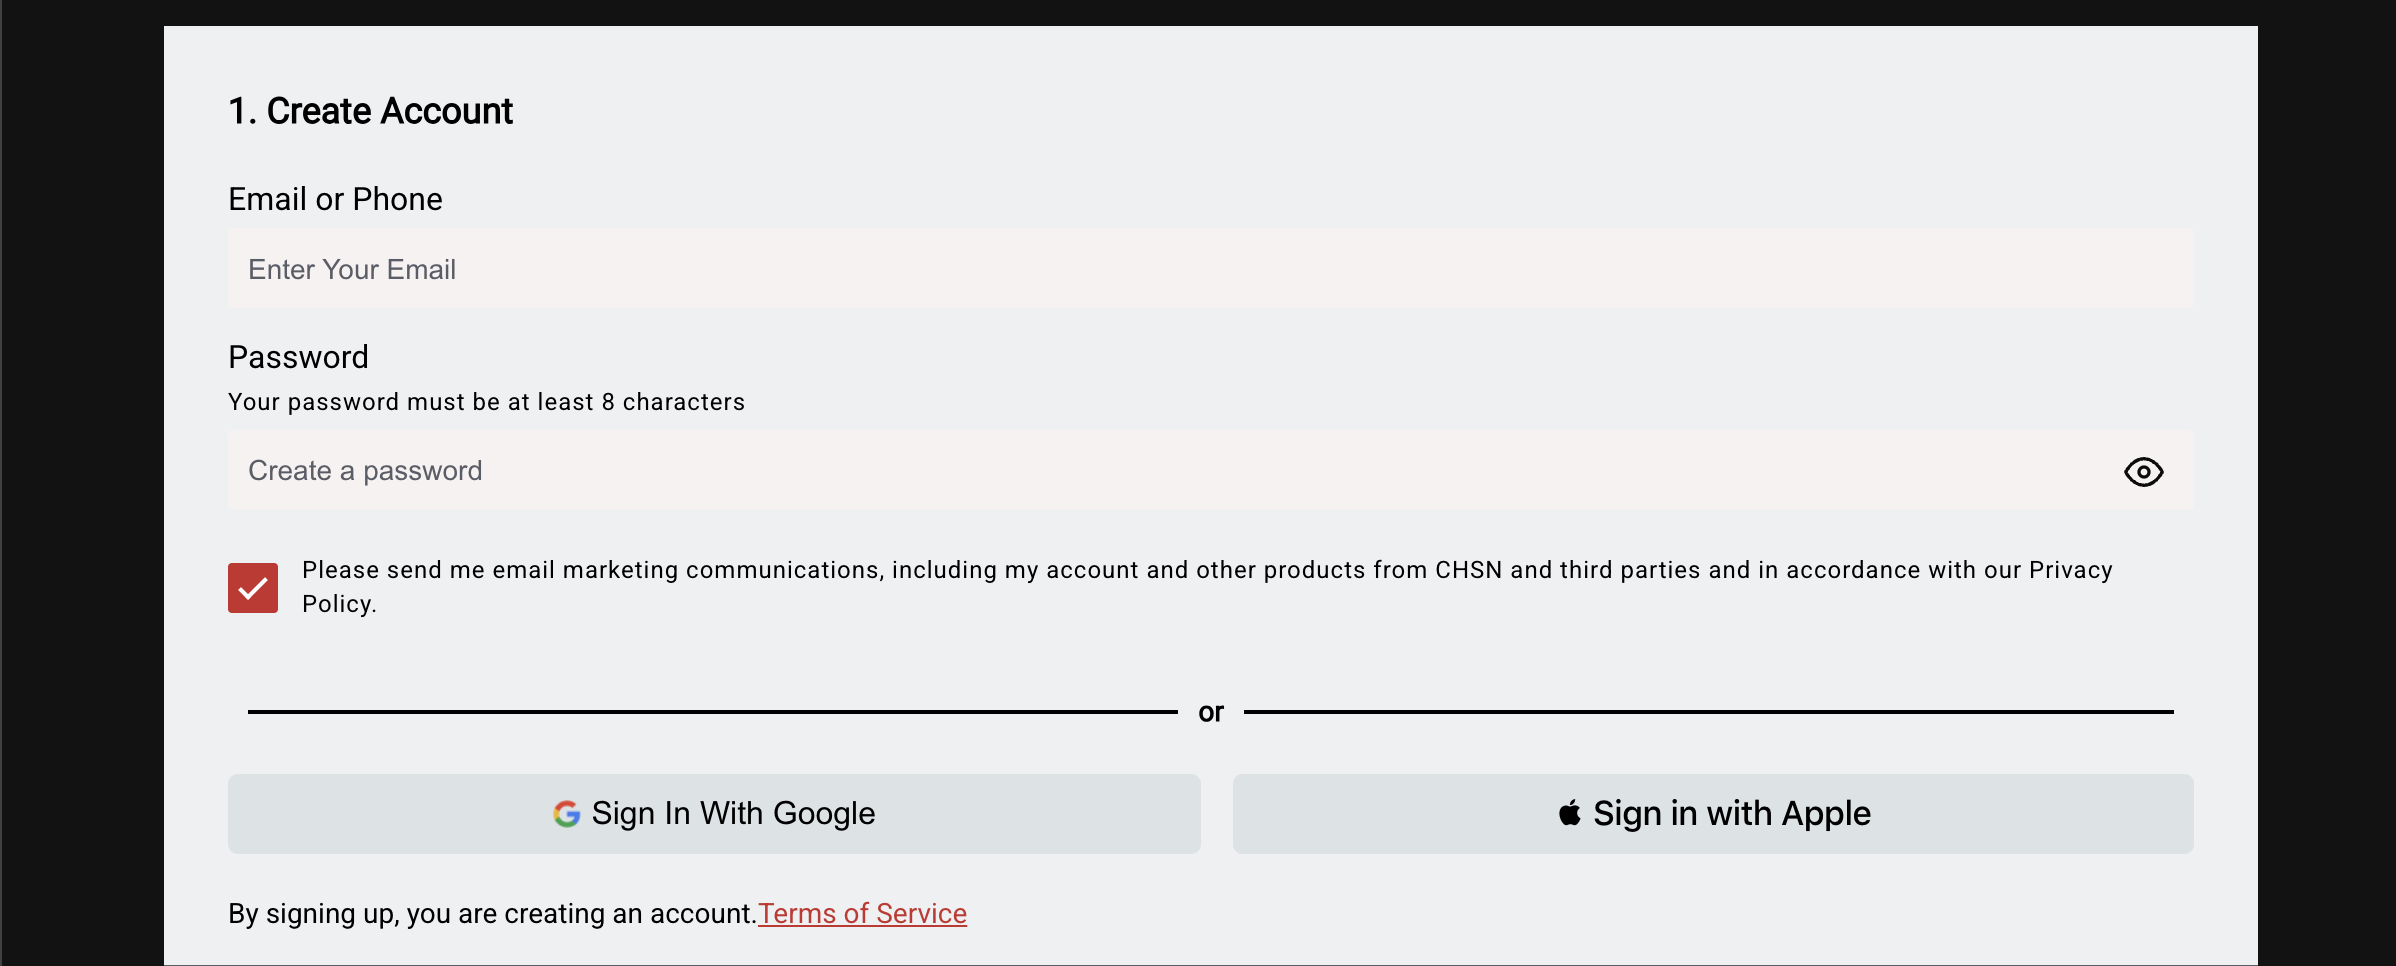
Figure 12. Create Account step on checkout. Email/phone validates on blur or Enter; OTP appears when an existing customer selects Sign In.
Plan selection and payment
After plans load and the customer is signed in (or only needs payment):
- They select a plan in the plan panel (unless one was pre-selected via URL or a prior page).
- The Payment section shows card fields (Stripe on web when configured).
- An offer code banner may appear above payment when checkout offers are active at the site level.
- They select Subscribe & Pay (or your customized Subscribe Cta Text).
- A payment status message appears — success, failure, or pending.
- After successful payment, they are redirected (see table below).
For Buy or Rent (TVOD) purchases started from content pages, the flow is the same payment step but completes a one-time transaction instead of a subscription.
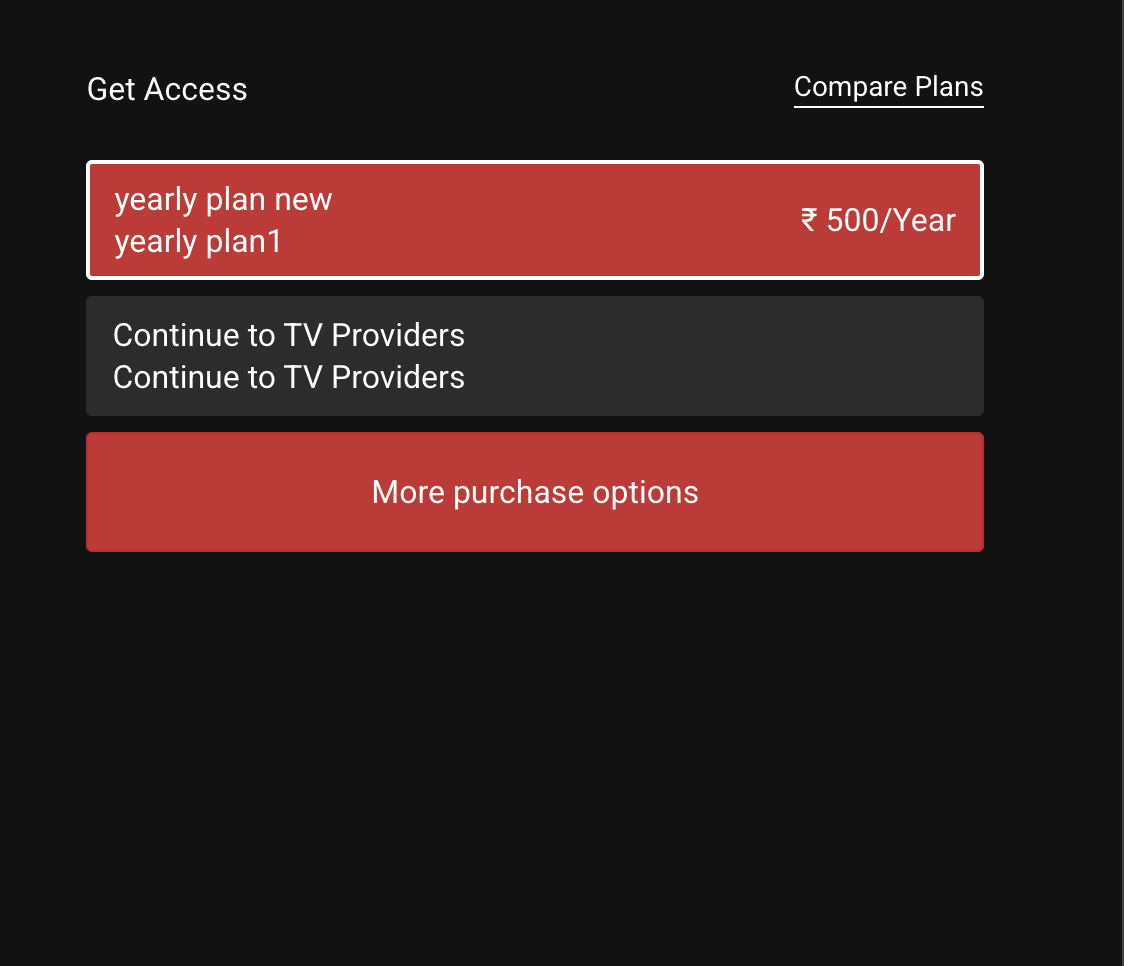
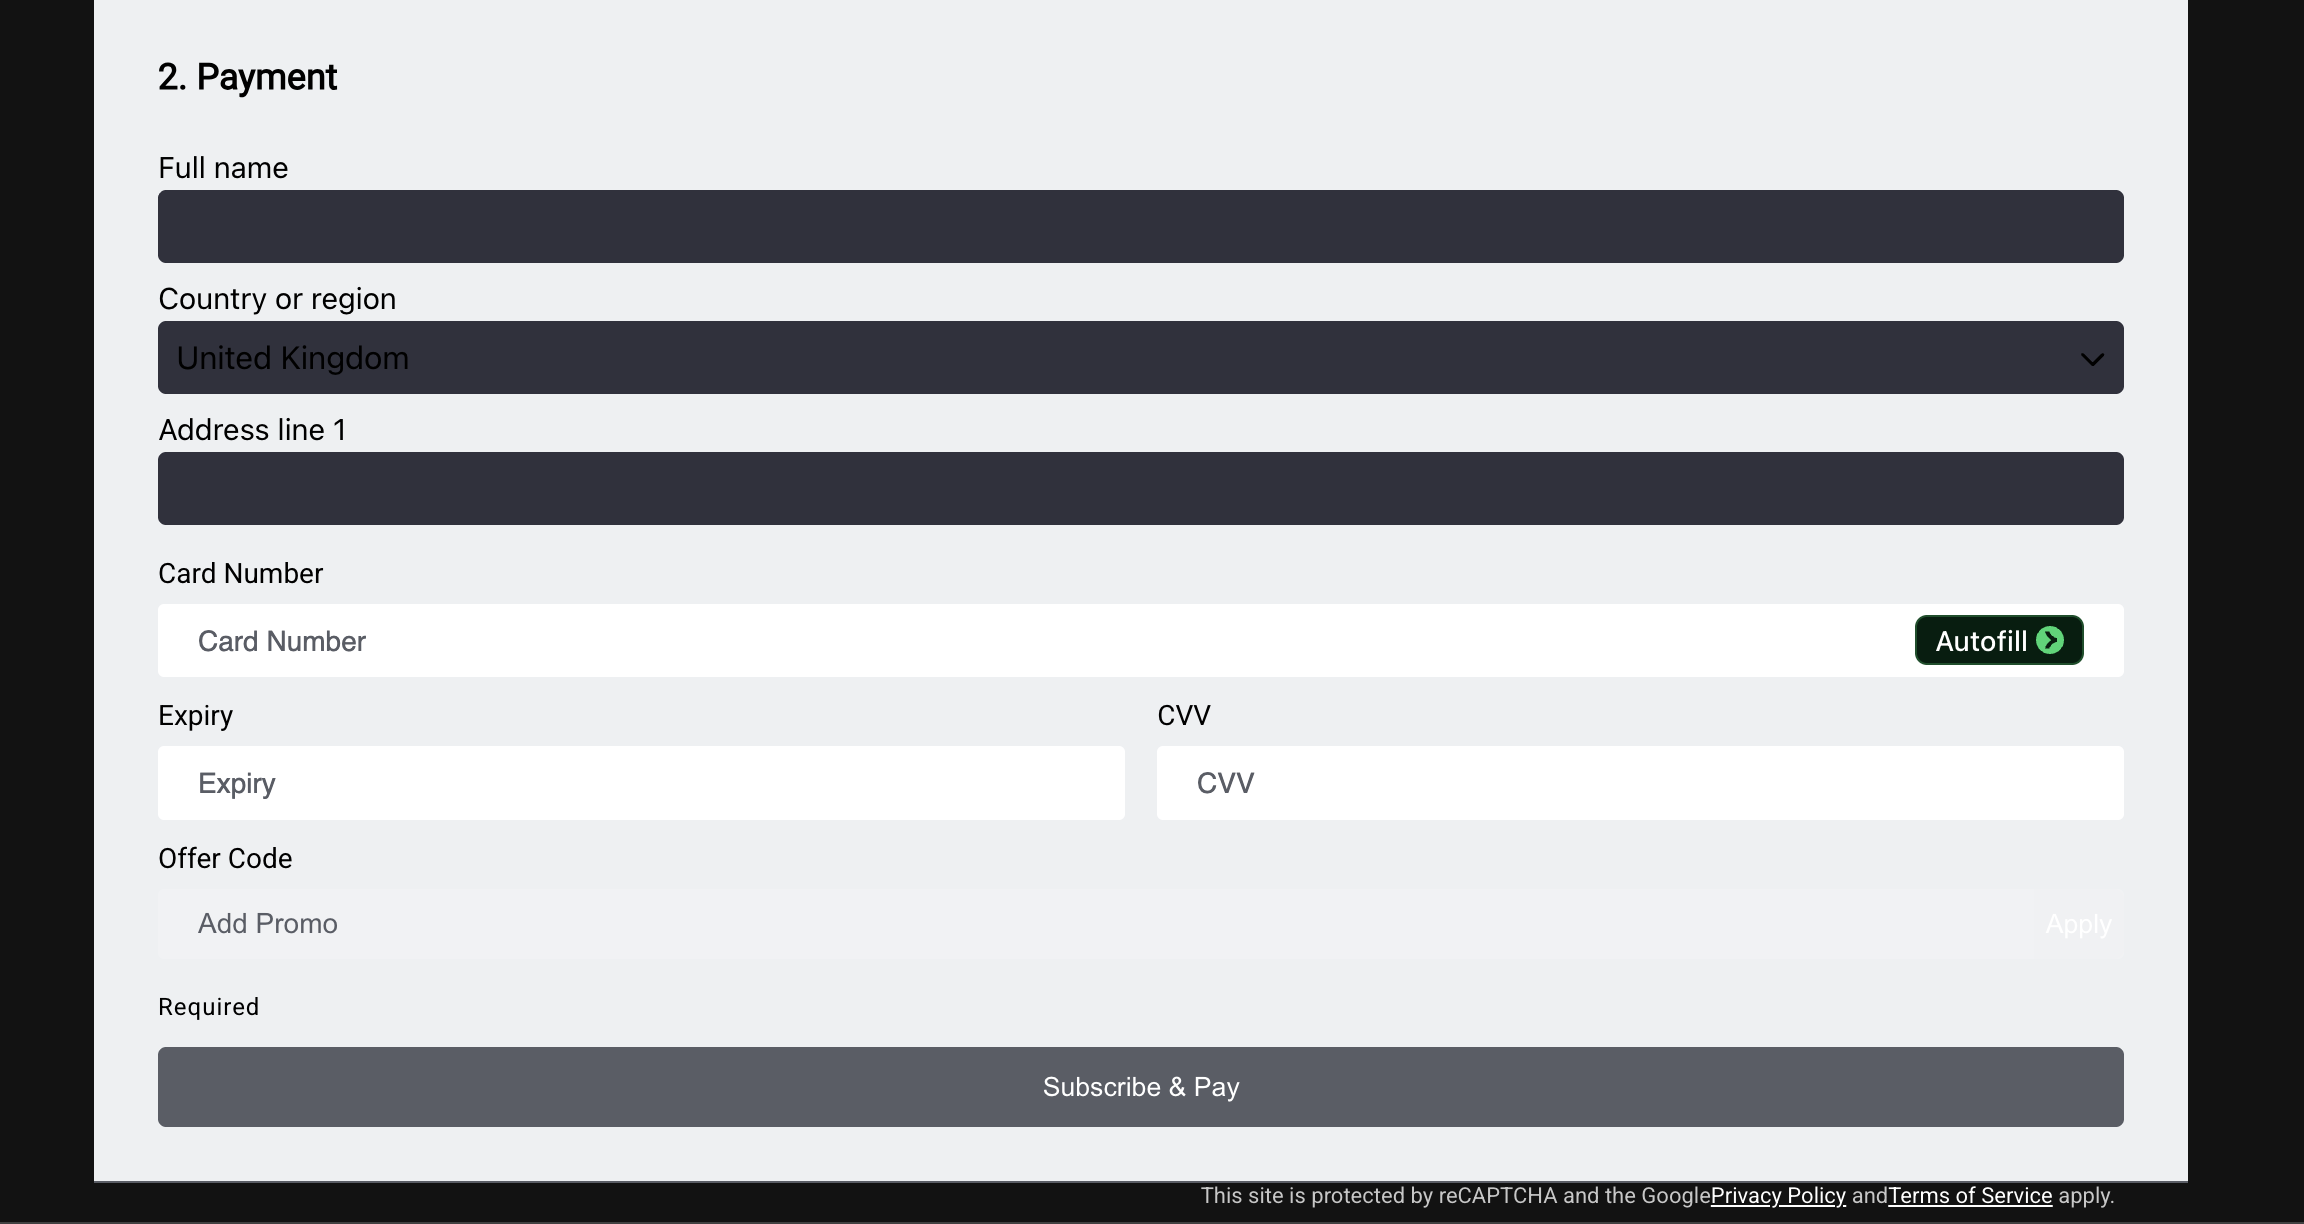
Figure 13. Payment section with card entry and Subscribe & Pay.
After successful checkout
| Situation | Where the customer goes |
|---|---|
| Started checkout from a video, show, or game detail page | Back to that content page |
Used standalone /checkout |
Next page per your site’s onboarding configuration (often the homepage) |
| Opened checkout from a mobile app in-app browser | Back to the app (deep link) when configured |
| Subscribed customer upgraded to a different plan | Stays in checkout flow until upgrade completes, then redirects per site setup |
| Used Continue Without Subscription | Next page per site onboarding setup (free account created) |
| TV provider authentication succeeded | Access granted — redirect per site and content setup |
Link Subscribe and Sign Up to checkout
Customers reach checkout from plan banners, masthead Subscribe links, sign-in Sign Up links, protected content prompts, and View Plans pages. All of those entry points should target the same published checkout path.
Step 1: Confirm your Checkout page path
- Open Template Builder.
- Go to Pages and open your Checkout System Screen.
- Open Page Settings.
- Note the page path (for example
/checkout). - Confirm the page is published.
Step 2: Update header or navigation Subscribe links
- From the Template Builder home screen, open Global Settings.
- Select Header Navigation (or Other Navigation).
- Find menu items such as Subscribe, Sign Up, or Get Access.
- Set Linked To to your Checkout page path — for example
/checkout. - Save and publish navigation changes.
Step 3: Check plan banners and masthead modules
If your site uses VL Plan Banner 01, VL Masthead, or similar modules with subscribe CTAs:
- Open the page that contains the module.
- Confirm subscribe buttons link to
/checkout(or your chosen path). - Save and publish the page.
Step 4: Verify on the live website
- Open your website in a private browser window.
- Select Subscribe or Sign Up from the header, a plan banner, or protected content.
- Confirm you land on your Checkout page (for example
https://www.yoursite.com/checkout). - Confirm plans load and the Create Account step appears when you are not signed in.
Step 5: Test the full purchase path
- Complete account creation with a test email or phone.
- Select a plan and enter test payment details (use your staging/sandbox environment).
- Confirm payment success messaging and redirect match your site setup.
Tip: Use one Checkout page path across the whole site. When navigation, plan banners, sign-in Sign Up links, and paywall prompts all use the same path, customers always see the checkout experience you configured in Template Builder.
Verification checklist
- Checkout page exists as a System Screen
- Page path is
/checkout(or the path your apps and CTAs expect) - VL Checkout 01 is on the layout
- Display toggles match your required account fields (name, DOB, zip, etc.)
- Monetisation CTA and Linked to Page are configured if detail pages use them
- Brand colors and Font Settings match your site
- Labels are reviewed for launch language(s)
- Subscriber Policy, Terms, and Privacy paths are set
- Plans and payment provider are active in AppCMS
- Page is published
- Website
/checkoutshows plans, account creation, and payment - Test purchase completes and redirects correctly
Troubleshooting
| Problem | What to check |
|---|---|
| VL Checkout 01 is not in the module list | Confirm the page type is System Screen (Developers Only page type). |
| Page path is wrong | Open Page Settings and set path to /checkout. |
| No plans shown | Confirm subscription plans are active in AppCMS and available in the customer’s region. Check SVOD service is enabled. |
| Customer sent to homepage immediately | They may already be subscribed to the selected plan. Test with a non-subscribed account or a different plan. |
| Payment section never appears | Plans may not have loaded, only a TV provider plan may be available, or URL parameters may indicate a TV provider flow (SubType=tve, planId=TVE). |
| TV provider button missing | TVE must be enabled for your site. Hide TV Provider CTA must be off. Content must support TV provider access. |
| Location step blocks checkout | Turn on Disable HBA (Location) if location verification should not run on checkout, or confirm location permissions in the browser. |
| Password field not shown | Password sign-in must be enabled for your site at the service level. |
| Compare Plans link goes nowhere | Enable Show Compare Plan CTA? and set Compare Plan Page Path to a valid View Plans page. |
| Labels do not change on the site | Save module settings, publish the page, and allow cache to clear. For localization, edit labels in the correct language. |
| Payment fails | Confirm Stripe (or your provider) is configured in AppCMS and you are using valid test or live credentials. |
| Changes not visible | Confirm publish, then clear cache or use a private window. |
Best Practices
- Use one Checkout System Screen at a stable path (
/checkout). - Align account field toggles with what you legally require and what your CRM needs — do not collect fields you will not use.
- Match brand colors and fonts to Authentication and the rest of the site.
- Keep legal links current — Terms, Privacy, and Subscriber Policy paths should point to published pages.
- Localize Labels when the site has multiple live languages.
- Test checkout end-to-end in staging: account creation, plan change, payment, upgrade, and TV provider paths.
- Publish after every meaningful change — draft System Screens do not update production.
FAQs
Q. What page type should I use for VL Checkout 01?
System Screen (set under New Page Type * Developers Only when creating the page).
Q. What is the recommended page path?
/checkout.
Q. Does checkout include sign-in, or do customers use the Authentication page first?
Checkout includes its own Create Account step. Customers can complete sign-up and payment without visiting /authentication first. Your Authentication page’s Sign Up link typically sends new customers to /checkout.
Q. How do customers create an account during checkout?
They enter an email or phone number. When they leave the field (or press Enter), checkout validates it. New customers continue to payment; the account is created when they complete Subscribe & Pay or Continue Without Subscription. Existing customers see an account-already-exists message and can select Sign In to receive a one-time verification code. Optional profile fields and password appear based on module toggles and site-level password settings.
Q. Can customers use TV provider login during checkout?
Yes, when TVE is enabled for your site and the content or plan supports it. They may see Continue to TV Providers on the account step and a Choose a provider section.
Q. What happens if a subscribed customer picks a different plan?
They see an Upgrade Subscription prompt instead of being turned away from checkout.
Q. What is Continue Without Subscription?
When Enable Continue Without Subscription is on, customers can create a free account without entering payment details.
Q. How is this different from VL Subscription 01?
VL Checkout 01 is the unified flow (account + plan + payment on one page). VL Subscription 01 is a legacy standalone payment page at /subscription that expects the customer to sign in first.
Q. How is this different from VL ViewPlans 01 / 02?
View Plans modules are standalone plan-picker pages. They route customers into checkout after plan selection. VL Checkout 01 is the checkout page itself.
Important Information
- VL Checkout 01 must be placed on a System Screen page (or embedded via detail-page checkout on supported Show Detail, Video Detail, and Game Detail experiences).
- Create the page as a System Screen, add the module, configure options, then publish.
- Post-checkout routing depends on where the customer started (content page, standalone checkout, or app webview) and your site’s onboarding configuration — not a single fixed path for every site.
- Offer code banners require site-level checkout offer configuration in addition to module label copy.
- Publish after configuration changes.
Glossary
| Term | Definition |
|---|---|
| System Screen | Template Builder page type used for sign-in, checkout, search, and other system flows. |
| VL Checkout 01 | The Template Builder module documented in this article. |
| OTP | One-time password / verification code sent to email or phone. |
| SVOD | Subscription video on demand — recurring subscription plans. |
| TVOD | Transactional video on demand — buy or rent individual titles. |
| TVE | TV Everywhere — authenticate with a TV provider instead of or in addition to a direct subscription. |
| HBA | Home-based authentication — location verification used to confirm the customer is in an allowed viewing area. |
| Monetisation CTA | Primary and secondary purchase-type buttons configured for plan-related UI. |
| Merge Checkout Form | Layout option that merges numbered checkout sections into a single combined form. |
Contact Support
If you need help beyond this article, contact the ViewLift support team.
- Email: techsupport@viewlift.com
- Phone (US): +1-800-859-0420
- Phone (UK): +44-203-014-8921
Support hours: B2C requests are handled Monday to Friday. B2B support is available 24/7.