Introduction
VL Authentication 02 is a Template Builder module that powers a newer sign-up and sign-in experience on your website and connected apps.
On the website, customers sign in with their email or phone number using a one-time verification code. When Google and Apple sign-in are enabled for the published authentication module, those buttons also appear on the login form. A password field appears only when password sign-in is enabled for your site at the service level.
This article explains how to create the Authentication page, add and configure VL Authentication 02, publish it, and verify the experience on the website.
Purpose
The purpose of this article is to help you:
- Create an Authentication Screen or System Screen for sign-in
- Add and configure the VL Authentication 02 module
- Set colors, hide options, password length, and the labels in the module form
- Understand what customers see on the website after sign-in
- Publish and verify the live Authentication page
Scope
This article covers:
- Creating the Authentication page in Template Builder
- Adding VL Authentication 02
- Layout colors, hide options, and password length
- Content labels: Title, Subtitle, Get Code CTA, and Skip CTA
- How the authentication page appears on the website
- An overview of the website sign-in flow
It does not cover:
- Setting up Google or Apple credentials in external provider consoles
- Turning password sign-in on at the service level
- Full TV provider (TVE) onboarding
- Other authentication modules (VL Authentication 01, VL Authentication With Password)
Prerequisites
Before you begin, ensure you have:
- Access to Template Builder with permission to create, edit, and publish pages
- Google or Apple sign-in configured at the site level if you plan to offer those options
- Brand colors and copy ready for the sign-in heading, instructions, and primary button
Example used in this article
The steps use a page named Authentication at path/authentication. Replace these examples with values that match your site.
Authentication flow overview (website)
The flowchart below shows the typical customer journey on the website when VL Authentication 02 is published on your Authentication page.
.png)
Notes
- Google and Apple buttons appear only when those providers are enabled for the published authentication module and configured for the site. The current module form does not include a social-provider list.
- A password field appears only when password sign-in is enabled for your site at the service level. Password labels and length in this module do not turn password sign-in on.
- Unlike VL Authentication 01, this module’s website flow does not send customers to a VPPA consent page as part of the standard post-sign-in redirect.
- If the customer started from checkout, checkout can continue after sign-in.
Step 1: Create the Authentication page
You can start a new page in either of these ways:
- Open Template Builder.
- Start Create New Page from one of these locations:
- On the Template Builder home screen, select + New Page.
- On the home Page Overview, select View All Pages, then select New Page.
- Enter a Page Name, such as
Authentication. - Under Page Type, select Authentication Screen or System Screen.
- Enter a Page Path.
/authenticationis the recommended path unless your site already uses a different sign-in path. - If localization is enabled, choose the Target Language.
- Select Create Page.
The page type cannot be changed after the page is created.
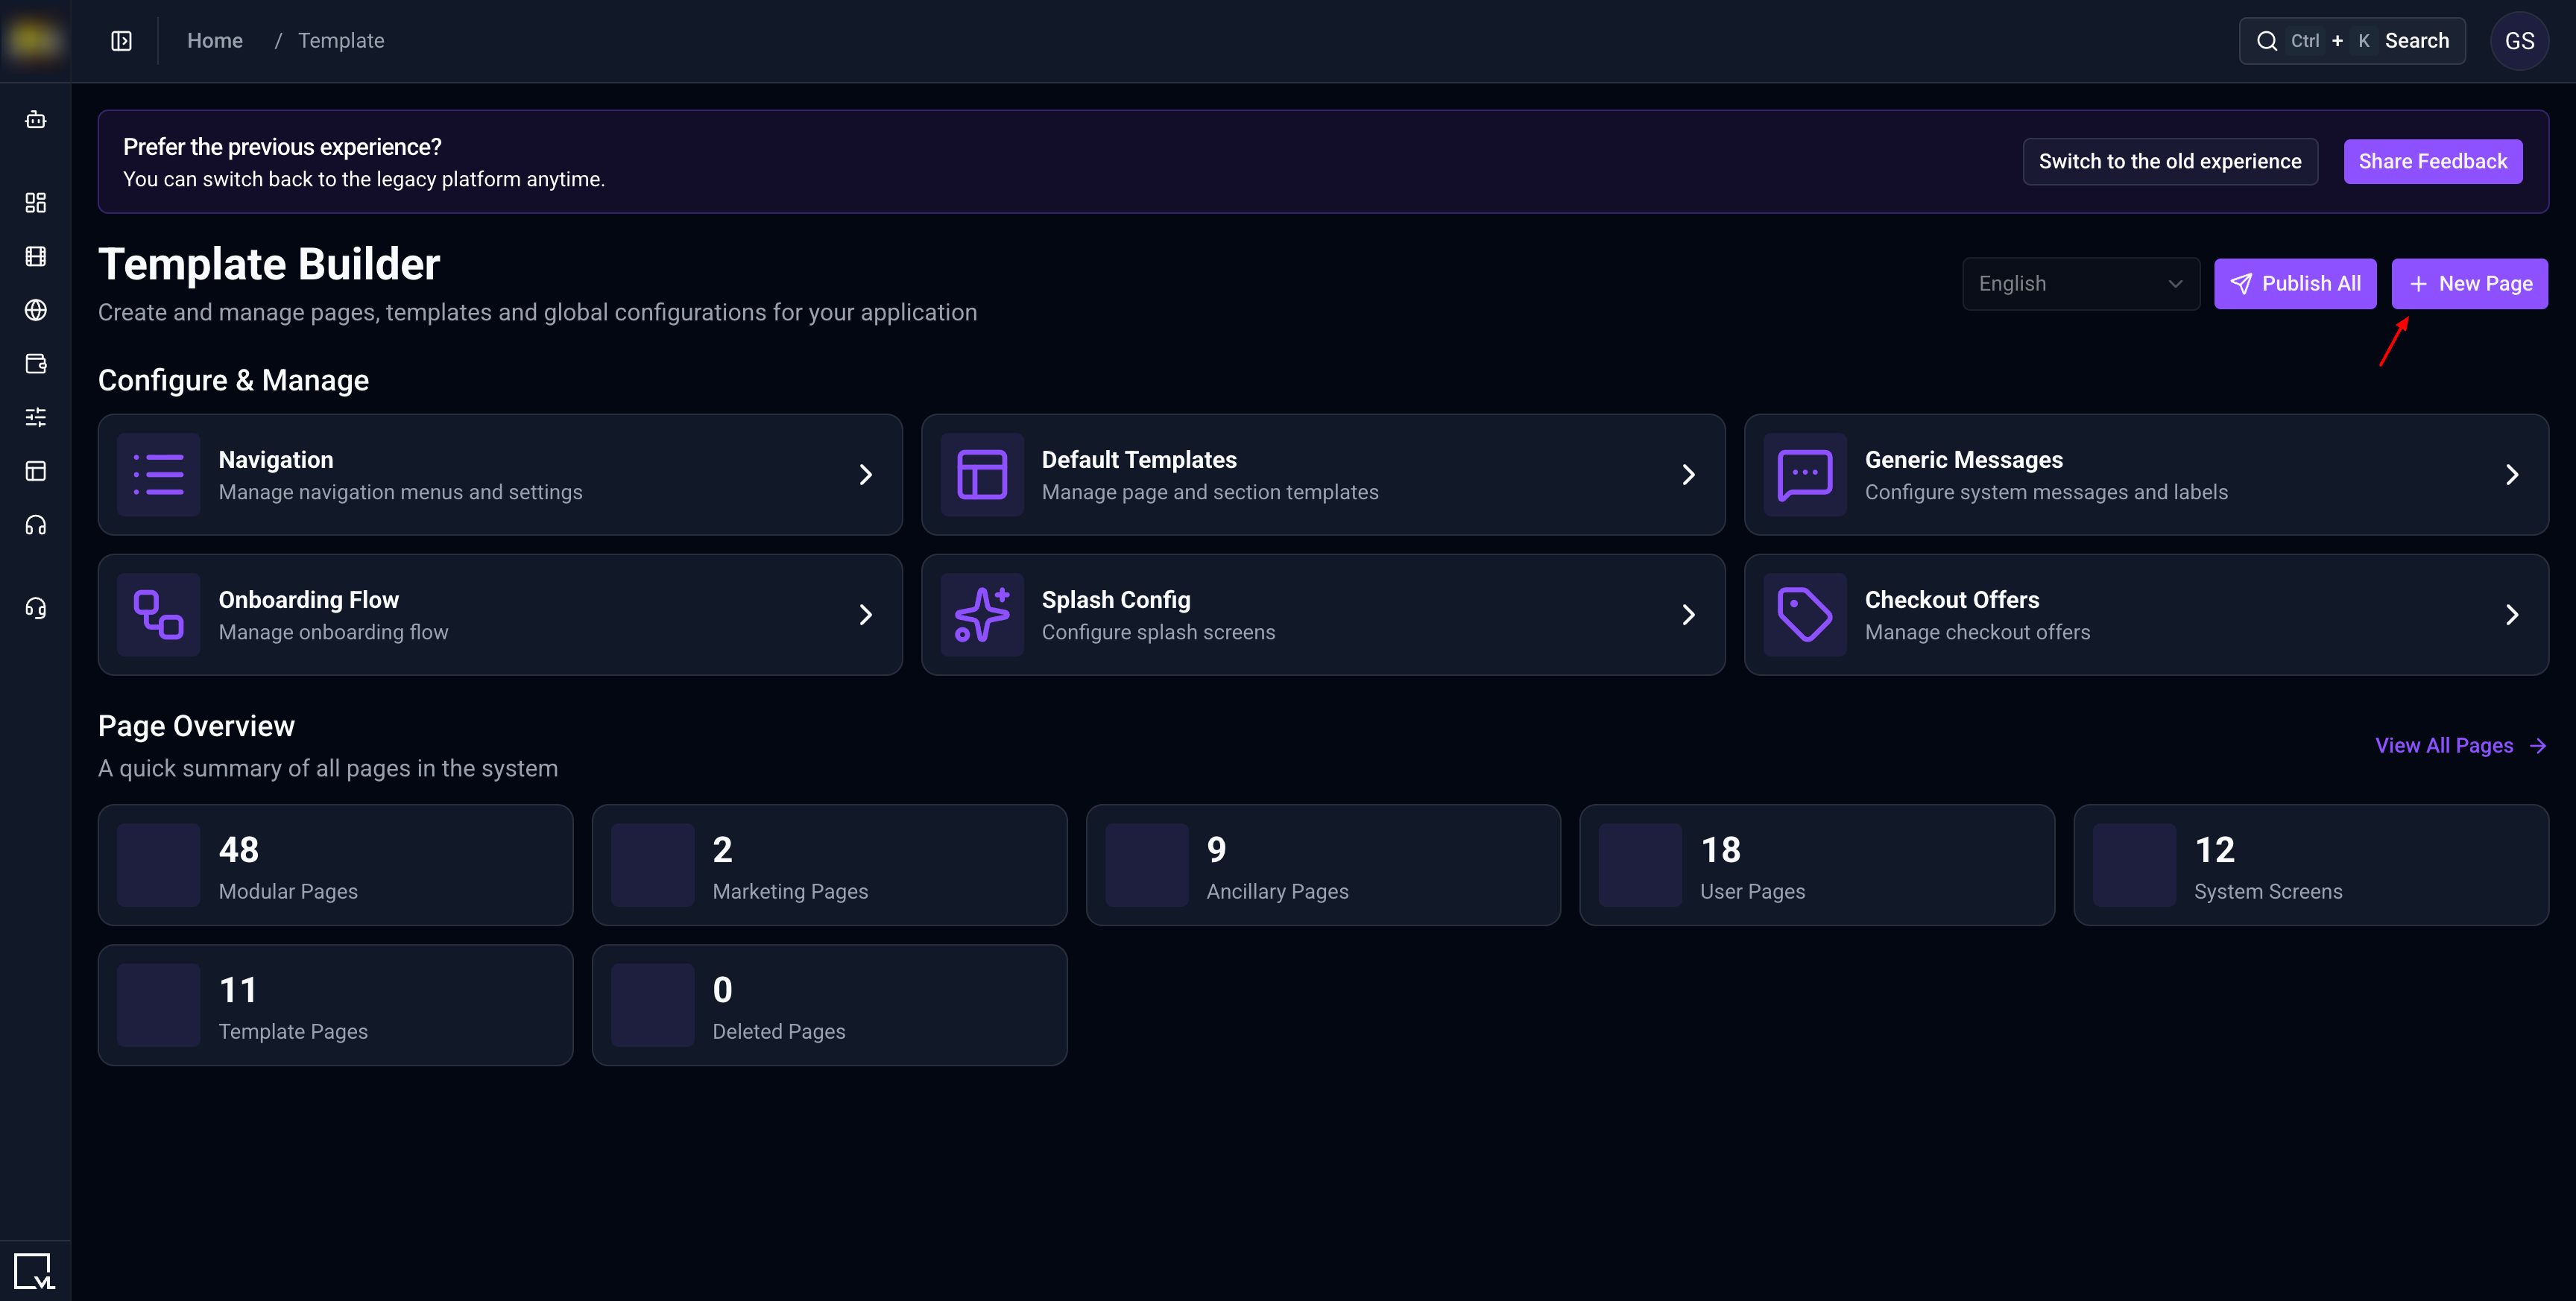
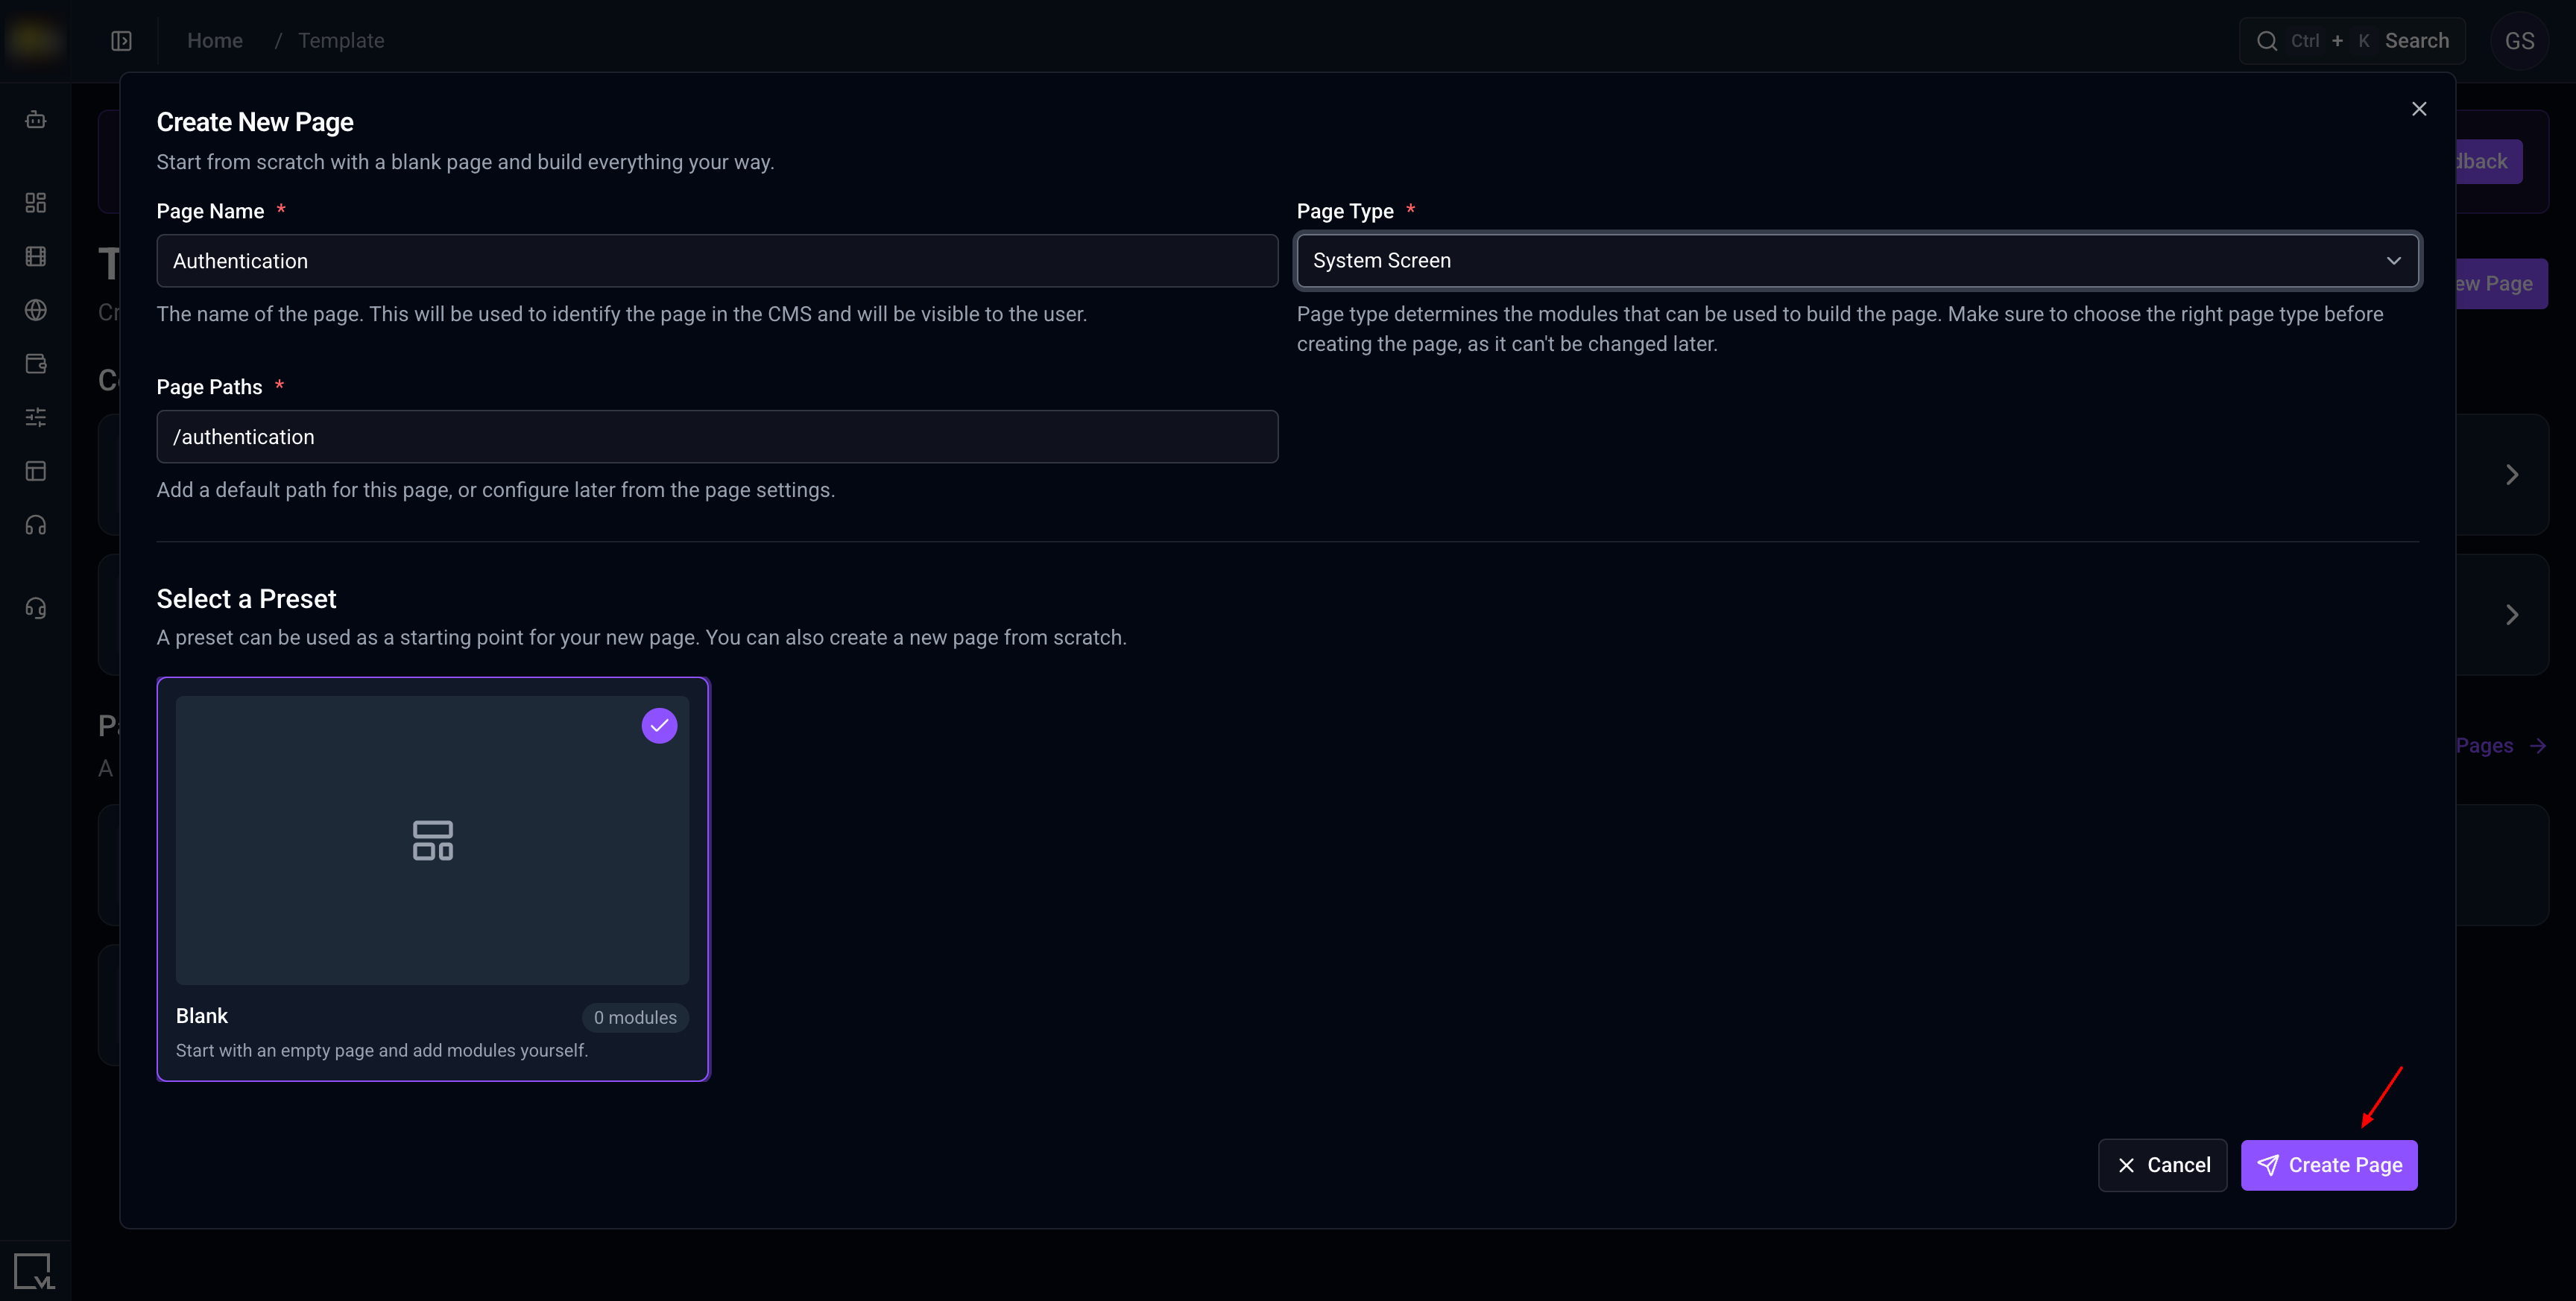
Create New Page with Authentication Screen or System Screen selected as the Page Type. Start from + New Page on the Template Builder home screen, or from New Page on View All Pages.
Also available on: Modular Page and Marketing Page. For the standard sign-in experience, use an Authentication Screen or System Screen.
Keep /authentication consistent across environments when you can. Many web and app flows send customers to this path.
Step 2: Add the VL Authentication 02 module
- Open the new page in the Template Builder editor.
- Select Add Modules.
- Open the Authentication group, or search for
VL Authentication 02. - Select VL Authentication 02 to add it to the page.
- Select the module on the page to open its settings.
System screens typically use a single primary system module. Avoid stacking unrelated trays on this page unless your product design requires them.
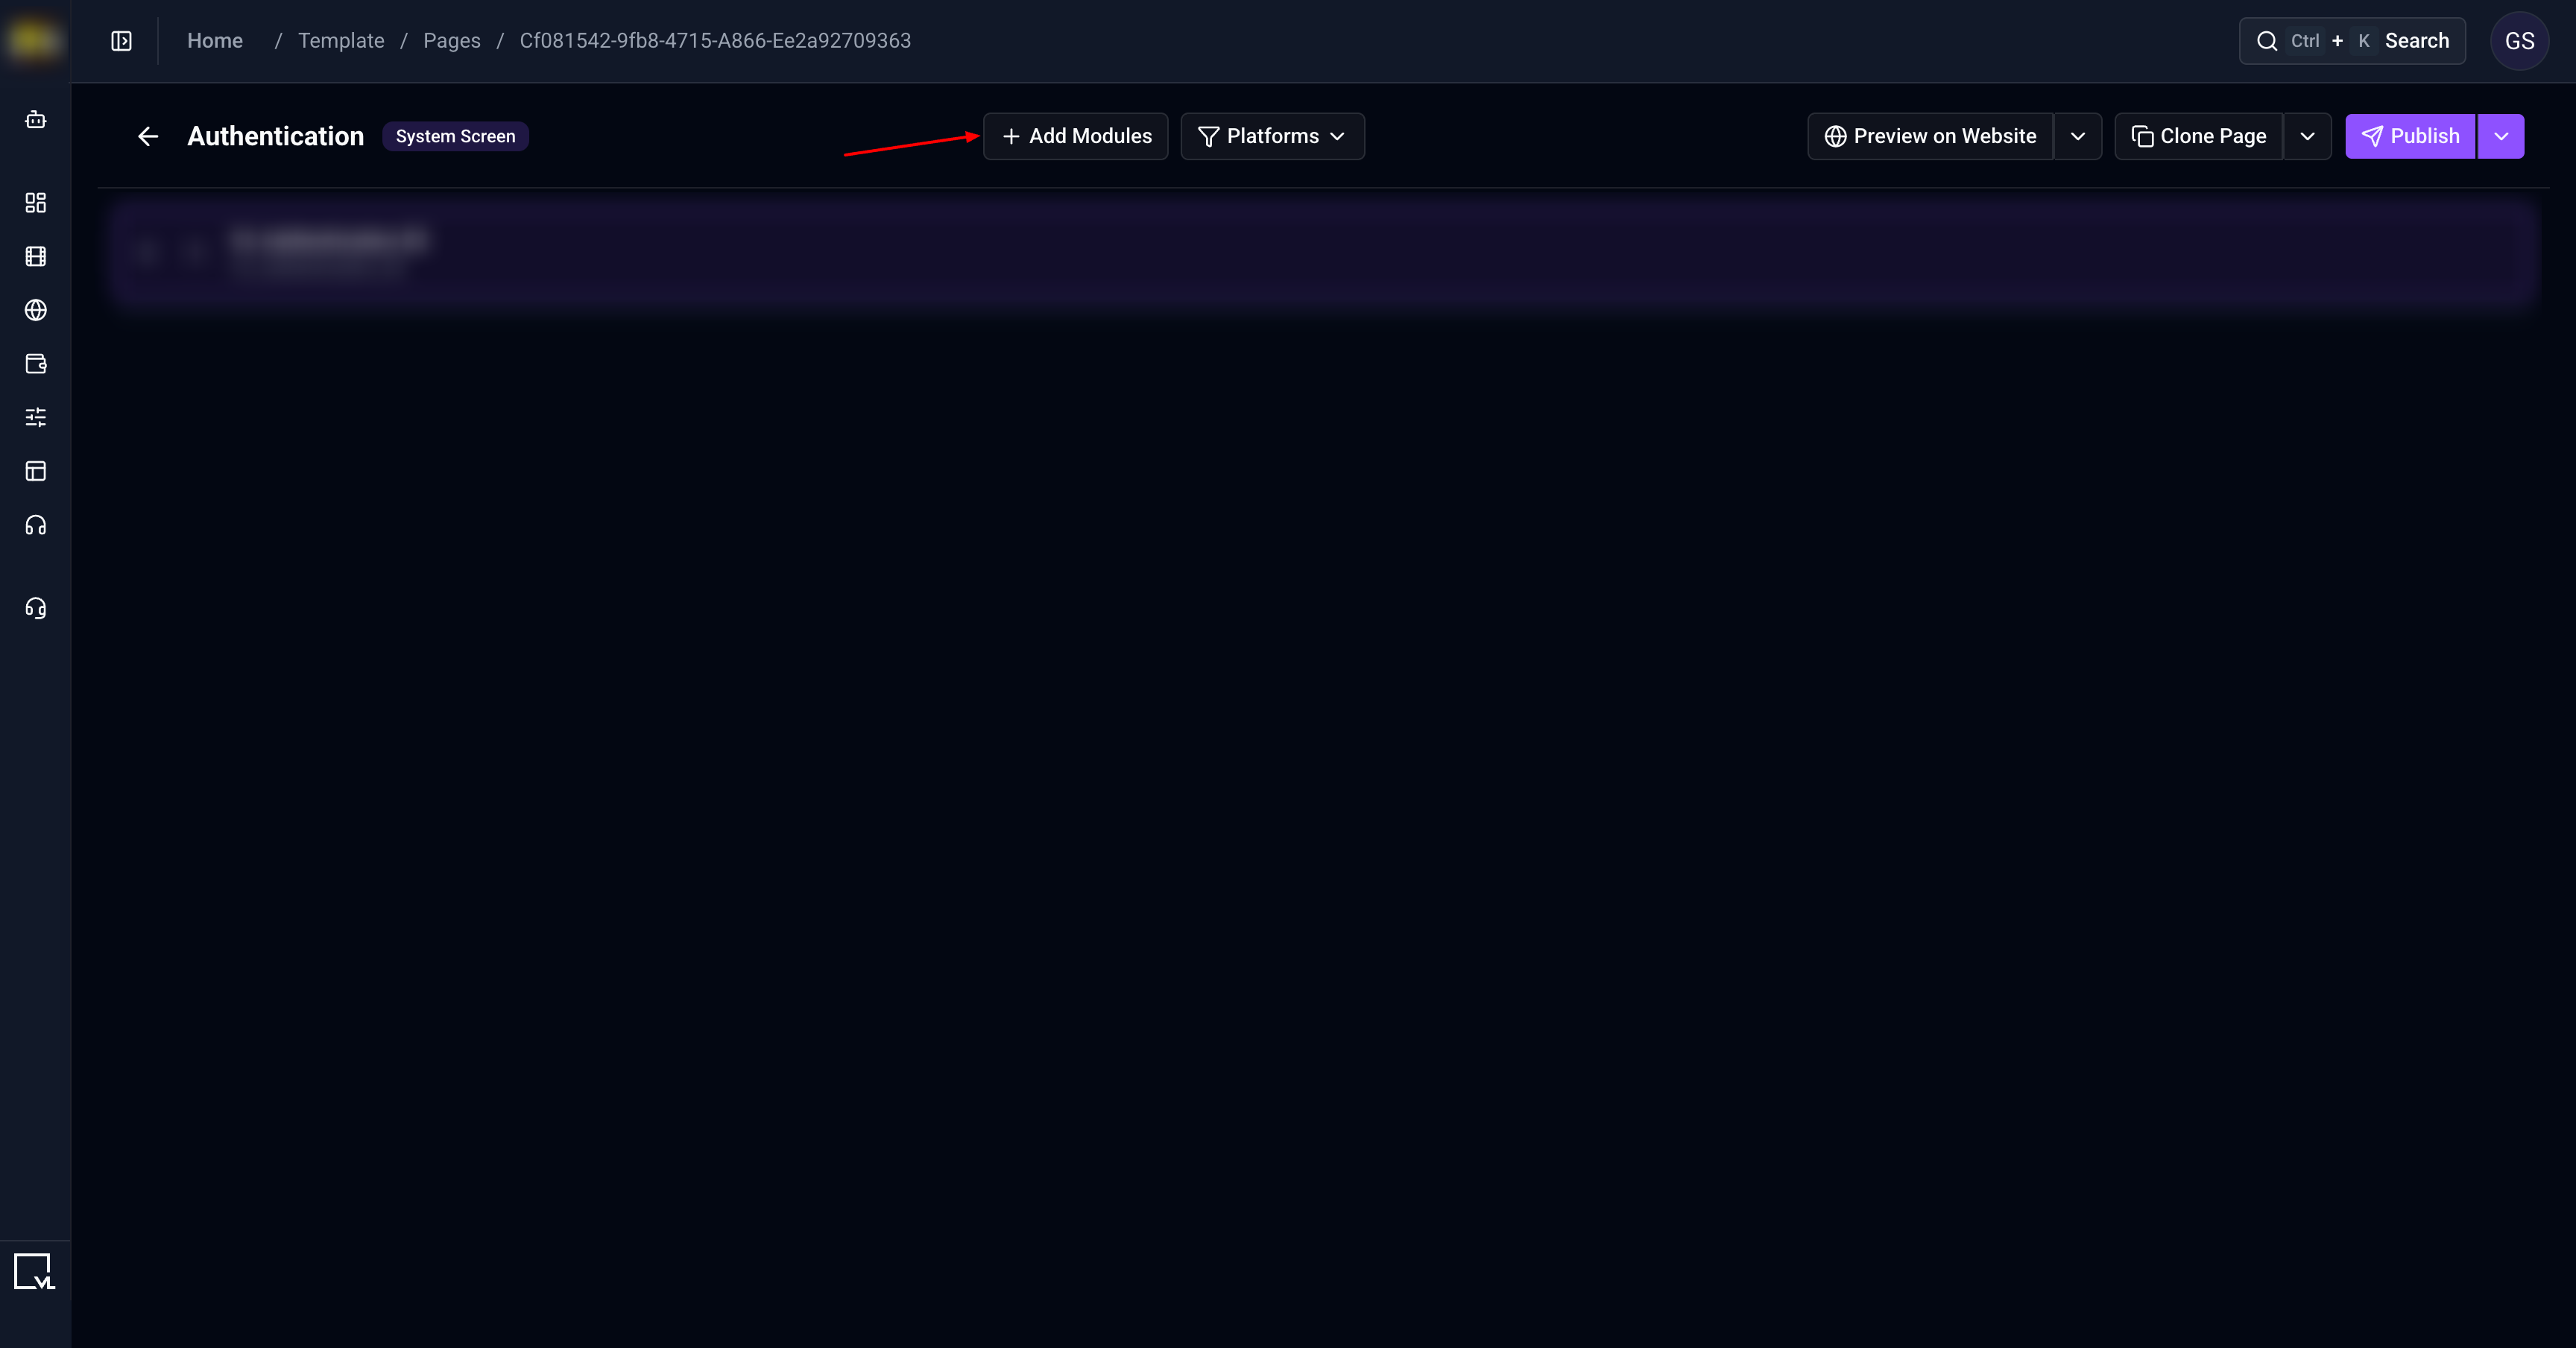
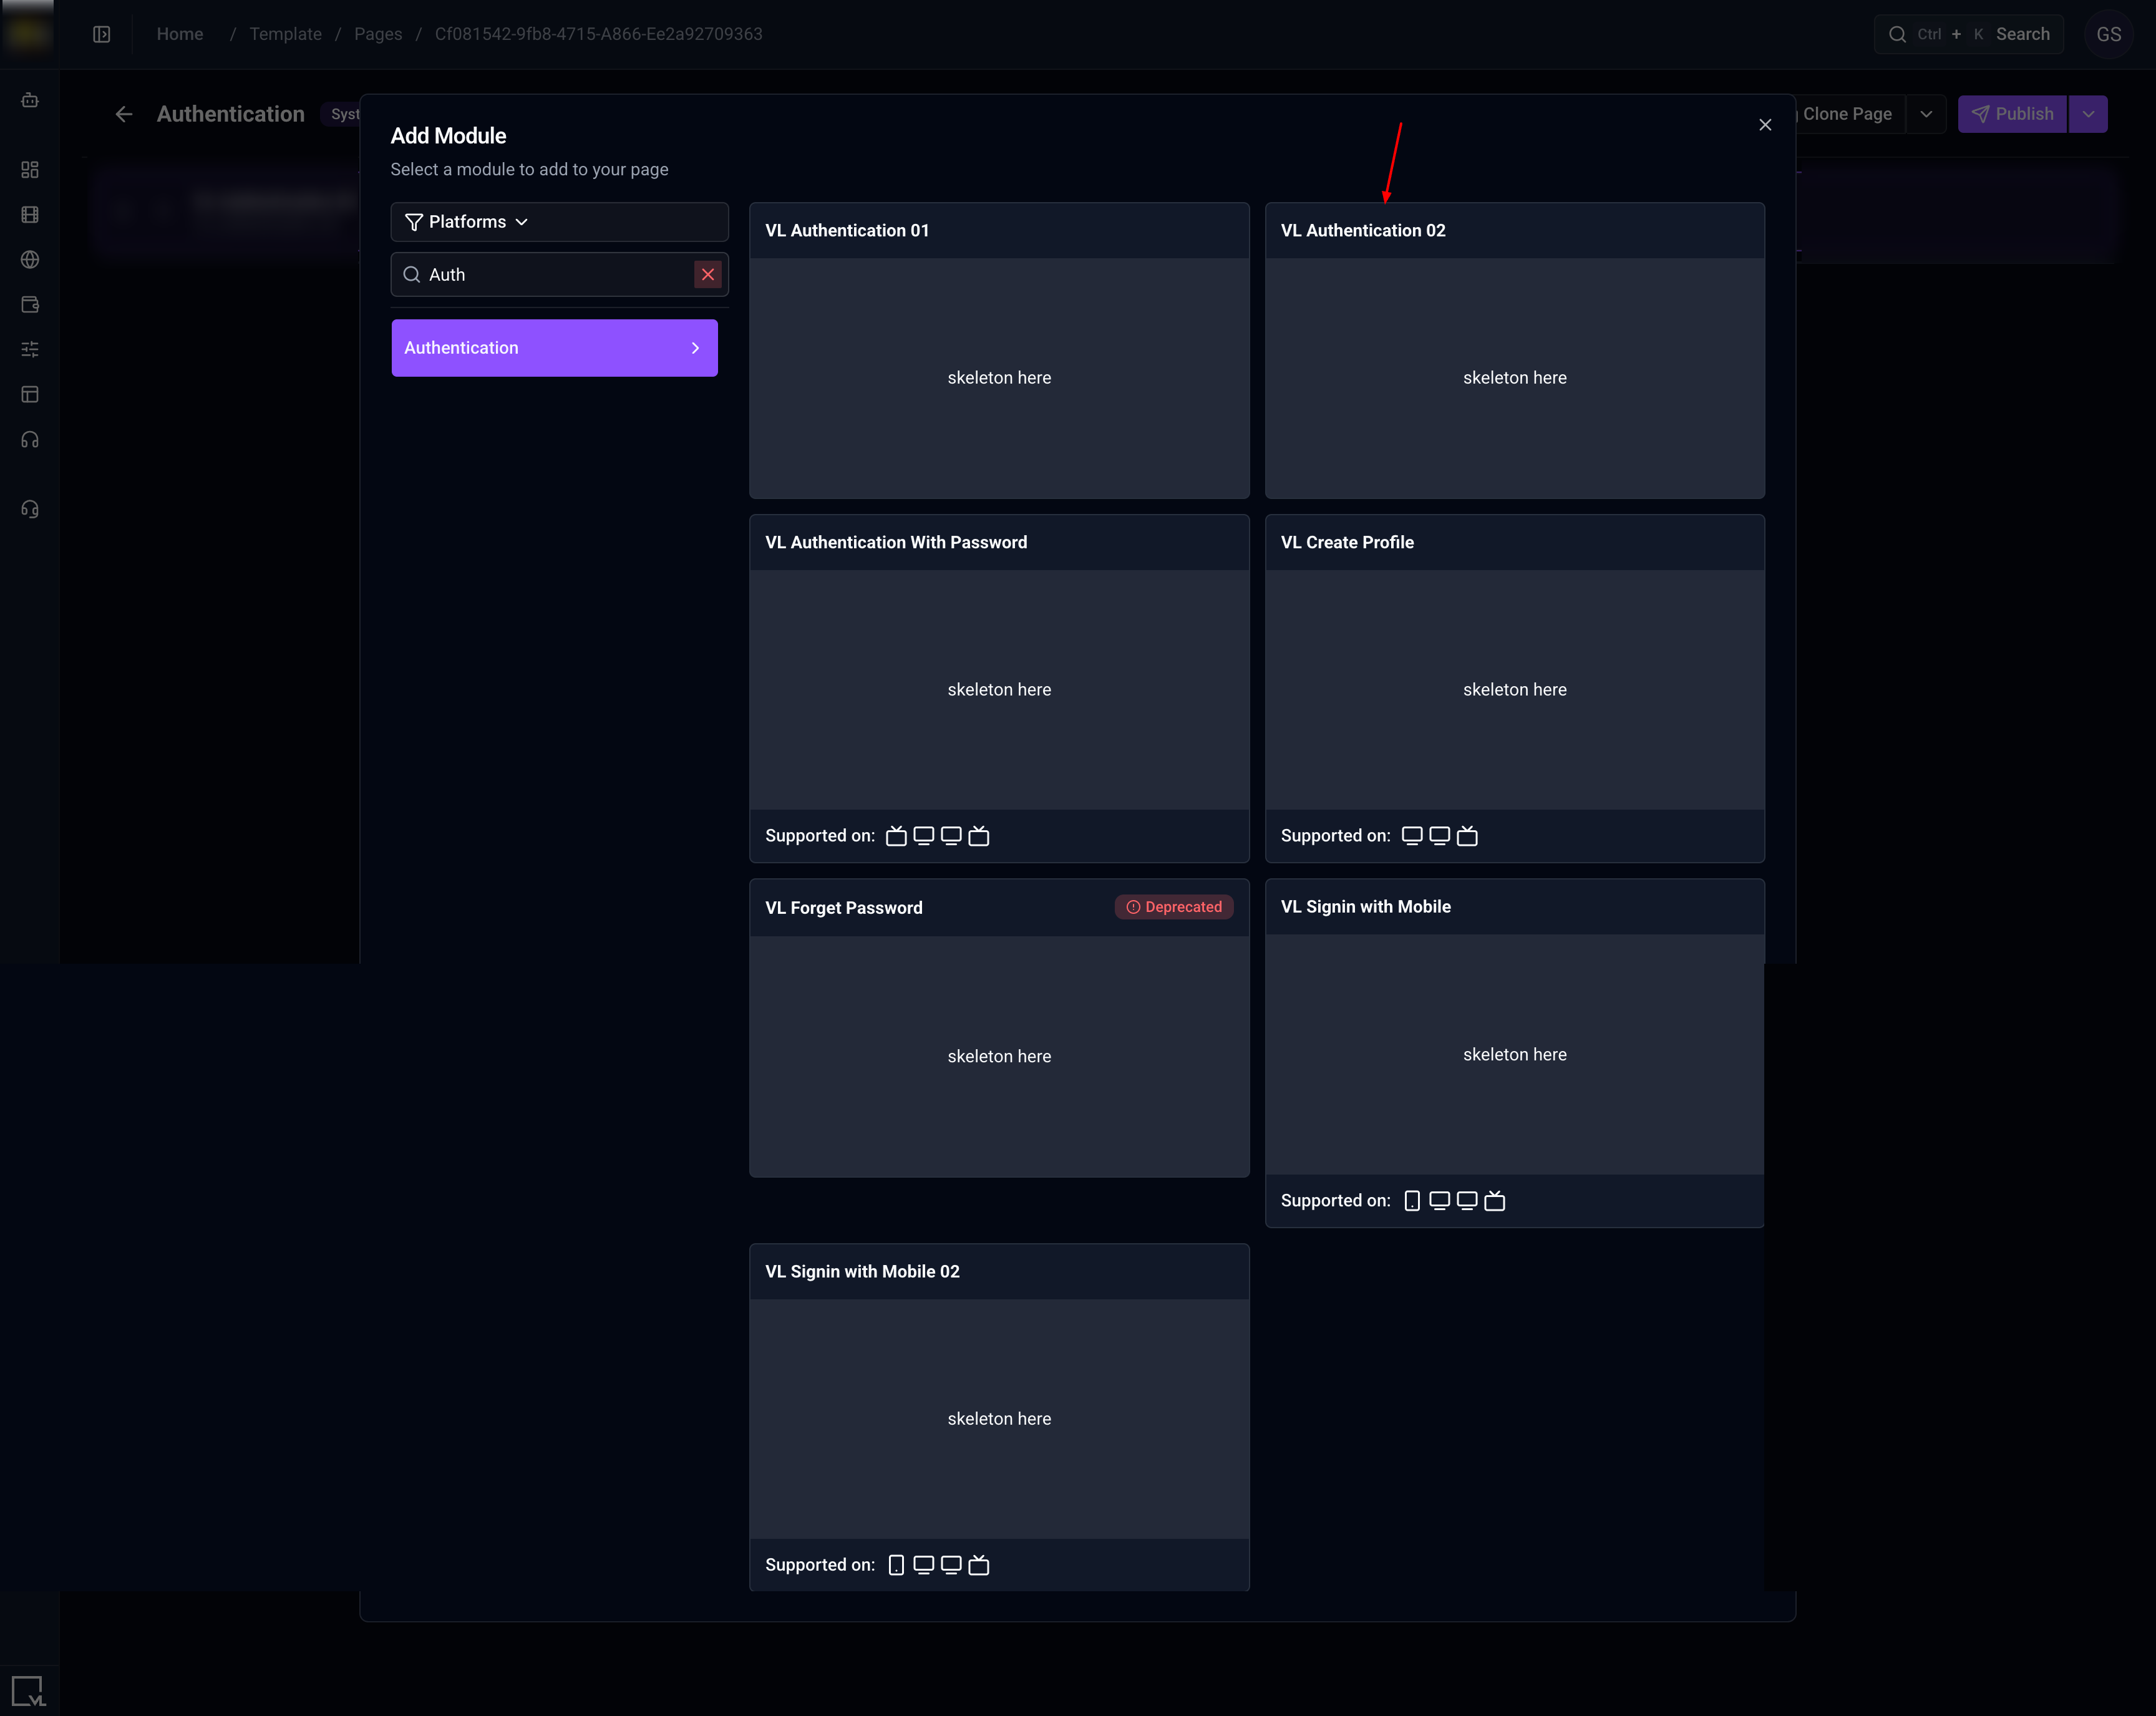
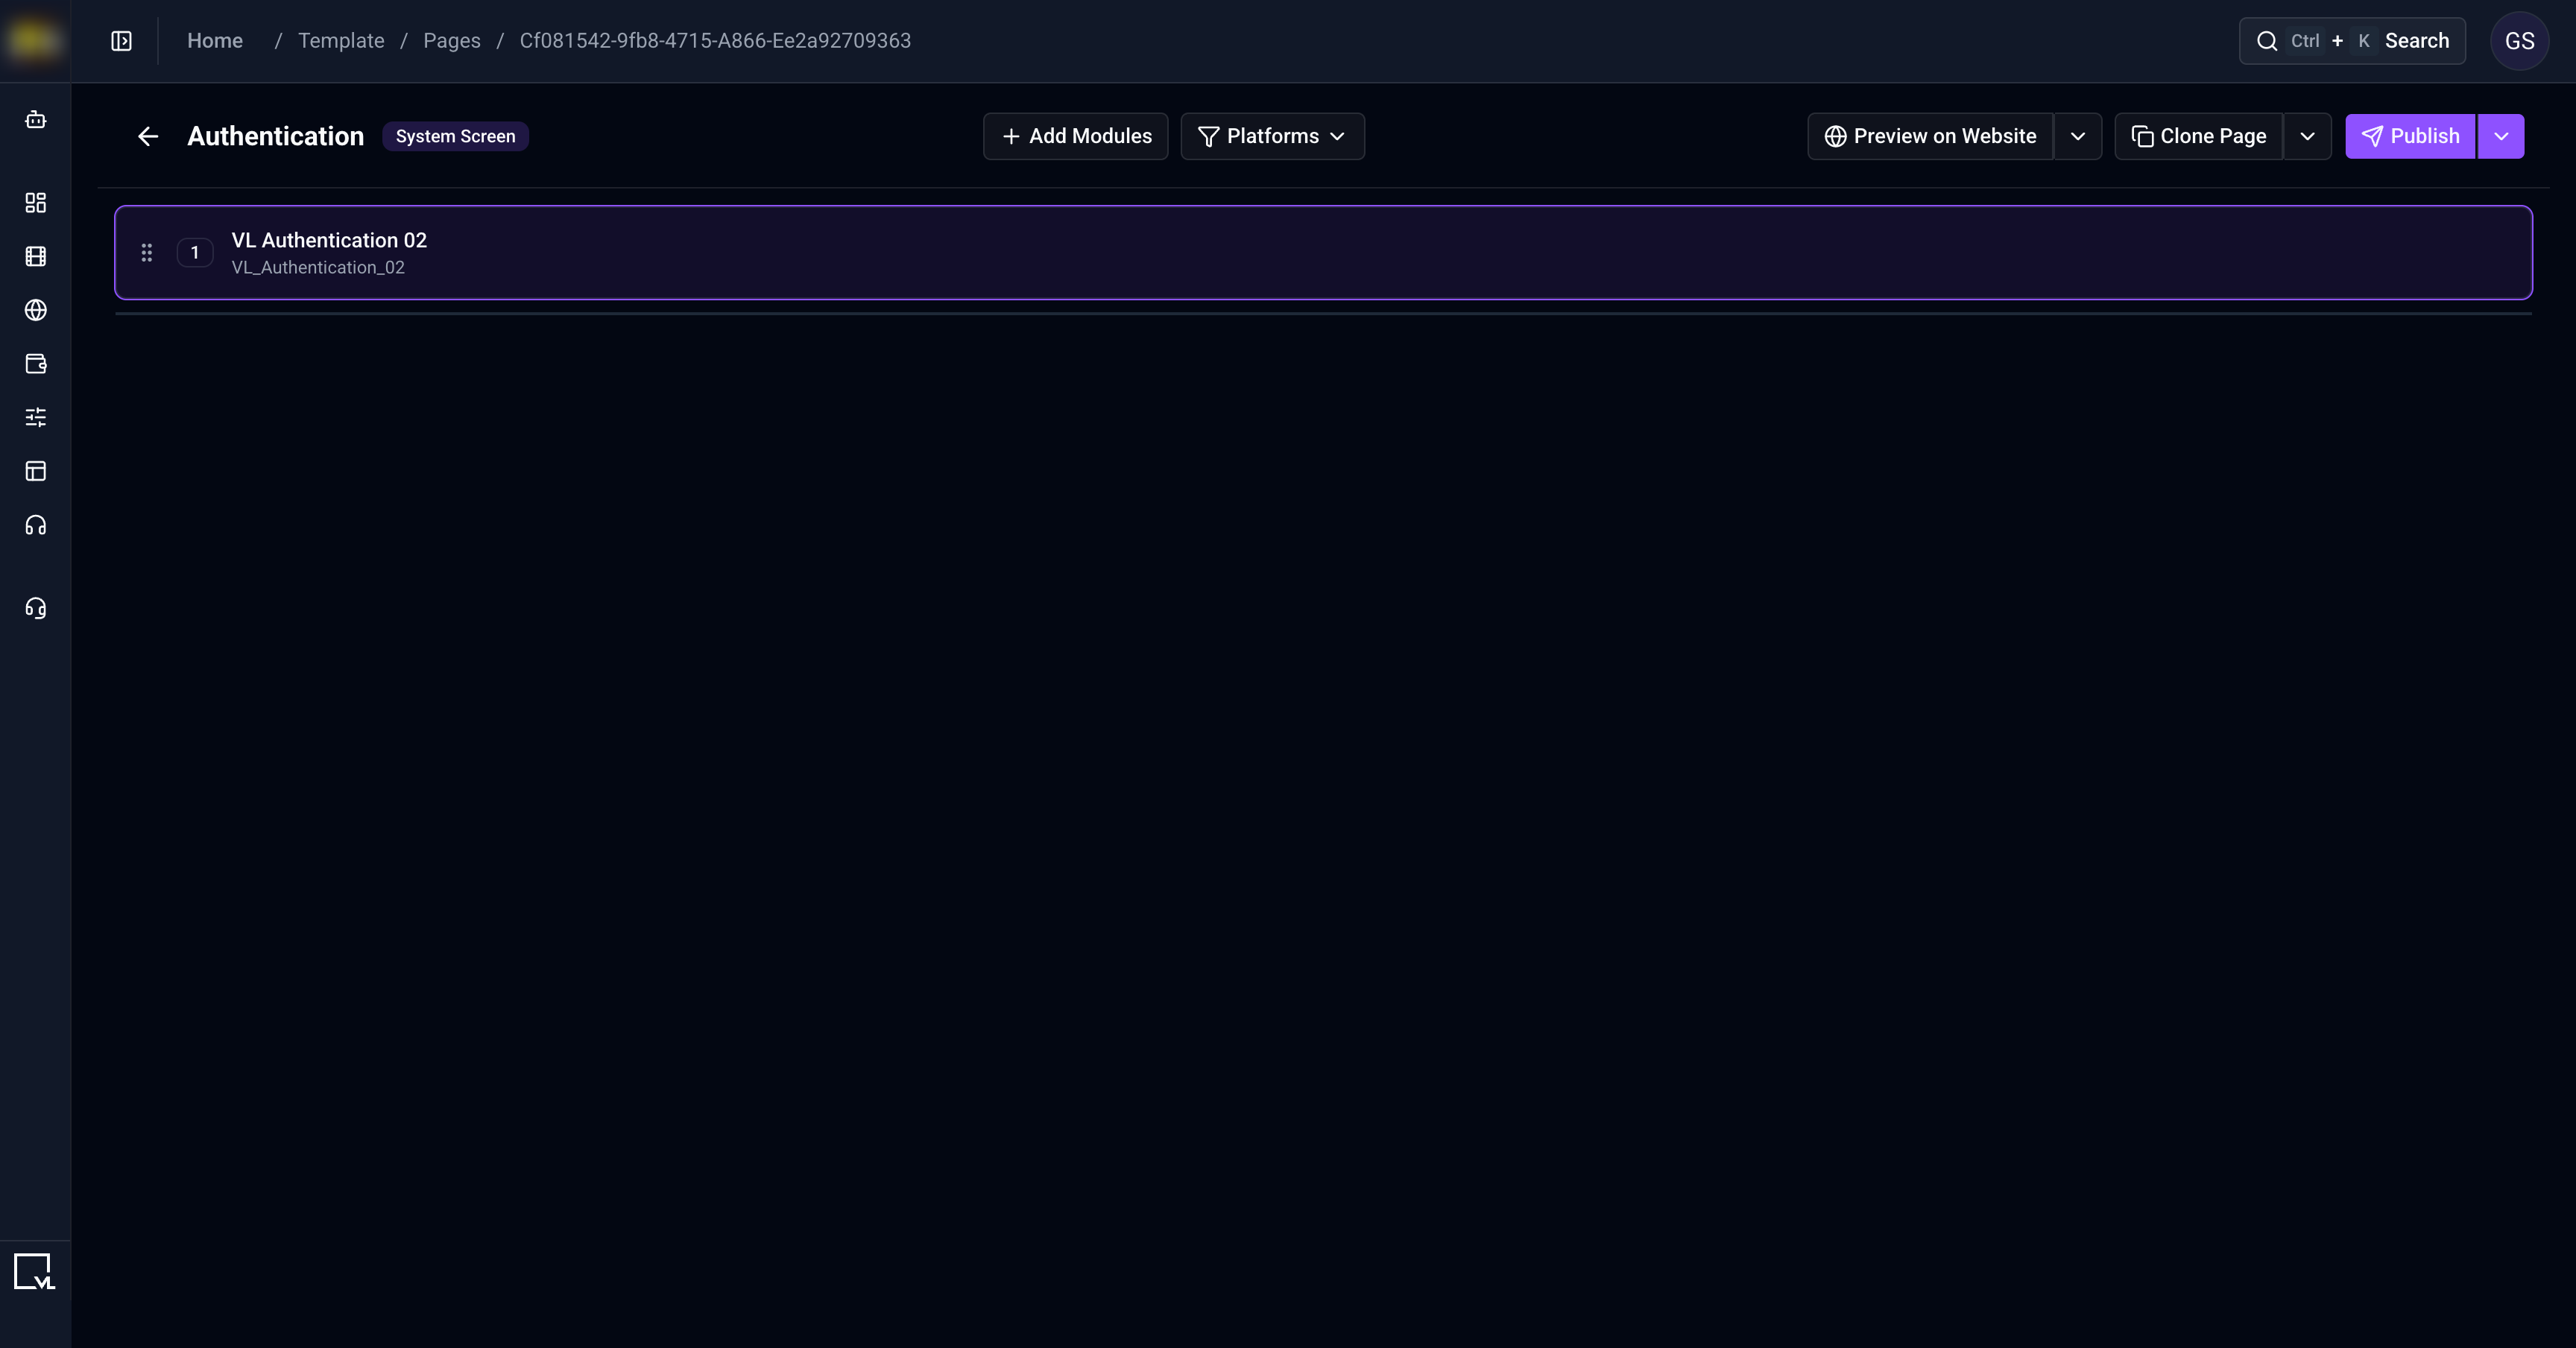
Add Modules → Authentication. Search for and insert VL Authentication 02.
Step 3: Configure Layout
Open Layout and configure:
| Setting | Description | Default |
|---|---|---|
| Background | Background color of the authentication module. | #0D2148 |
| Active CTA | Background color of the primary button when it is available. | #D2393B |
| Input Background | Background color of the email / phone field on the standalone sign-in page. | #2B426E |
| Disabled CTA | Background color of the primary button when it is not available. | #FFFFFF |
| Text | Text color used on supported authentication controls. | #FFFFFF |
| Error | Color reserved for error styling. | #FF0000 |
| Override Input Background | Alternate input background used in some contexts, such as checkout. | #FFFFFF |
| Override Text | Alternate input text color used in some contexts, such as checkout. | #000000 |
| Hide Mobile Number | When on, the website does not show the phone country picker when the customer enters a phone number. | Off |
| Hide Email | Hides email entry on supported experiences. | Off |
| Hide TOS Text | Hides Terms of Service text on supported experiences. | Off |
| Hide Terms On Web | Hides Terms of Service text on the website where this setting is applied. | Off |
| Password Min Length | Minimum password length used when password sign-in validates length. | 8 |
| Password Max Length | Maximum password length stored with the module. | 50 |
| Caliente MX SSO Container Background | Container color used when Caliente MX SSO is part of your site. Leave the default if that method is not used. | #212121 |
| Caliente MX SSO Button Background | Button background used when Caliente MX SSO is part of your site. | #029B00 |
| Caliente MX SSO Button Text | Button text color used when Caliente MX SSO is part of your site. | #FFFFFF |
Confirm Hide TOS Text and Hide Terms On Web on your live page. The standalone website sign-in page can still show a Terms of Service line depending on how the published page is set up.

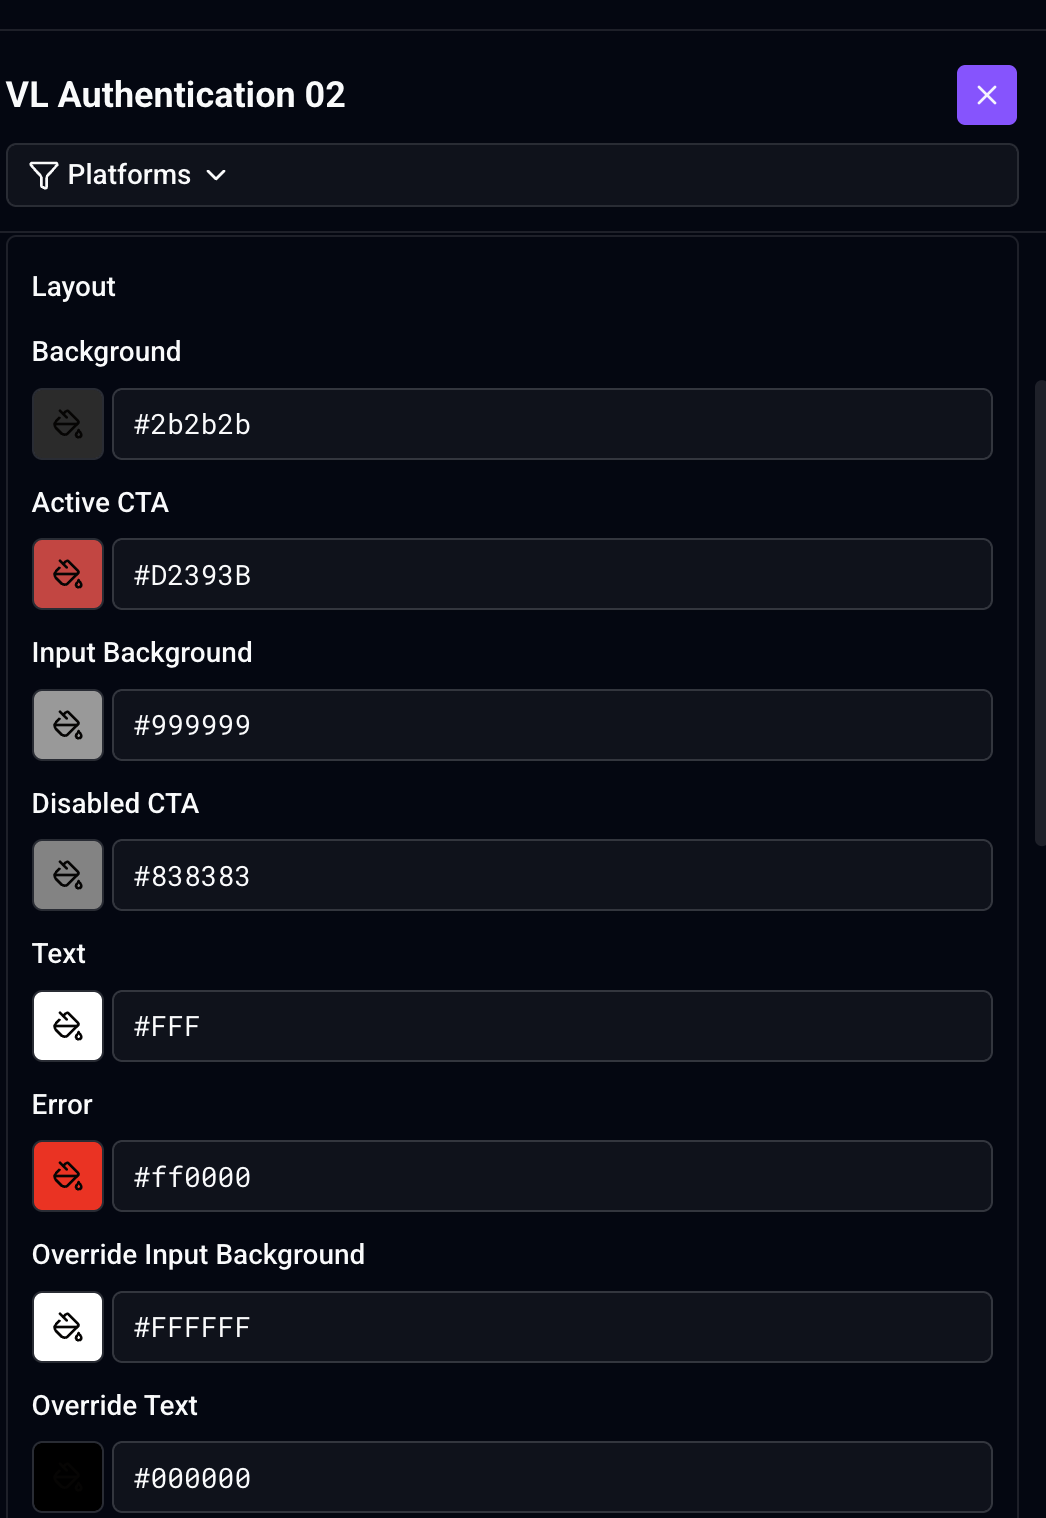
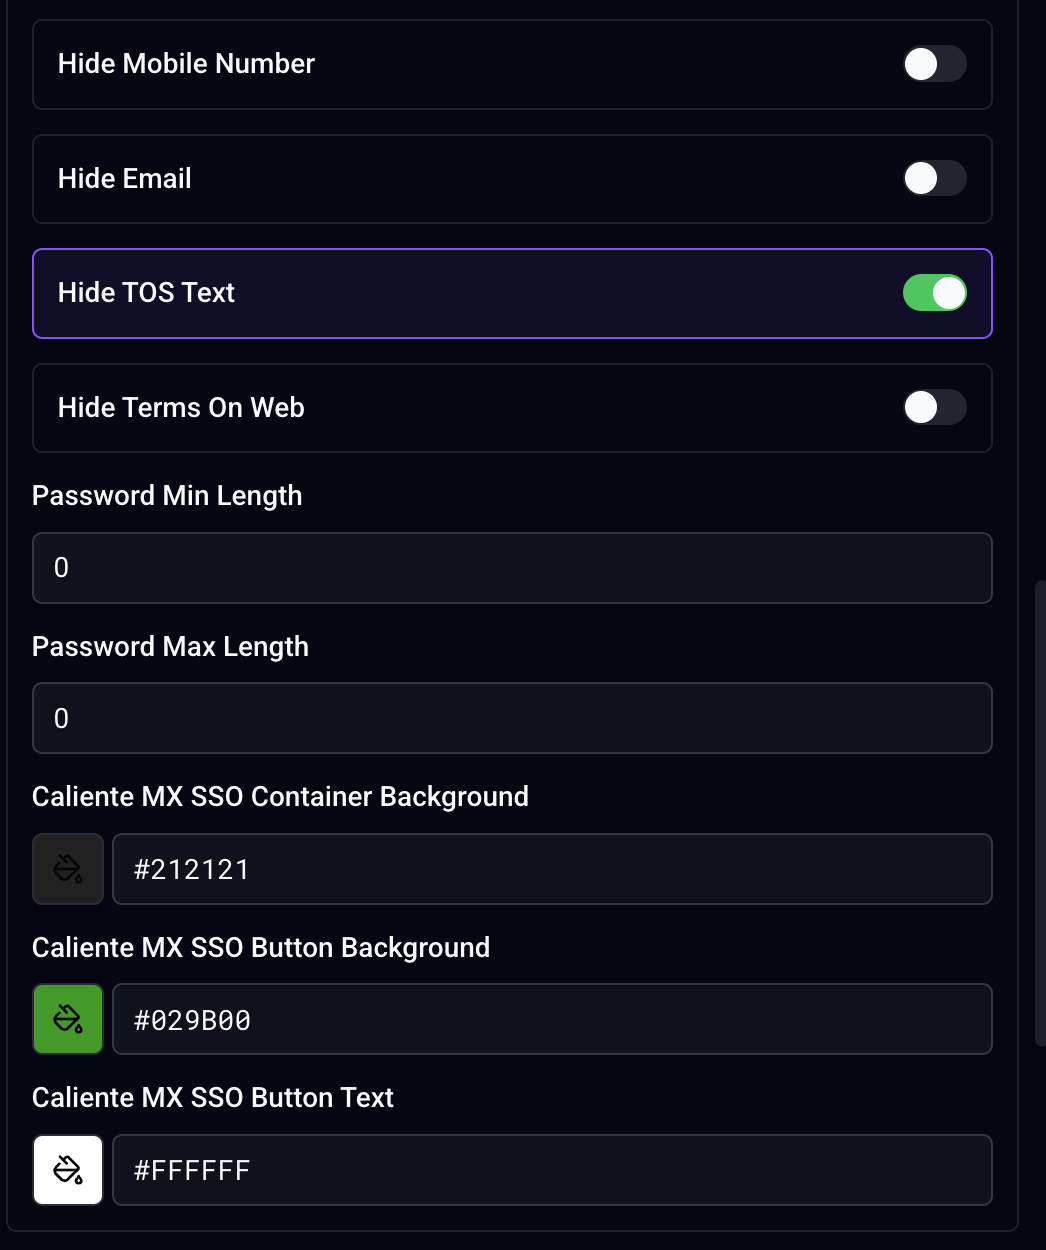
VL Authentication 02 → Layout. Set colors, hide options, and password length.
Step 4: Configure Content labels
Open Content and review these localizable labels:
| Setting | Description | Default |
|---|---|---|
| Title | Sign-in title stored with the module. Default is Log In. |
Log In |
| Subtitle | Instructions stored with the module. | Enter your phone number or email address to receive a single-use, secure verification code. |
| Get Code CTA | Label on the primary button before the code is sent. | Get Verification Code |
| Skip CTA | Skip label stored with the module. Whether customers see Skip depends on the sign-in flow for your site. | SKIP |
On the standalone website page, the visible heading often comes from published login-button copy (or a LogIn fallback), not only from Title. After you change Title, verify the live heading.
If your site supports multiple languages, review these values in every published language.
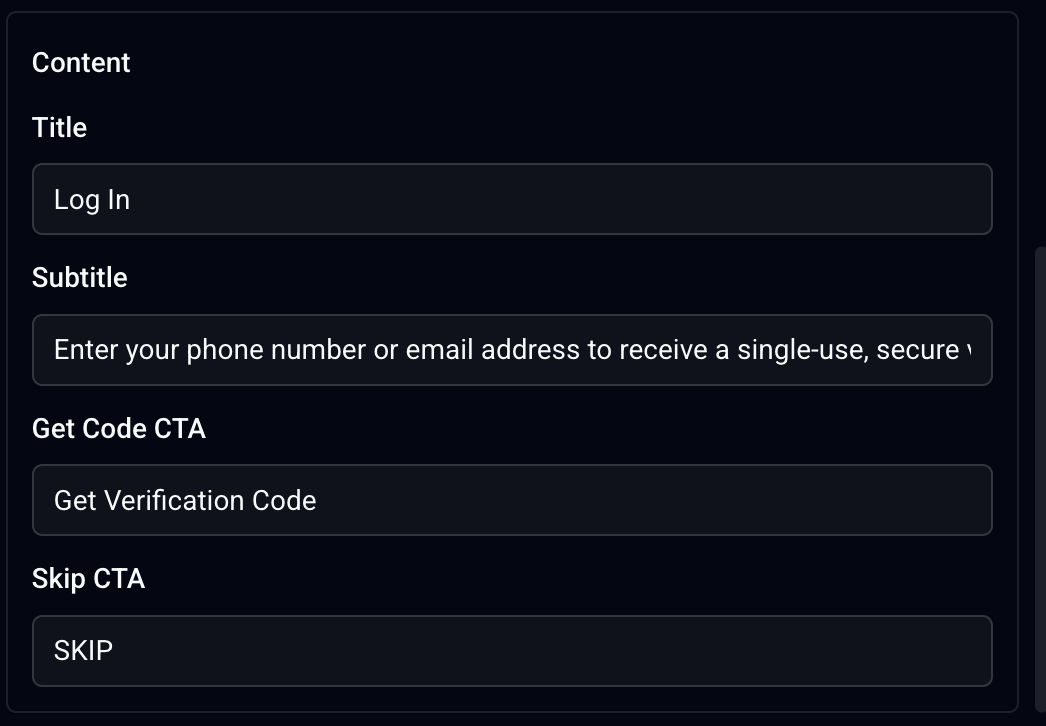
VL Authentication 02 → Content. Edit Title, Subtitle, Get Code CTA, and Skip CTA.
Step 5: Publish the page
- Review the page layout and module settings.
- Select Publish in the page toolbar.
- In the confirmation dialog, select Publish Page.
- Wait for the publish action to complete.
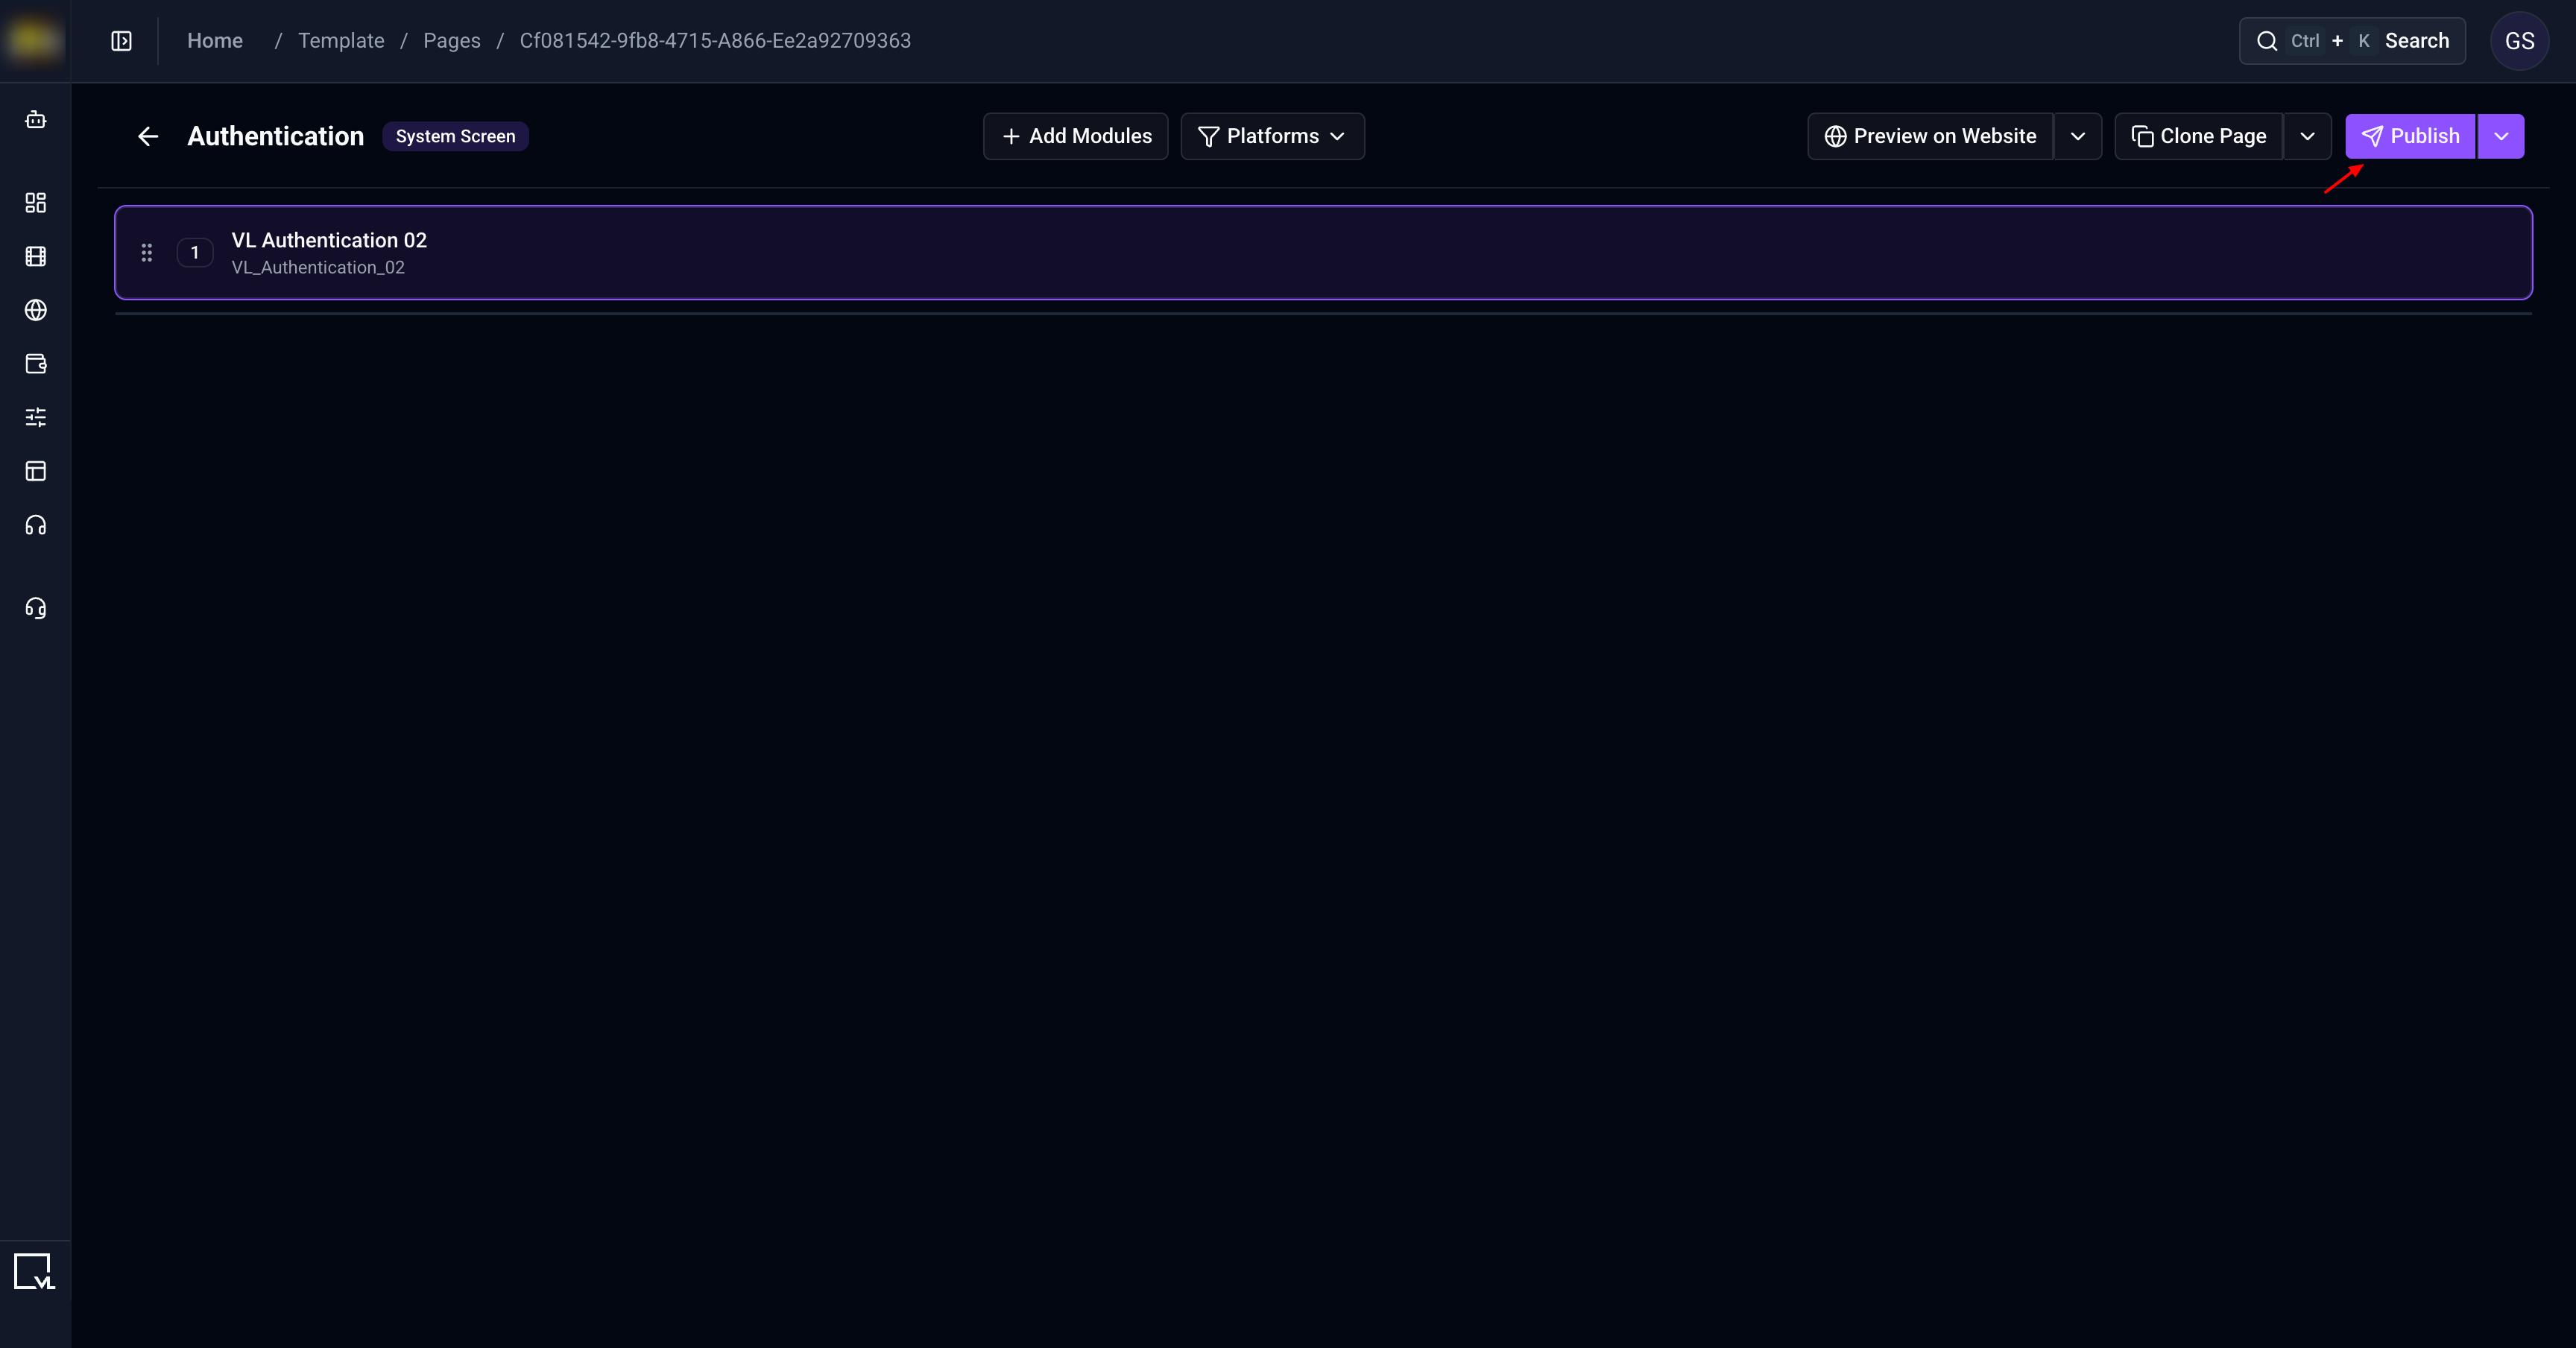
Until the page is published, the website and apps will not show your latest Authentication configuration.
Step 6: How it looks on the website
After publish, open your site’s Authentication URL, for example:
https://www.example.com/authentication
Typical website layout
On the website, customers usually see:
- Heading — often Log In (or published login-button copy)
- Email or phone input — placeholder
Enter your email or phone number - Primary CTA — from Get Code CTA
- Password field and Forgot Password — only when password sign-in is enabled for your site
- Divider “or” — when Google and/or Apple are enabled
- Google / Apple buttons — when those providers are enabled
- Terms of Service line — with a link to your Terms page when a Terms path is published with the module
- Don’t have an account? Sign Up — opens
/checkout - reCAPTCHA legal text — on the standalone sign-in page
The standalone form uses Background, Input Background, Active CTA, and Disabled CTA. Override Input Background and Override Text are used for inputs in some contexts, such as checkout.
When this module is used during checkout, additional profile fields or a Continue to TV Providers option can appear, depending on your checkout setup. Those extra fields are not configured in this module’s current form.
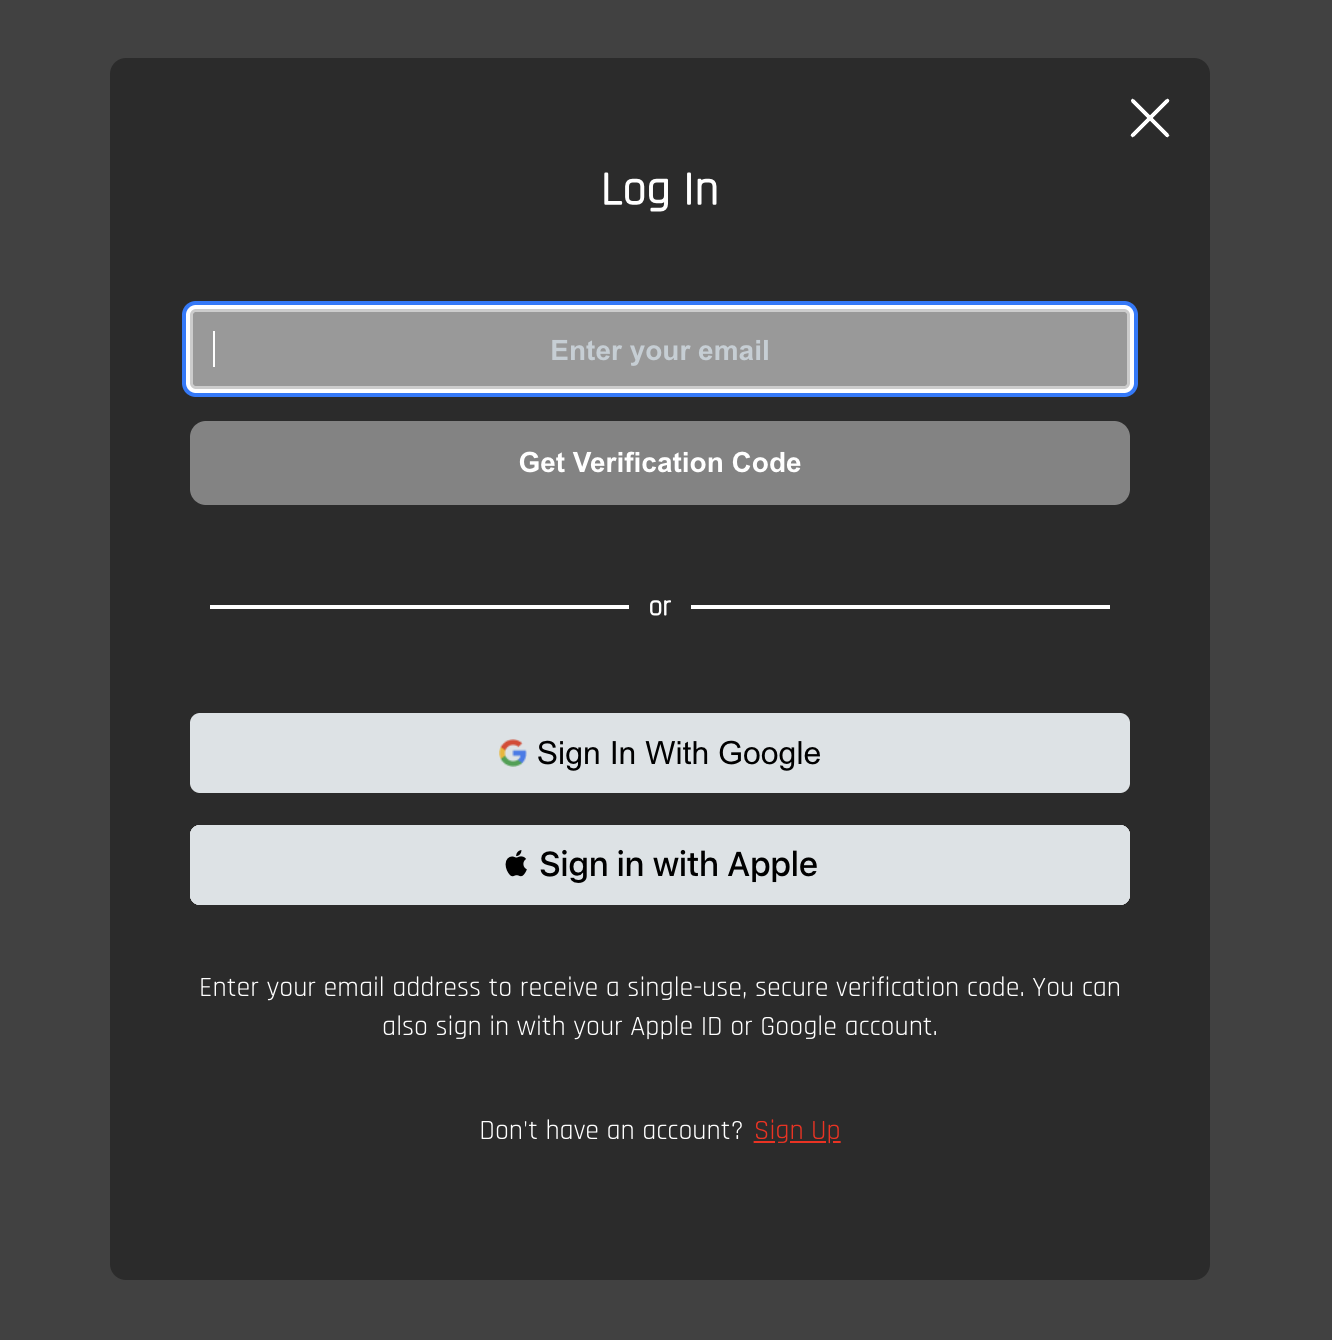
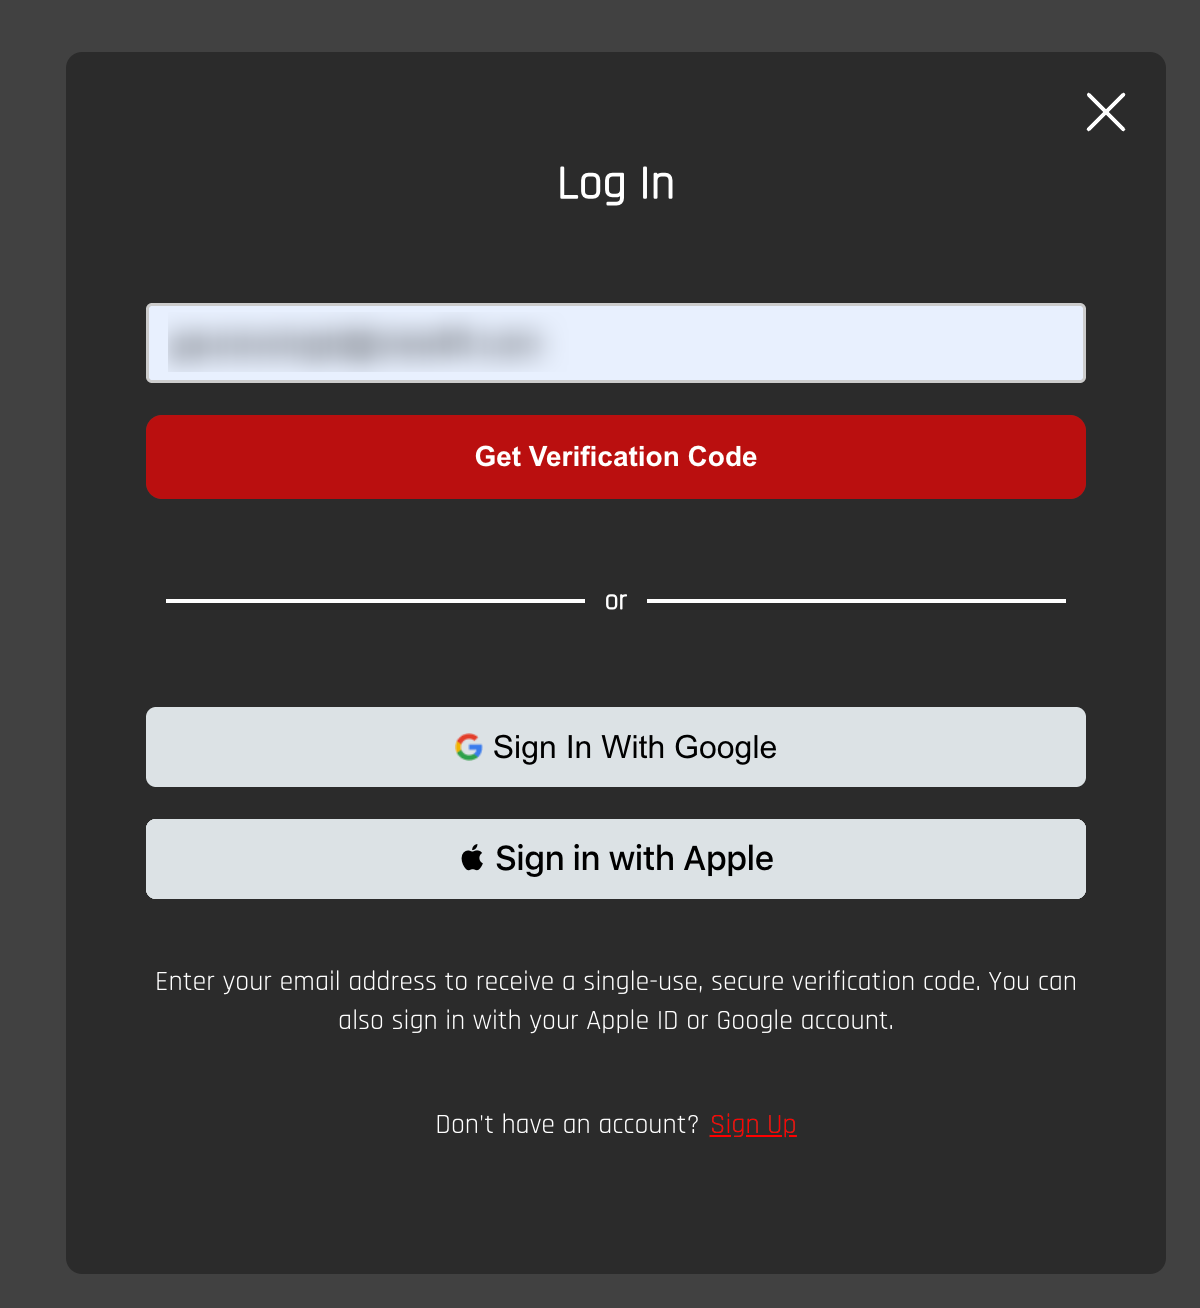
Website Authentication page (/authentication). Heading, email/phone field, primary CTA, and enabled social options.
One-time code on the website
After the customer submits an email or phone number:
- The page switches to the verification screen.
- The customer enters the 6-digit code and submits it.
- They can send a new code or return to use a different email or phone.
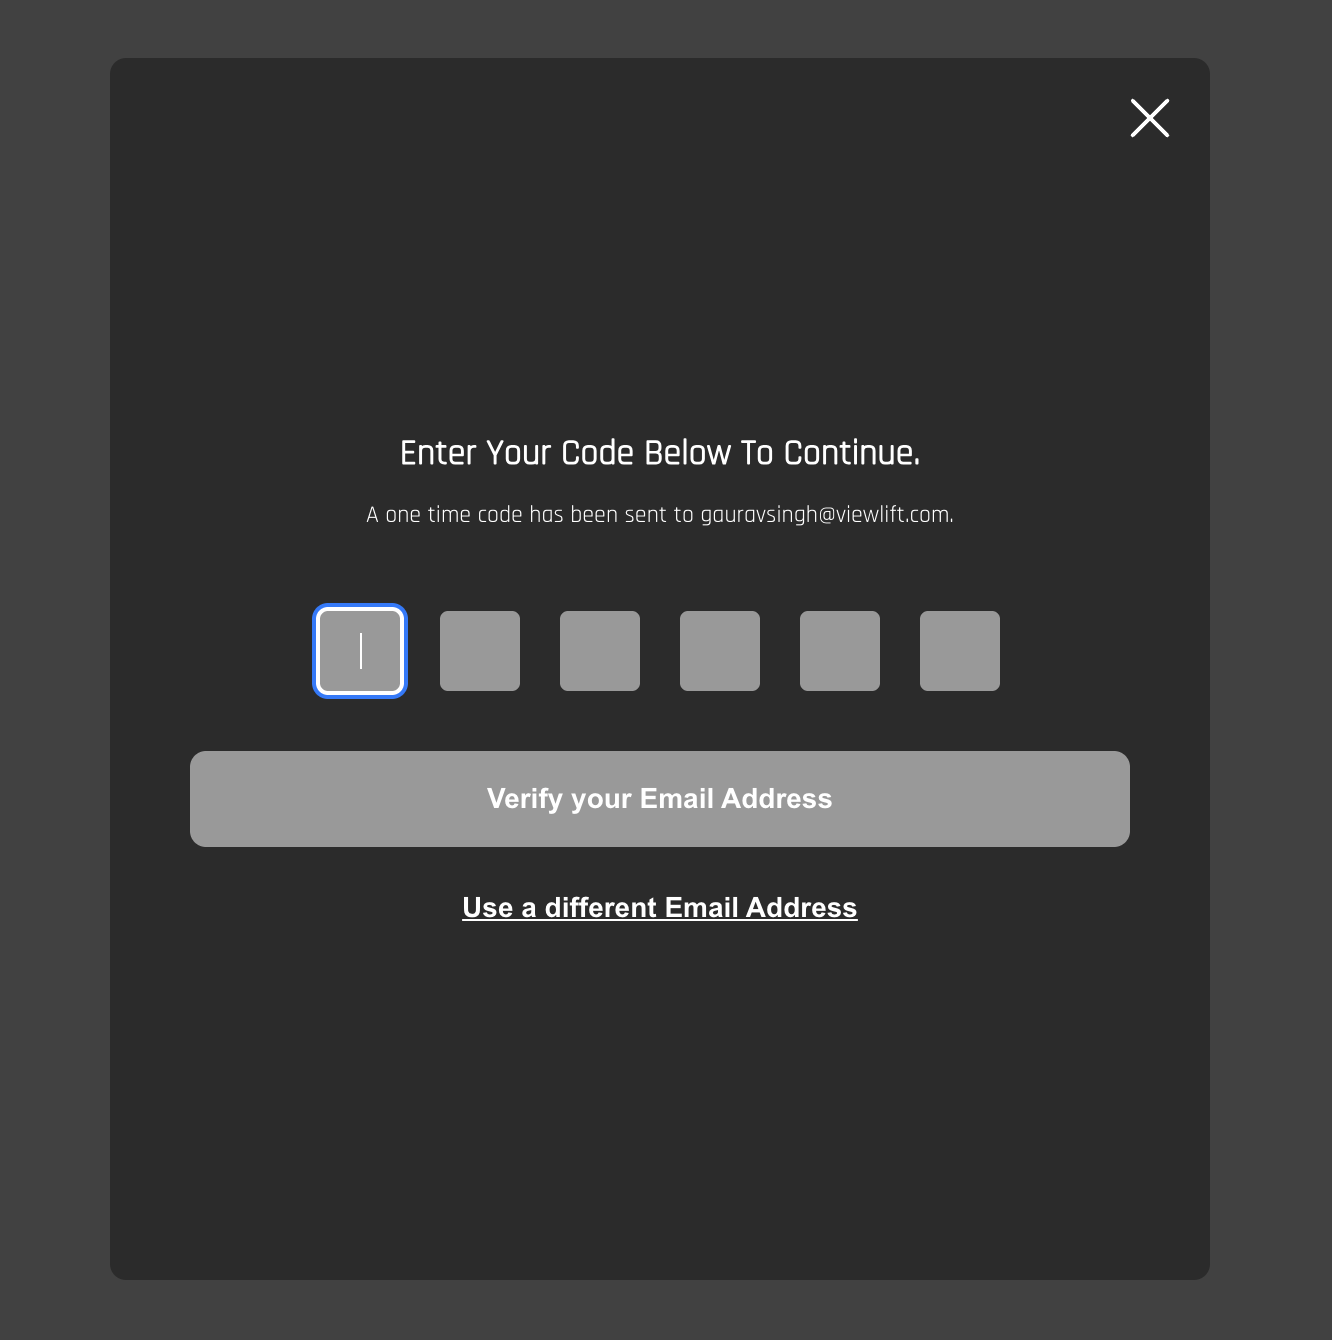
Website verification. Enter the one-time code, submit, or switch to a different email or phone.
After successful sign-in
Depending on your site setup, the customer may be sent to:
| Situation | Where the customer goes |
|---|---|
| Device activation in progress | Device activation page (/activate) |
| Gift card redeem in progress | Redeem page (/redeem) |
| Roku activation in progress (Roku box sign-in) | Roku activation page (/rokuactivate) |
| Customer is not subscribed and was on the sign-in page | Previous page they came from, or homepage (/) |
| Password sign-in succeeded | Previous page they came from, or homepage (/) |
| Already signed in when opening the sign-in page | Previous page they came from, or homepage (/) |
| Customer was in checkout | Checkout flow continues (the page may refresh) |
Link Sign In from the site
After you publish the Authentication page, customers need a way to reach it.
- Confirm the published page path (for example
/authentication). - From Template Builder, open Global Settings and update Header Navigation (or Other Navigation if Sign In lives in a secondary menu).
- Set the Sign In item’s destination to that same path only. Do not add language codes or extra parameters unless your site requires them.
- If the header is built with VL Masthead or another header module, point those Sign In / Account links to the same path.
- Open the website in a private window and select Sign In. Confirm you land on the Authentication page.
Use one Authentication path across the site so header links and login prompts open the same experience.
Verification checklist
- The page type is Authentication Screen or System Screen
- Page path is
/authentication(or the path your apps expect) - VL Authentication 02 is on the page
- Layout colors, hide options, and password length are reviewed
- Title, Subtitle, and Get Code CTA are reviewed for launch language(s)
- The page is published
- Website
/authenticationshows the expected heading, field, and button - A one-time code completes sign-in
- Google and Apple complete sign-in when those providers are enabled
- Password sign-in works only if it is enabled for the site
- Sign Up opens
/checkout - After sign-in, the customer lands on the expected next page
- Header Sign In opens the same Authentication path
Troubleshooting
| Problem | What to check |
|---|---|
| VL Authentication 02 is not in the module list | Confirm the page type is Authentication Screen, System Screen, Modular Page, or Marketing Page. |
| Google or Apple button is missing | Confirm Google or Apple is configured for the site and enabled for the published authentication module. The current form does not list social providers. |
| Social button does nothing | Complete site-level Google or Apple setup, then publish the page again. |
| Password field is not shown on the website | Password sign-in must be enabled for your site at the service level. Password Min Length and Password Max Length do not turn it on. |
| Phone country picker is missing | Turn Hide Mobile Number off and publish. |
| Title change does not update the website heading | The standalone heading may use published login-button copy. Verify the live page after publish. |
| Terms line still appears after Hide TOS / Hide Terms On Web | Confirm the page is published, then check the live /authentication page. |
| Facebook, Amazon, or TVE is not on the standalone login form | Expected. The website form shows Google and Apple when enabled. TV provider options can appear during checkout. |
| Labels do not change on the site | Save Title, Subtitle, or Get Code CTA, publish the page, and retry in a private window. |
| Customer goes to activate or redeem unexpectedly | They may have started from a device activation or gift-card flow before signing in. |
| One-time code never arrives | Confirm email or SMS delivery is configured; confirm the customer entered a valid address or number. |
| Changes do not appear immediately | Confirm the page is published, then retry in a private window after allowing time for cache updates. |
Best Practices
- Use one Authentication page at a stable path (
/authentication). - Match Background, Active CTA, and Input Background to the rest of the site.
- Use Override colors when checkout inputs should look different from the standalone sign-in page.
- Enable only the sign-in methods your site supports end-to-end.
- Align Password Min Length with your site’s password policy if password sign-in is on.
- Point every Sign In link to the same published path.
- Localize Title, Subtitle, and Get Code CTA when the site has more than one live language.
- Publish after every meaningful change. Draft system screens do not update the live site.
FAQs
Q. What page type should I use for VL Authentication 02?
Use an Authentication Screen or System Screen.
Q. How do I create the page?
Select + New Page on the Template Builder home screen, or open View All Pages and select New Page. Then choose the page type, enter the name and path, and select Create Page.
Q. What is the recommended page path?
/authentication.
Q. How do customers sign in on the website?
With email or phone using a one-time verification code. Google and Apple are also available when those providers are enabled. Password sign-in appears only when it is enabled for your site.
Q. Can I turn Google or Apple on in this module’s form?
The current form does not include a social-provider list. Google and Apple still appear on the website when they are enabled for the published authentication module and configured for the site.
Q. When does password login appear on the website?
Only when password sign-in is enabled for your site at the service level. Use Password Min Length and Password Max Length to store the length policy; they do not enable the field.
Q. Where does “Don’t have an account? Sign Up” go?
It navigates to your checkout page (/checkout).
Q. How is this different from VL Authentication 01?
Authentication 02 uses a different website layout, override colors, password-length fields, and a different post-sign-in redirect (no VPPA consent step in the standard website flow). This article covers VL Authentication 02 only.
Important Information
- VL Authentication 02 belongs on an Authentication Screen or System Screen.
- The website sign-in form uses email or phone plus a one-time code, with Google and Apple when enabled.
- Password sign-in is controlled at the service level, not by a toggle in this form.
- Title, Subtitle, Get Code CTA, and Skip CTA are the customer-facing strings you can edit in this module.
- Google and Apple buttons depend on site-level provider setup and the published module, not on a provider list in the current form.
- Post-sign-in routing depends on whether the customer was activating a device, redeeming a gift card, or continuing checkout — not a single path for every site.
Glossary
| Term | Definition |
|---|---|
| Authentication Screen | Template Builder page type used for the sign-in experience. |
| System Screen | Template Builder page type used for sign-in, checkout, search, and other system flows. |
| VL Authentication 02 | The module that displays the sign-in experience documented in this article. |
| One-time code | Verification code sent to email or phone. |
| Social sign-in | Sign-in via Google or Apple on the website when those providers are enabled. |
| Override colors | Alternate input colors used in some contexts, such as checkout. |
Contact Support
If you need help beyond this article, contact the ViewLift support team.
- Email: techsupport@viewlift.com
- Phone (US): +1-800-859-0420
- Phone (UK): +44-203-014-8921
Support hours: B2C requests are handled Monday to Friday. B2B support is available 24/7.