Overview
Push notifications are a powerful communication tool that allows you to reach your users directly, providing them with timely updates, reminders, and personalized messages about your app. This guide will walk you through the entire process of creating and managing push notifications using Firebase.
Introduction
Firebase Cloud Messaging (FCM) helps you send notifications to your users in real time. Whether you aim to inform users of new features, promotions, or important updates, FCM enables you to deliver these messages efficiently and effectively.
Prerequisites
Before you begin, make sure you have the following:
A Firebase account: If you don’t have one, create it at Firebase.
An app integrated with Firebase Cloud Messaging: Refer to the Firebase documentation for integration steps
Benefits of Push Notifications
Using Firebase Cloud Messaging for push notifications offers several advantages:
Enhanced Engagement: Keep users informed and engaged with real-time updates.
Targeted Messaging: Send personalized messages to specific user segments.
Real-Time Communication: Instantly notify users about important events or promotions.
Increased Retention: Regular notifications can help improve user retention rates.
Cost-Effective: Compared to other marketing channels, push notifications are generally more economical.
Customizable Content: Personalize notifications with user-specific content and visuals.
Improved Conversion Rates: Drive higher conversions with targeted promotions and reminders.
Step-by-Step Instructions
Step 1: Log in to Firebase
Visit the Firebase Console.
Enter your Google account credentials and click Sign In.
Step 2: Access Your Firebase Project
Select Your Project: Navigate to your Firebase console and select your project.
Click on Run: On the left-hand side, click on Run.
Expand the Menu: Expand the menu to see the Messaging option.

Step 3: Access Messaging
Locate the Messaging Option: Once logged in, look for the Messaging option in the left sidebar.
Open Messaging Dashboard: Click on Messaging to access the dashboard.
Step 4: Create a New Campaign
Create Campaign: Click on Create a Campaign.

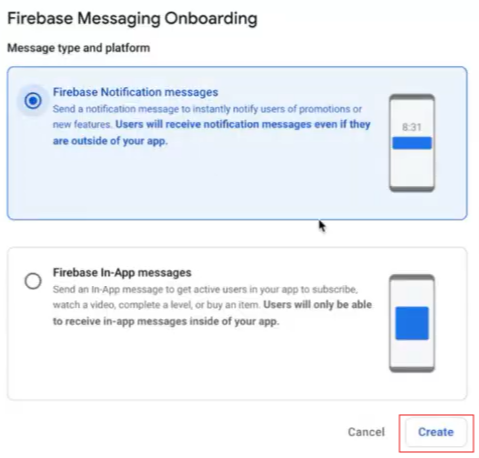
Select Notification Type: You will see two options:
Firebase Notification messages
Firebase In-App messages
Choose Firebase Notification Messages: Click Create after selecting Firebase Notification Messages.
Step 5: Configure Your Notification
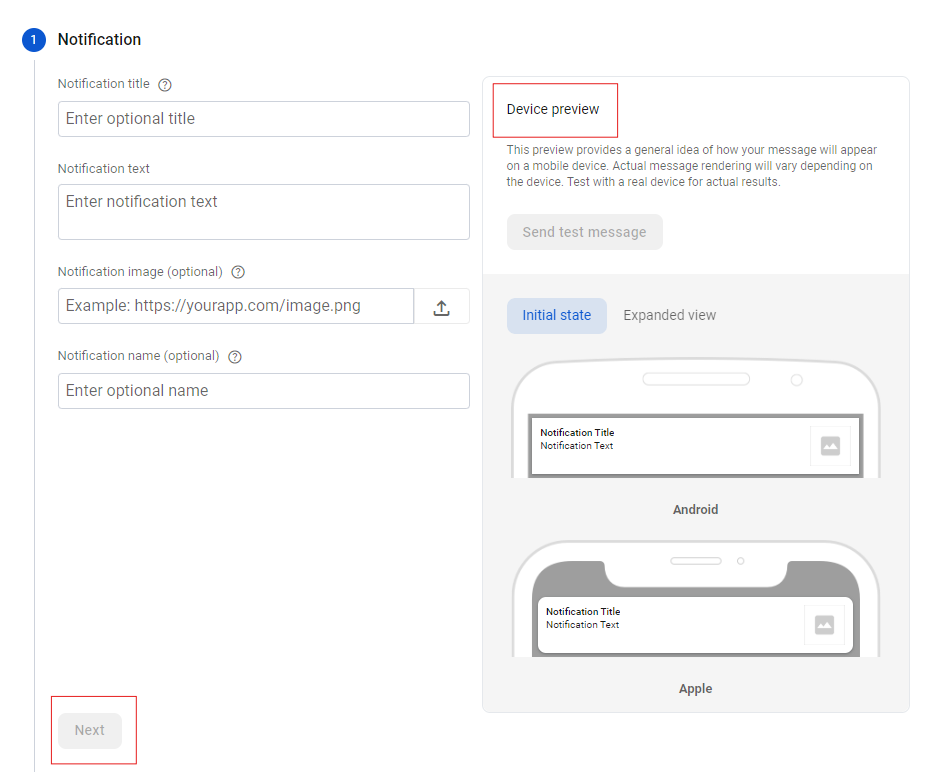
Notification Title
Description: Enter a catchy title (e.g., "Don't Miss Out!").
Tip: Keep it concise to capture attention quickly.
Notification Text
Description: Write a brief message (e.g., "Check out our latest features!").
Tip: Use direct language to encourage action.
Notification Image (Optional)
Description: Add an image in the tools under the content section.
Steps to Add Image:
Click on Content, then Add Image.
Select an image from your system or drag it into the upload area.
Tip: Once published, copy the URL by clicking on Copy URL.
Notification Name (Optional)
Description: Provide an internal name for reference (e.g., "Spring Promotion 2024").
Device Preview
Description: View how your notification will appear on a mobile device.
Options for Preview:
Initial State
Expanded State
Tip: Test on a real device for best accuracy.
Step 6: Set Targeting Options
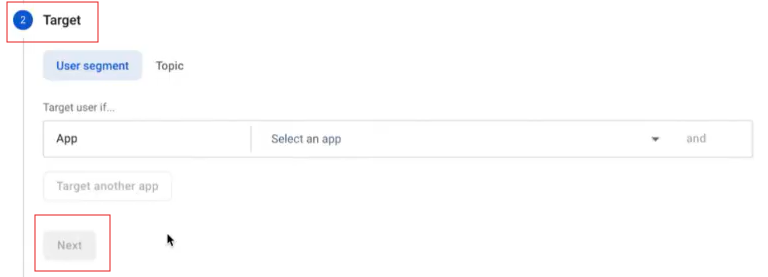
Targeting Options: Choose your audience:
User Segment: Target users based on behavior or demographics.
Topic: Send messages to users subscribed to specific topics.
User Segment Options: Under User Segment, select:
Target User If: Choose criteria based on user behavior.
Select App: Specify which app to target if managing multiple apps.
Step 7: Click "Next"
After setting your targeting options, click Next to proceed to the scheduling options.
Step 8: Set Scheduling Options
Send to Eligible Users: Choose between the following options:
One-Time Notification: Send immediately or schedule for a later date and time.
Recurring Notifications: Set up daily or custom recurring notifications.
Step 9: Click "Next"
After selecting your scheduling preferences, click Next to configure additional options.

Step 10: Additional Options
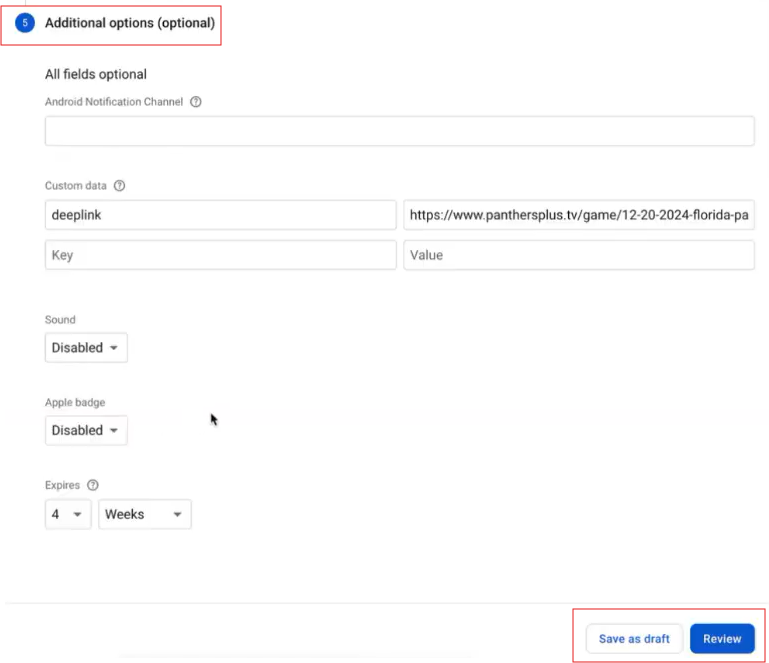
Optional Fields:
Android Notification Channel: Select or create a notification channel.
Custom Data (Deeplink): Include deep links for better navigation.
Sound: Choose whether to enable or disable notification sounds.
Apple Badge: Control Apple badge settings (Enabled/Disabled).
Badge Count: Specify the badge count for iOS notifications.
Expires: Set an expiration time for the notification.
Step 11: Save or Review
Save as Draft: If you want to save your progress, click Save Draft.
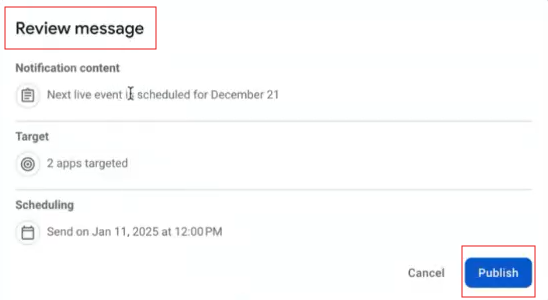
Review: Click Review to double-check all details.
Step 12: Publish Notification
Once you are satisfied with the review, click the Publish button to send your notification.
Step 13: Editing Existing Campaigns
To make changes to the same campaign, click Duplicate and modify the necessary details.

📄 Notes:
Ensure that your images are engaging and relevant to the message.
Test notifications on different devices to ensure they are displaying correctly.
Monitoring and Analyzing Notifications
After sending notifications, it’s crucial to monitor their performance:
Use the Analytics section in the Firebase Console to track delivery rates, open rates, and user engagement.
Analyze the data to refine your messaging strategy and improve future notifications.
Troubleshooting Tips
🔰 Not Receiving Notifications?
Check if the device is online and notifications are enabled.
🔰 Preview Doesn’t Match?
Double-check your content and test on different devices.
🔰 Scheduling Issues?
Ensure that the scheduled time is set correctly and is in the future.
FAQ
Q1: How can I track my notification performance?
A1: You can monitor metrics like delivery rates and engagement in the Firebase Console.
Q2: Can I target specific user groups?
A2: Yes, you can segment your audience based on user behavior and preferences.
Q3: Are there limits on sending notifications?
A3: While there are no strict limits, maintain best practices to avoid overwhelming users.
📖 Best Practices
Personalization: Tailor messages to individual user preferences for better engagement.
Optimal Timing: Send notifications when users are most likely to engage.
Frequency Control: Avoid sending too many notifications to prevent user fatigue.
Contact Support
If you need further assistance or have any questions, our support team is here to help:
Contact Information
Email: techsupport@viewlift.com
Phone:
US: +1-800-859-0420
UK: +44-203-014-8921
Support Hours
B2C (Business to Consumer): Monday to Friday
B2B (Business to Business): 24/7 support available