Overview
Personalization in your application allows users to receive tailored content based on their preferences. This guide provides detailed instructions on how to enable and configure personalization settings, including banners and homepage content.
Prerequisites
Access to Tools: Ensure you have the necessary access to the AppCMS tools.
Administrative Permissions: You may need administrative rights to make these changes.
Familiarity with AppCMS: Basic understanding of the AppCMS interface and navigation.
Teams Should Be Added: Ensure that teams are added under the content section so that personalization can be done based on it.
Step-by-Step Instructions
Login and Enable Personalization
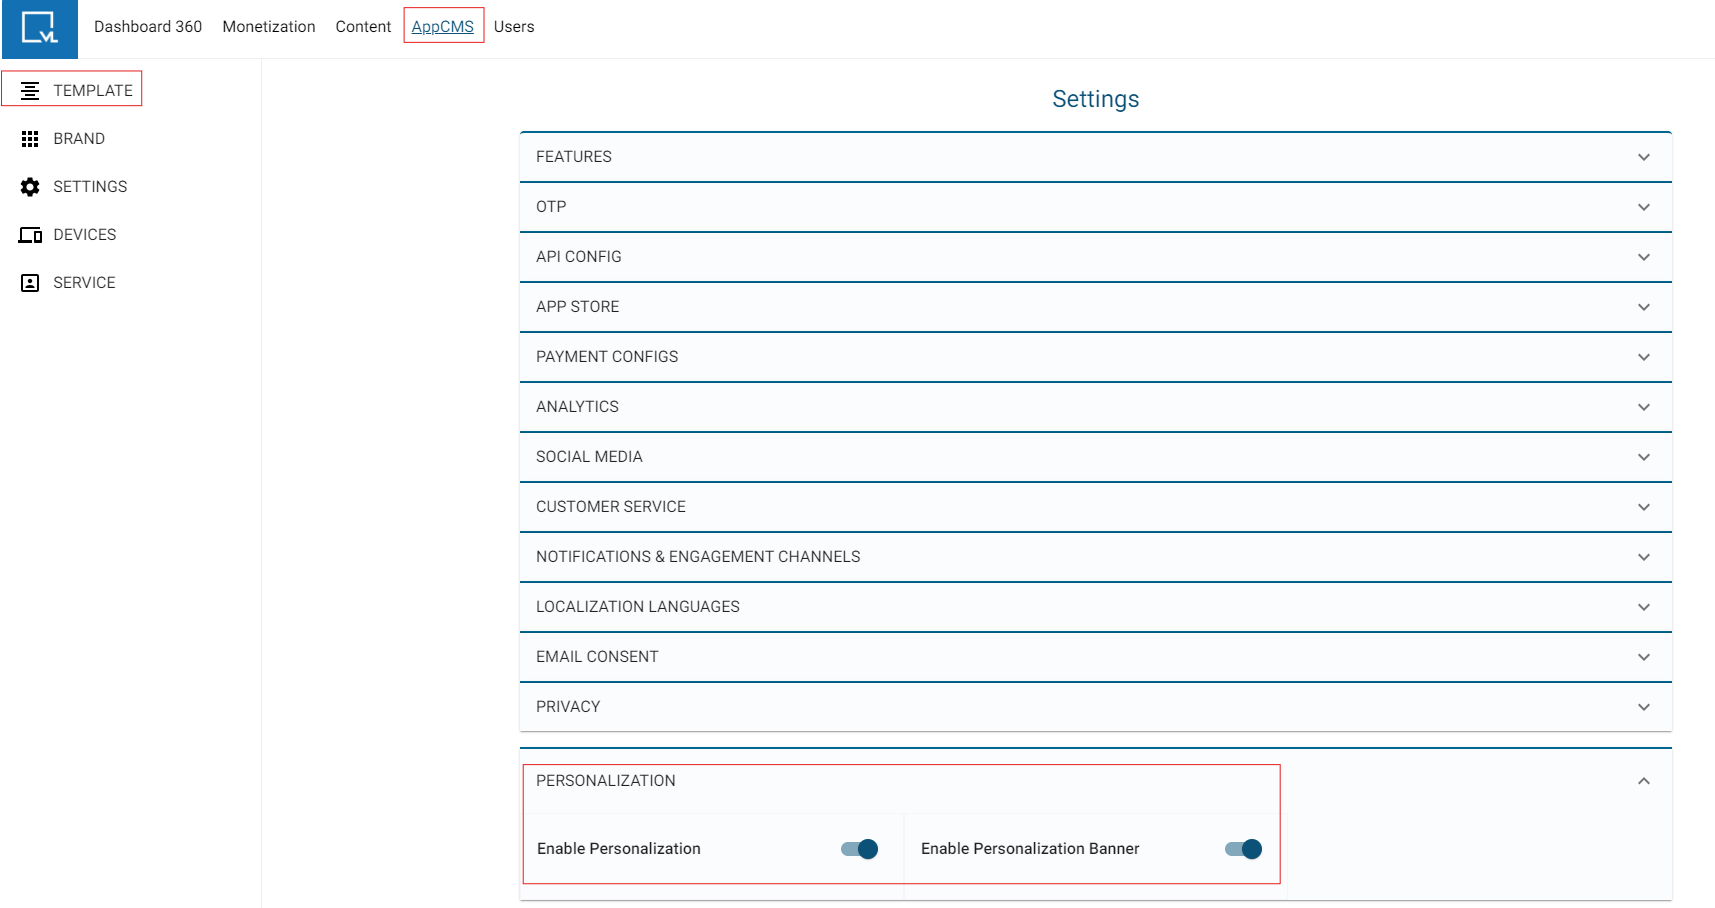
Login to Tools: Access the AppCMS platform using your credentials.
Navigate to AppCMS: Click on the AppCMS option from the main menu.
Go to Settings: Select Settings from the AppCMS dashboard.
Enable Personalization:
Toggle the Enable Personalization option to ON.
Toggle the Enable Personalization Banner option to ON.
Save the Personalization Settings: After enabling these options, ensure that you save the changes to apply the personalization settings.

Configure Personalization Banner
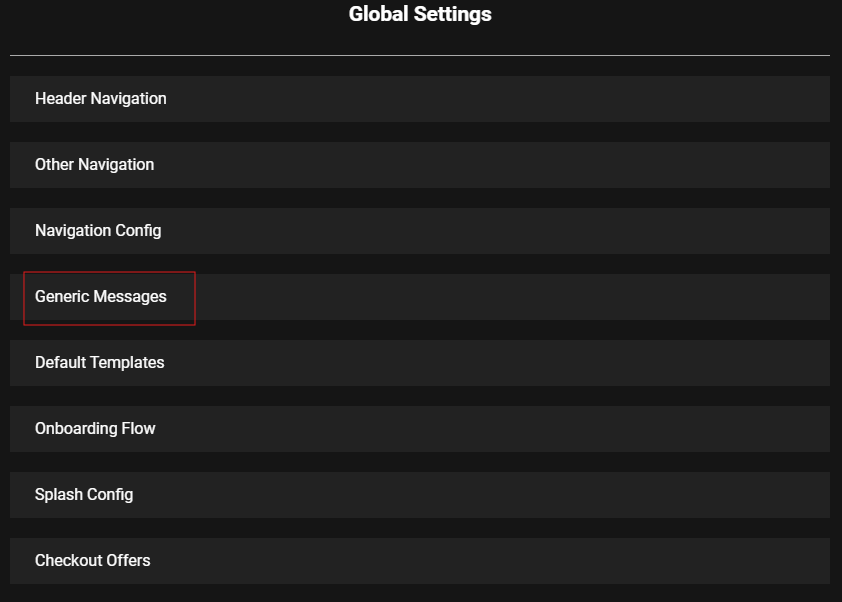
Access Template Builder:
Click on Template Builder in the AppCMS menu.
Select Edit Template.
Generic Messages:
Click on Generic Messages.

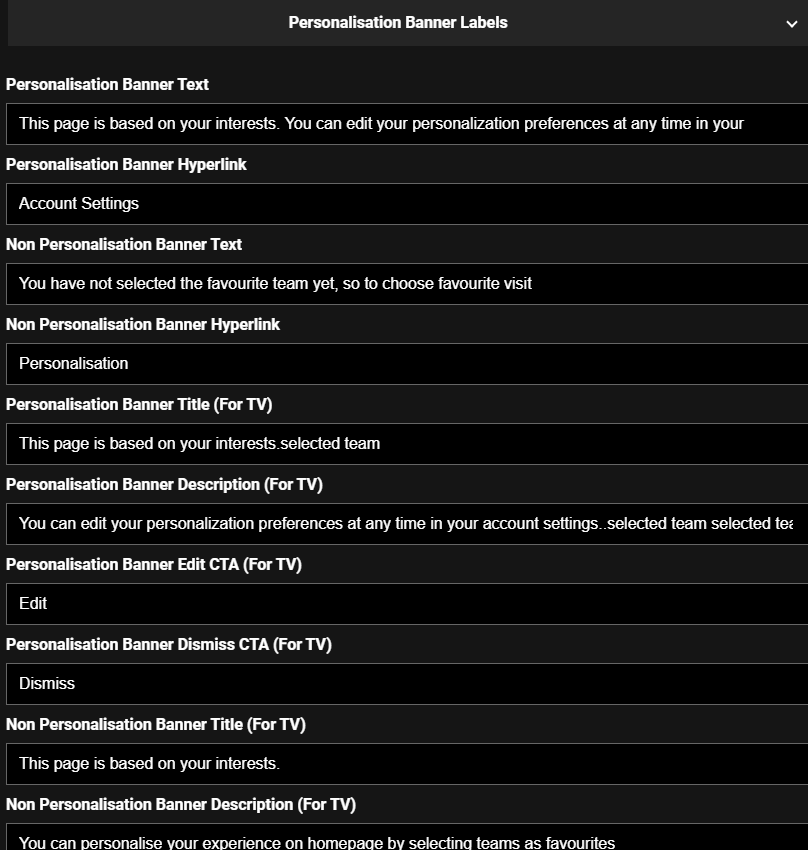
Search for Personalization Banner Labels:
In the search bar, type Personalization Banner Labels.

Expand Personalization Banner Settings:
Click on the entry to expand the settings.
Fill in the Following Details:
Personalization Banner Text:
Example: "This page is based on your interests. You can edit your personalization preferences at any time in your"
Personalization Banner Hyperlinks:
Example: "Account Settings"
Non-Personalization Banner Text:
Example: "You have not selected a favourite team yet, so to choose your favourites visit"
Non-Personalization Banner Hyperlink:
Example: "Personalization"
Personalization Banner Title (For TV):
Example: "This page is based on your interests. Selected team"
Personalization Banner Description (For TV):
Example: "You can edit your personalization preferences at any time in your account settings. Selected team, selected team, selected team."
Personalization Banner Edit CTA (For TV):
Example: "Edit"
Personalization Banner Dismiss CTA (For TV):
Example: "Dismiss"
Non-Personalization Banner Title (For TV):
Example: "This page is based on your interests."
Non-Personalization Banner Description (For TV):
Example: "You can personalize your experience on the homepage by selecting teams as favorites."

Non-Personalization Banner Edit CTA (For TV):
Example: "Edit"
Non-Personalization Banner Dismiss CTA (For TV):
Example: "Dismiss"

Setup Home Page Personalization
Search for Home Page:
Use the "Search for a Page" feature under Pages to locate the home page.
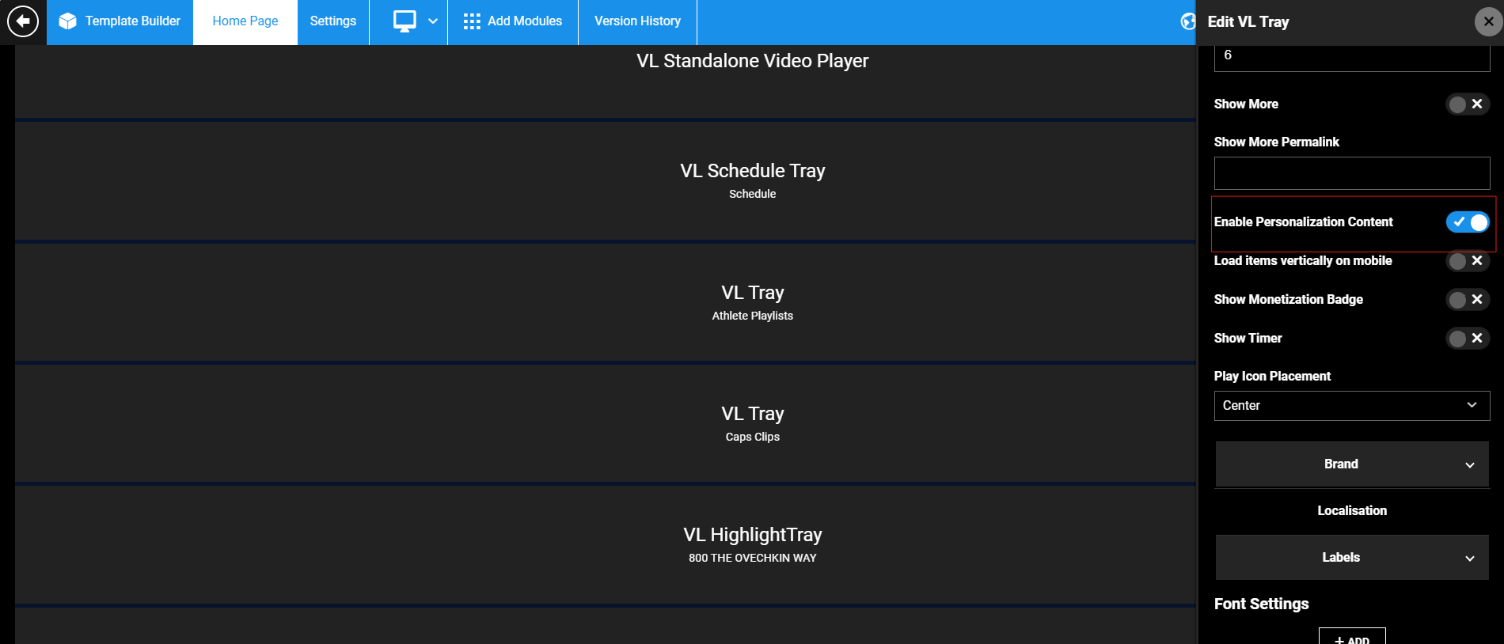
Enable Personalization Content:
In the home page settings, find the "Enable Personalization Content" toggle.
Set this toggle to ON to display personalized content on the homepage.
Enable Personalization in Trays:
For each tray (e.g., VL Preview Tray, VL Schedule Tray, VL Landscape Tray, VL Tray), ensure the "Enable Personalization Content" toggle is set to ON to show personalization in these sections on the homepage.

Save Changes
Publish All Changes:
After making all necessary adjustments, click on "Publish All" to save your changes and ensure that the personalization settings are applied.

Best Practices for Personalization
Regularly Update Content: Keep personalization content fresh and relevant by regularly updating the preferences and banners.
User Feedback: Gather user feedback on personalization features to improve the experience continuously.
Monitor Engagement: Analyze user engagement metrics to determine the effectiveness of personalized content and make necessary adjustments.
A/B Testing: Consider A/B testing different banner texts and layouts to see which performs better with your audience.
Troubleshooting Common Issues
🔰 Banner Not Displaying:
Ensure both Enable Personalization and Enable Personalization Banner are toggled ON.
Check that the correct templates are applied to the pages.
🔰 Incorrect Personalization Content:
Verify that the correct labels and text have been filled in under the Generic Messages settings.
🔰 Home Page Personalization Not Working:
Ensure the Enable Personalization Content toggle for the home page is set to ON.
Check if the user has selected any favorite teams or preferences.
💡 Important Notes
Ensure that all text and hyperlinks are correctly formatted and relevant to the user experience.
Regularly review personalization settings to keep content updated and engaging.
FAQ
Q1. What is the purpose of the personalization banner?
Ans: The personalization banner informs users that the content is tailored to their interests and provides them with options to adjust their preferences.
Q2. Can I customize the text in the personalization banner?
Ans: Yes, you can customize all the text fields in the personalization banner to better fit your branding and messaging.
Q3. What happens if I disable personalization?
Ans: If you disable personalization, users will not see tailored content or banners, which may affect their engagement with the application.
Q4. Is it necessary to enable both personalization and the personalization banner?
Ans: Yes, both settings should be enabled to provide users with a complete personalized experience along with informative banners.
Q5. How can I test if personalization is working correctly?
Ans: After enabling personalization, log in as a user and check the homepage and other relevant pages to see if the banners and personalized content appear as intended.
📄 Additional Resources
AppCMS Documentation: Refer to the official AppCMS documentation for more detailed technical guidance.
User Feedback Tools: Implement tools to gather user feedback on personalization features.
Analytics Dashboard: Use analytics to track user interactions with personalization features and make data-driven decisions.
Contact Support
If you need further assistance or have any questions, our support team is here to help:
1. Contact Information
Email: techsupport@viewlift.com
Phone:
US: +1-800-859-0420
UK: +44-203-014-8921
2. Support Hours
B2C (Business to Consumer): Monday to Friday
B2B (Business to Business): 24/7 support available