Introduction
VL Authentication 01 is a System Screen module in Template Builder. It powers the sign-up and sign-in experience on your website and connected apps.
On the website, customers sign in with their email or phone number using a one-time verification code (OTP). When you enable them in module settings, Google and Apple sign-in buttons also appear on the login form.
This article explains how to create the Authentication page in Template Builder, configure VL Authentication 01, publish it, and verify the experience on the web.
Purpose
The purpose of this article is to help you:
- Create an Authentication System Screen in Template Builder
- Add and configure the VL Authentication 01 module
- Enable the sign-in and sign-up methods your site needs
- Brand and localize the authentication screens
- Understand what customers see on the website after sign-in
- Publish and verify the live Authentication page
Scope
This article covers:
- Creating a System Screen page for authentication in Template Builder
- Adding VL Authentication 01 to the page layout
- Module settings: Authentication Options, Images, display toggles, Brand, Localization (Labels and Errors)
- How the authentication page appears on the website
- An overview of the sign-in flow on web (flowchart)
It does not cover:
- Setting up Google or Apple credentials in external provider consoles
- Full TV provider (TVE) onboarding
- Other authentication modules (for example VL Authentication 02)
Prerequisites
Before you begin, ensure you have:
- Access to Template Builder for your site
- Access to ViewLift Tools / AppCMS if you need to enable TVE or other service-level login settings
- Google or Apple sign-in configured at the site level if you plan to offer those options
- Brand colors and copy ready: titles, subtitles, button labels, Terms of Service, and Privacy Policy links
Example used in this article
Throughout the steps below we use an Authentication page named Authentication at path/authentication. Replace the sample values with your own.
Authentication flow overview (website)
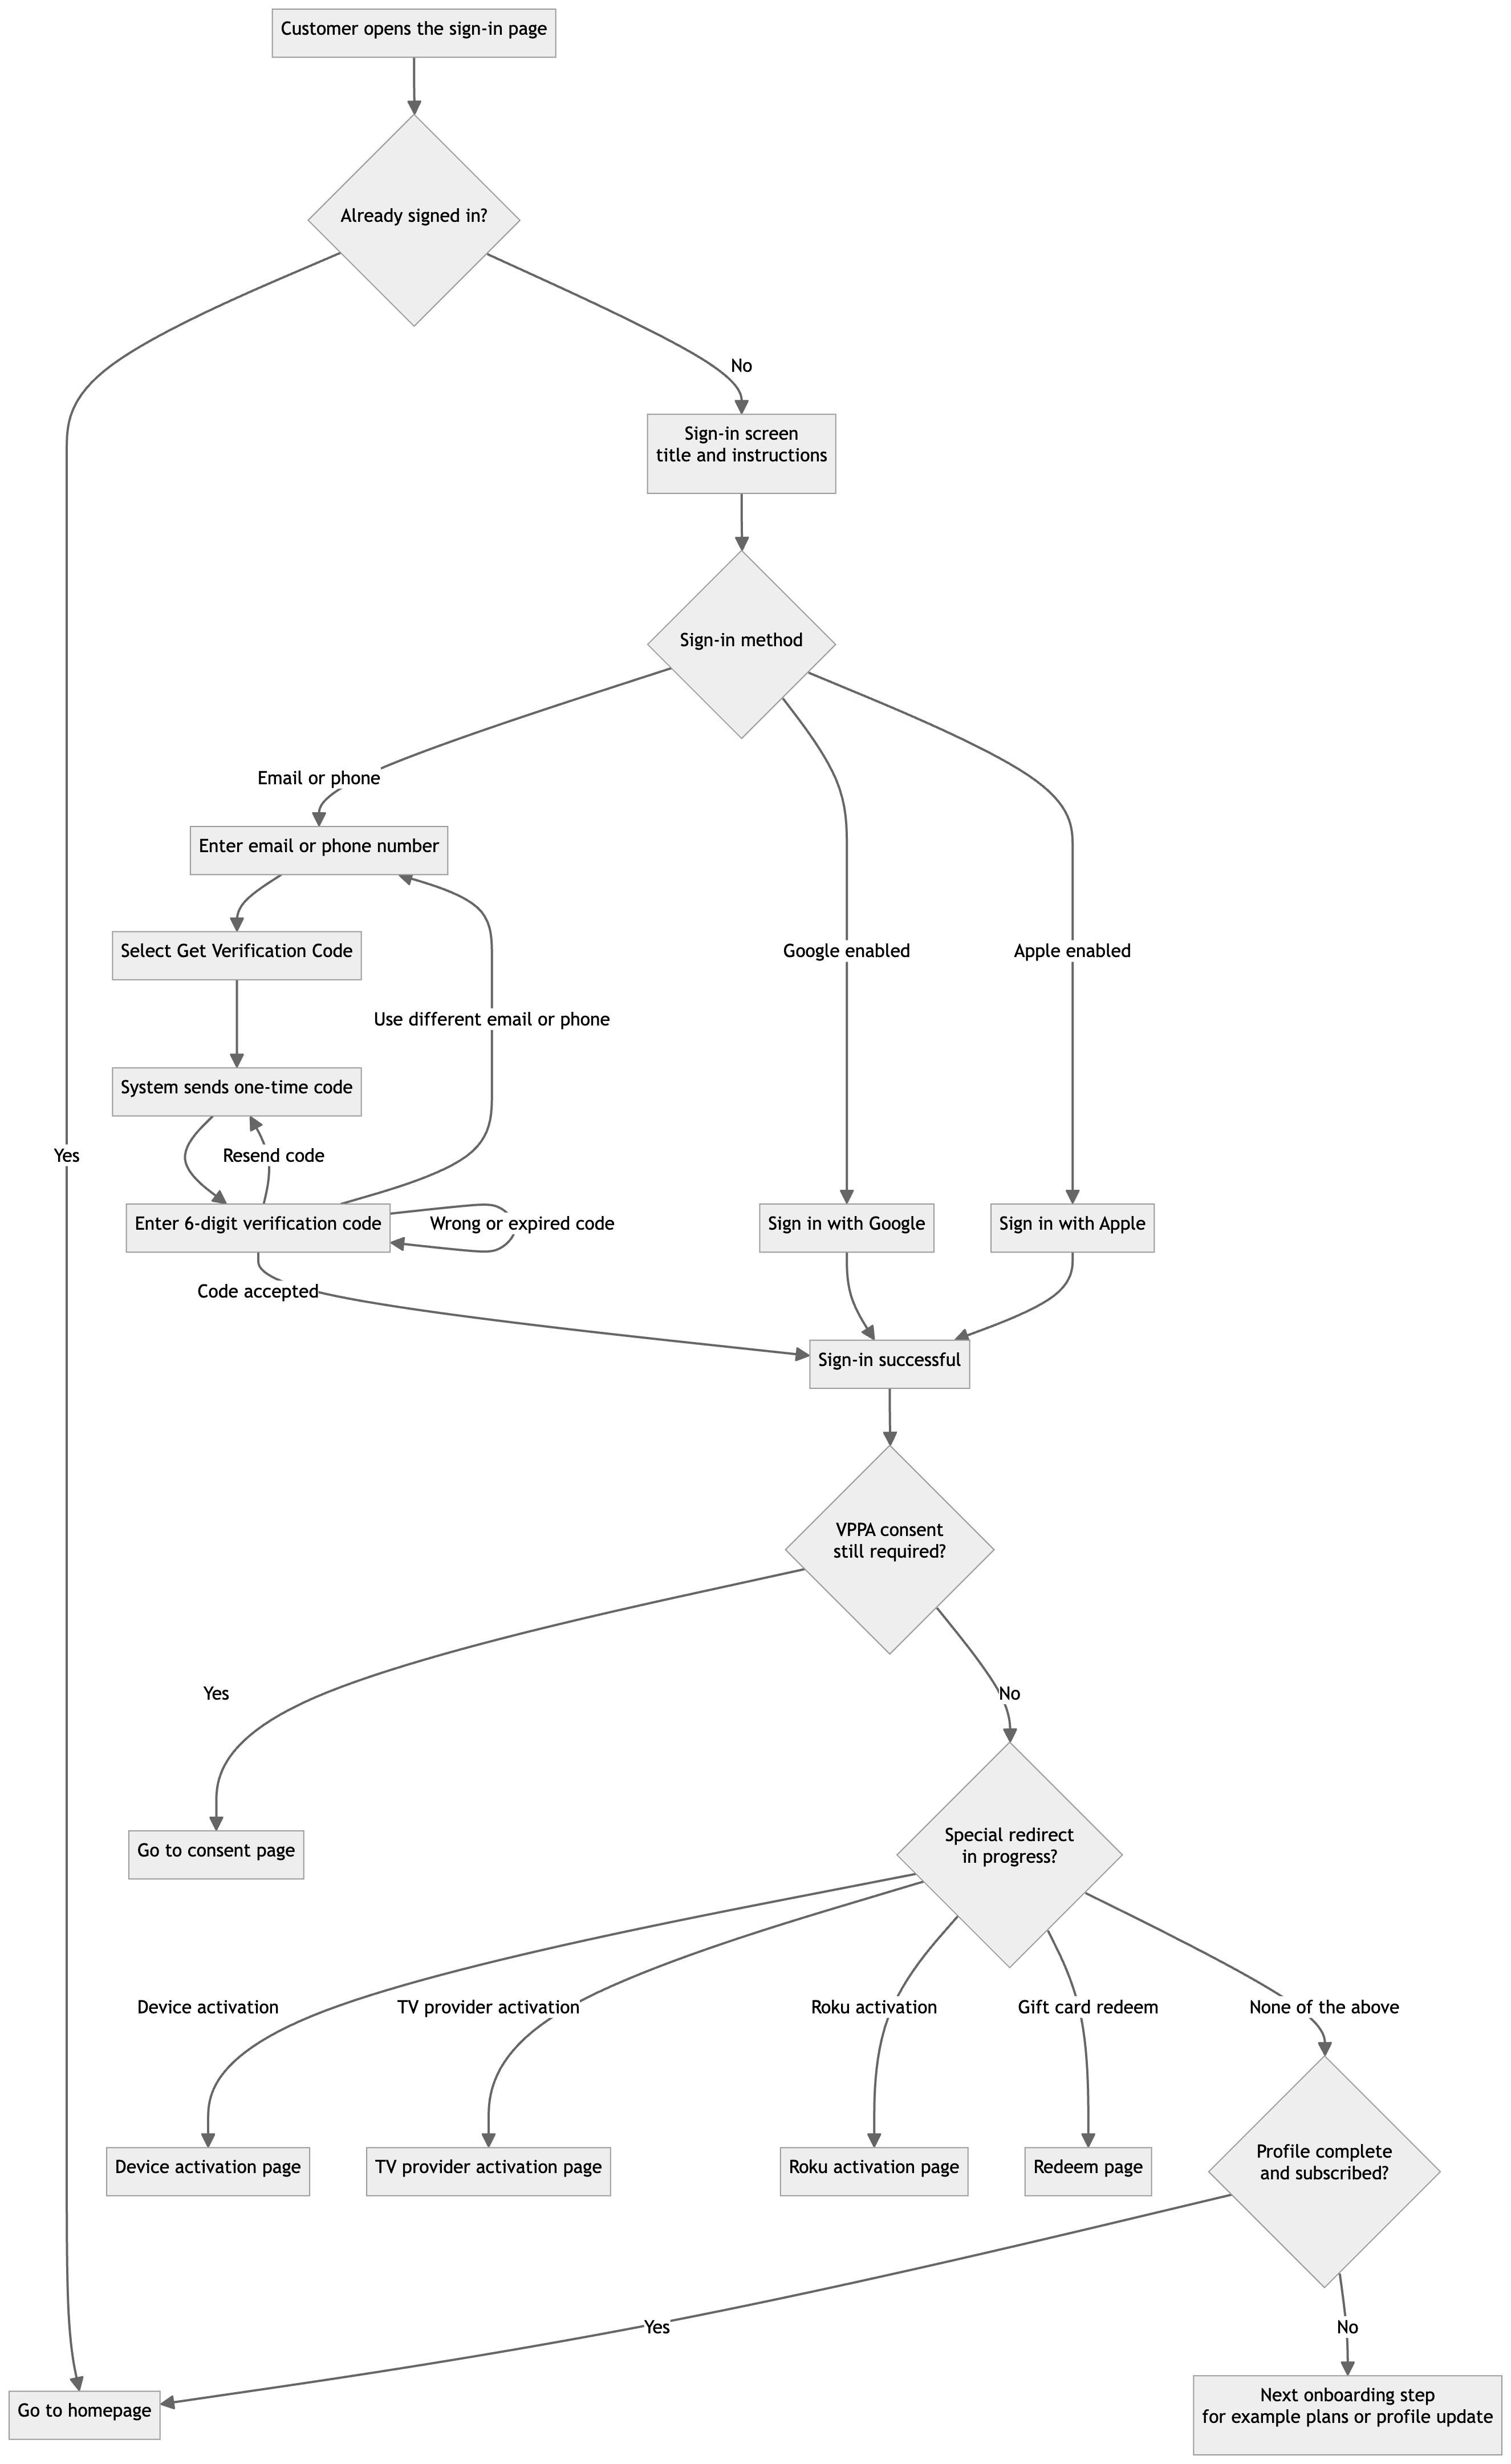
The flowchart below shows the typical customer journey on the website when VL Authentication 01 is published on your Authentication page.
Notes
- After sign-in, customers may be sent to different pages depending on your site setup (consent, device activation, redeem, onboarding, or home).
- On the website login form, Google and Apple are the social sign-in options shown when enabled in Authentication Options. Facebook, Amazon, and TVE can be configured in Template Builder but are used on other platforms or flows, not as buttons on this web login form.
- This module does not use email-and-password login on the website; sign-in is OTP-based, plus Google and Apple when enabled.
Step 1: Open Template Builder
- Log into ViewLift Tools.
- Open AppCMS → Edit Template Builder (or open Template Builder for your site from your usual entry point).
- Confirm you are on the correct site and language (if localization is enabled, use the language selector on the Template Builder home screen before editing page copy).
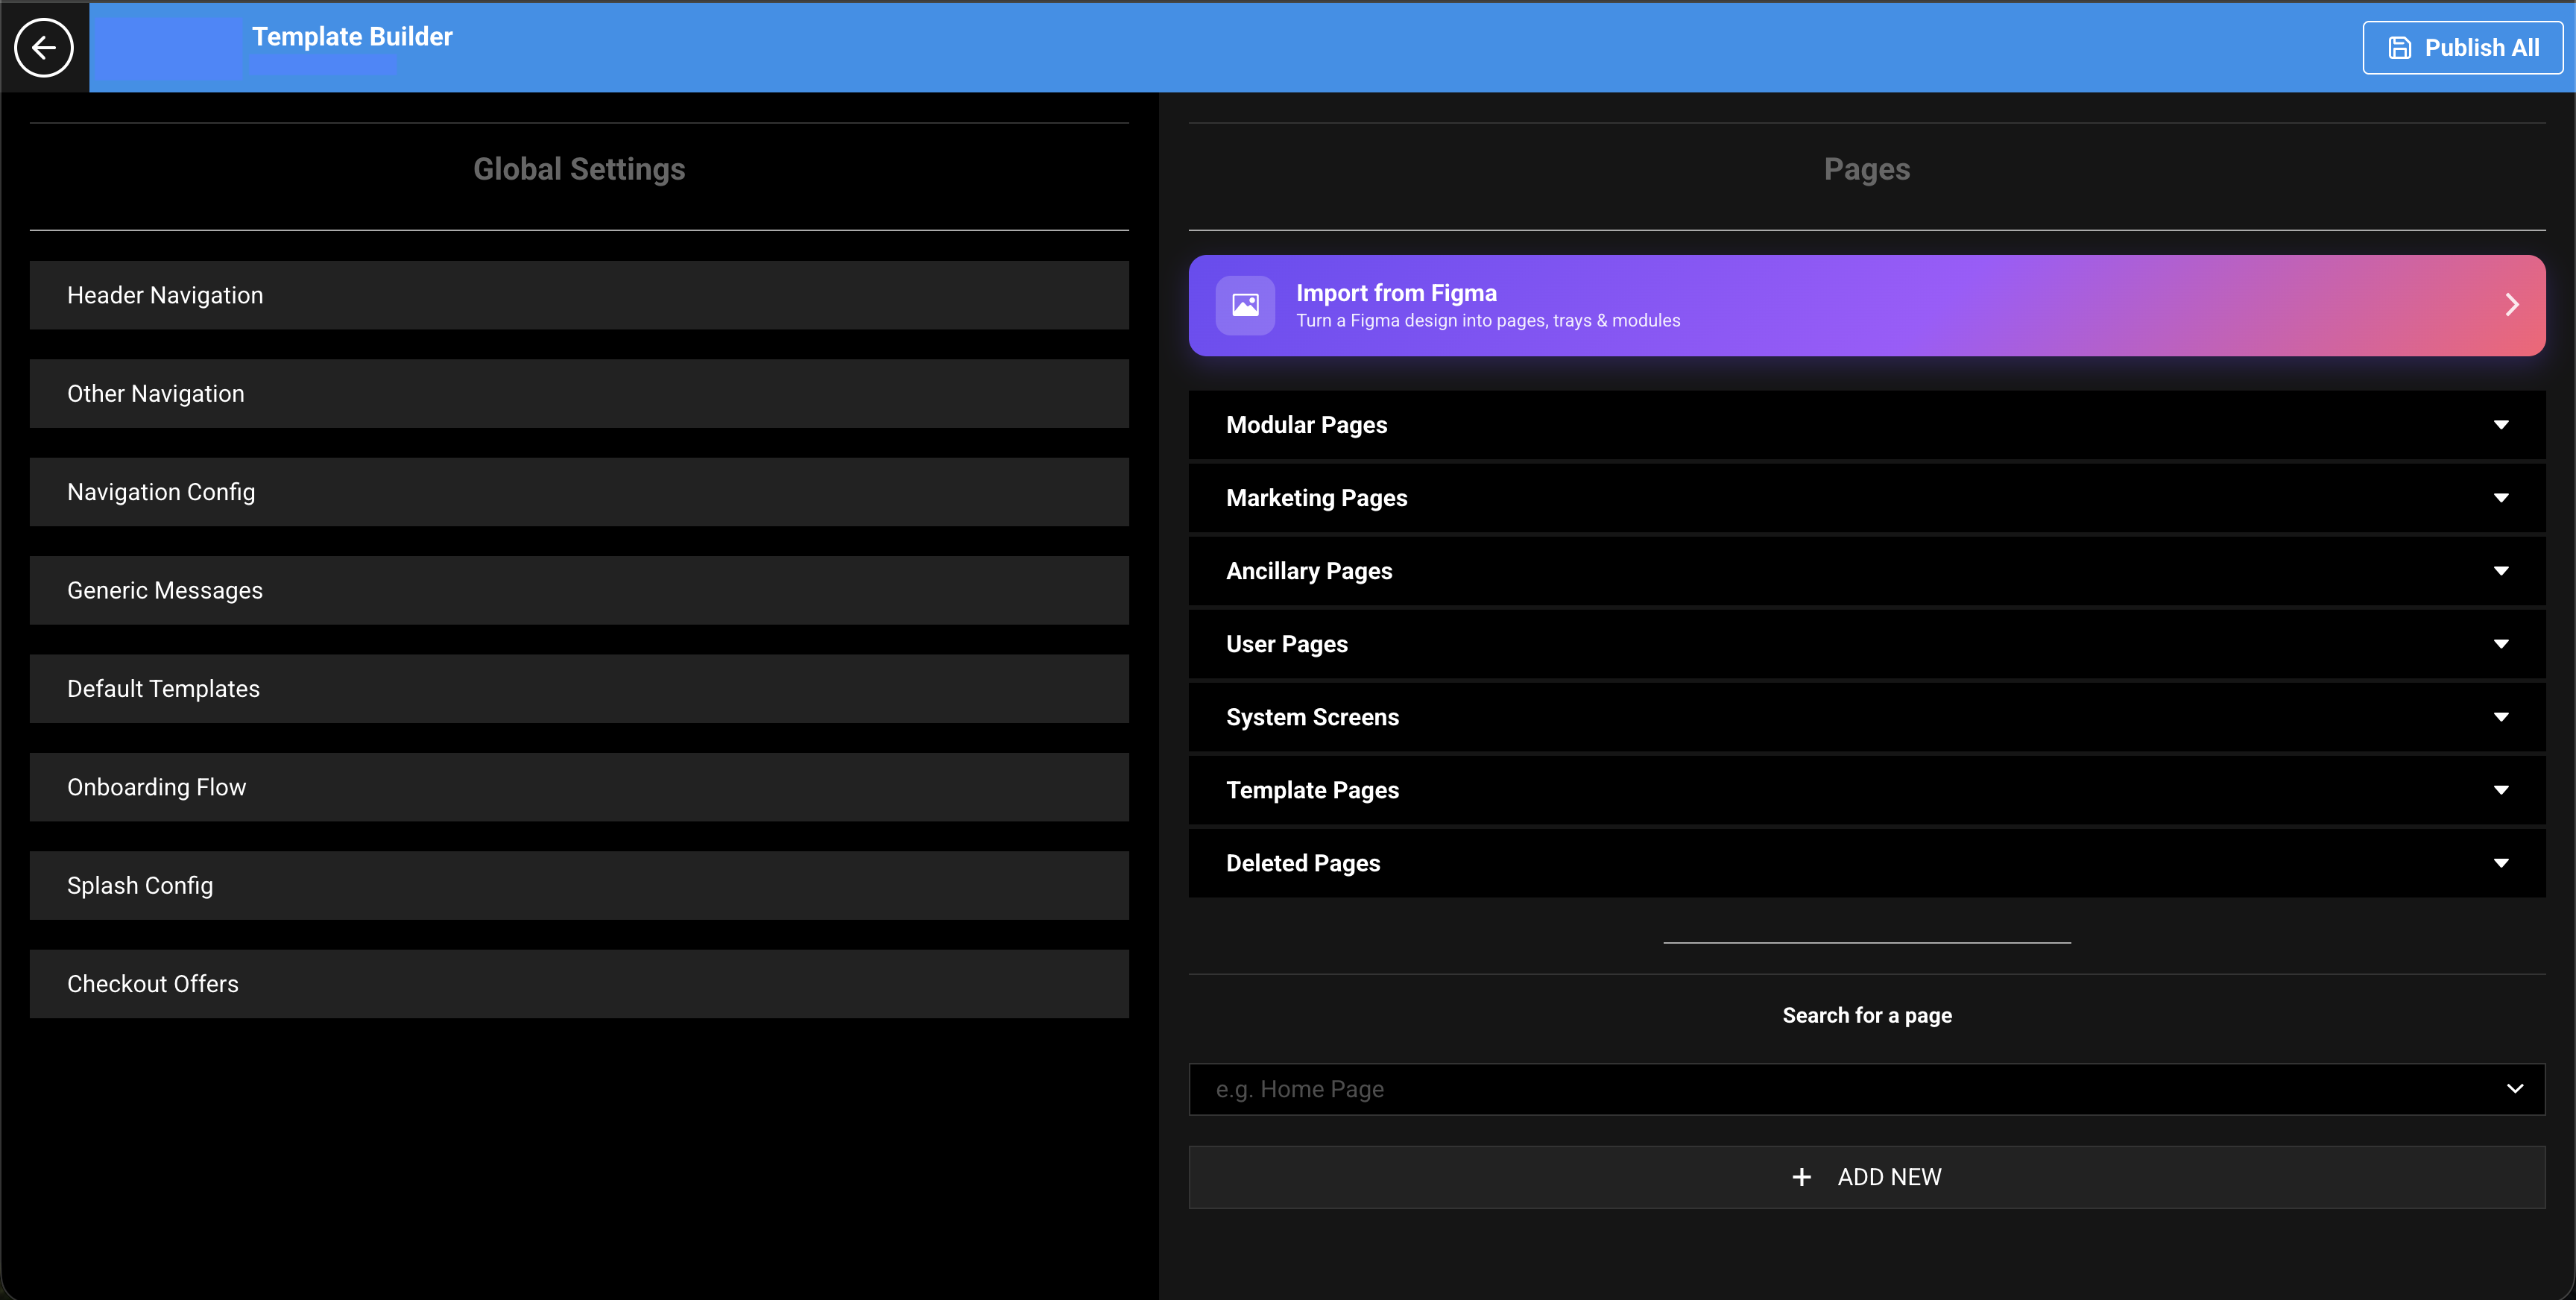
Figure 1. Template Builder home. From here you create pages and open System Screens.
Step 2: Create the Authentication System Screen
The Authentication page must be a System Screen so that system modules (including VL Authentication 01) are available in the module picker.
- In Template Builder, go to Pages.
- Select + ADD NEW (or Create a New Page).
- Enter New Page Name:
Authentication(or your preferred name). - In New Page Type * Developers Only, select System Screen.
- Optionally set Target Language (If localized Page) if you are creating a language-specific Authentication page.
- Select CREATE.
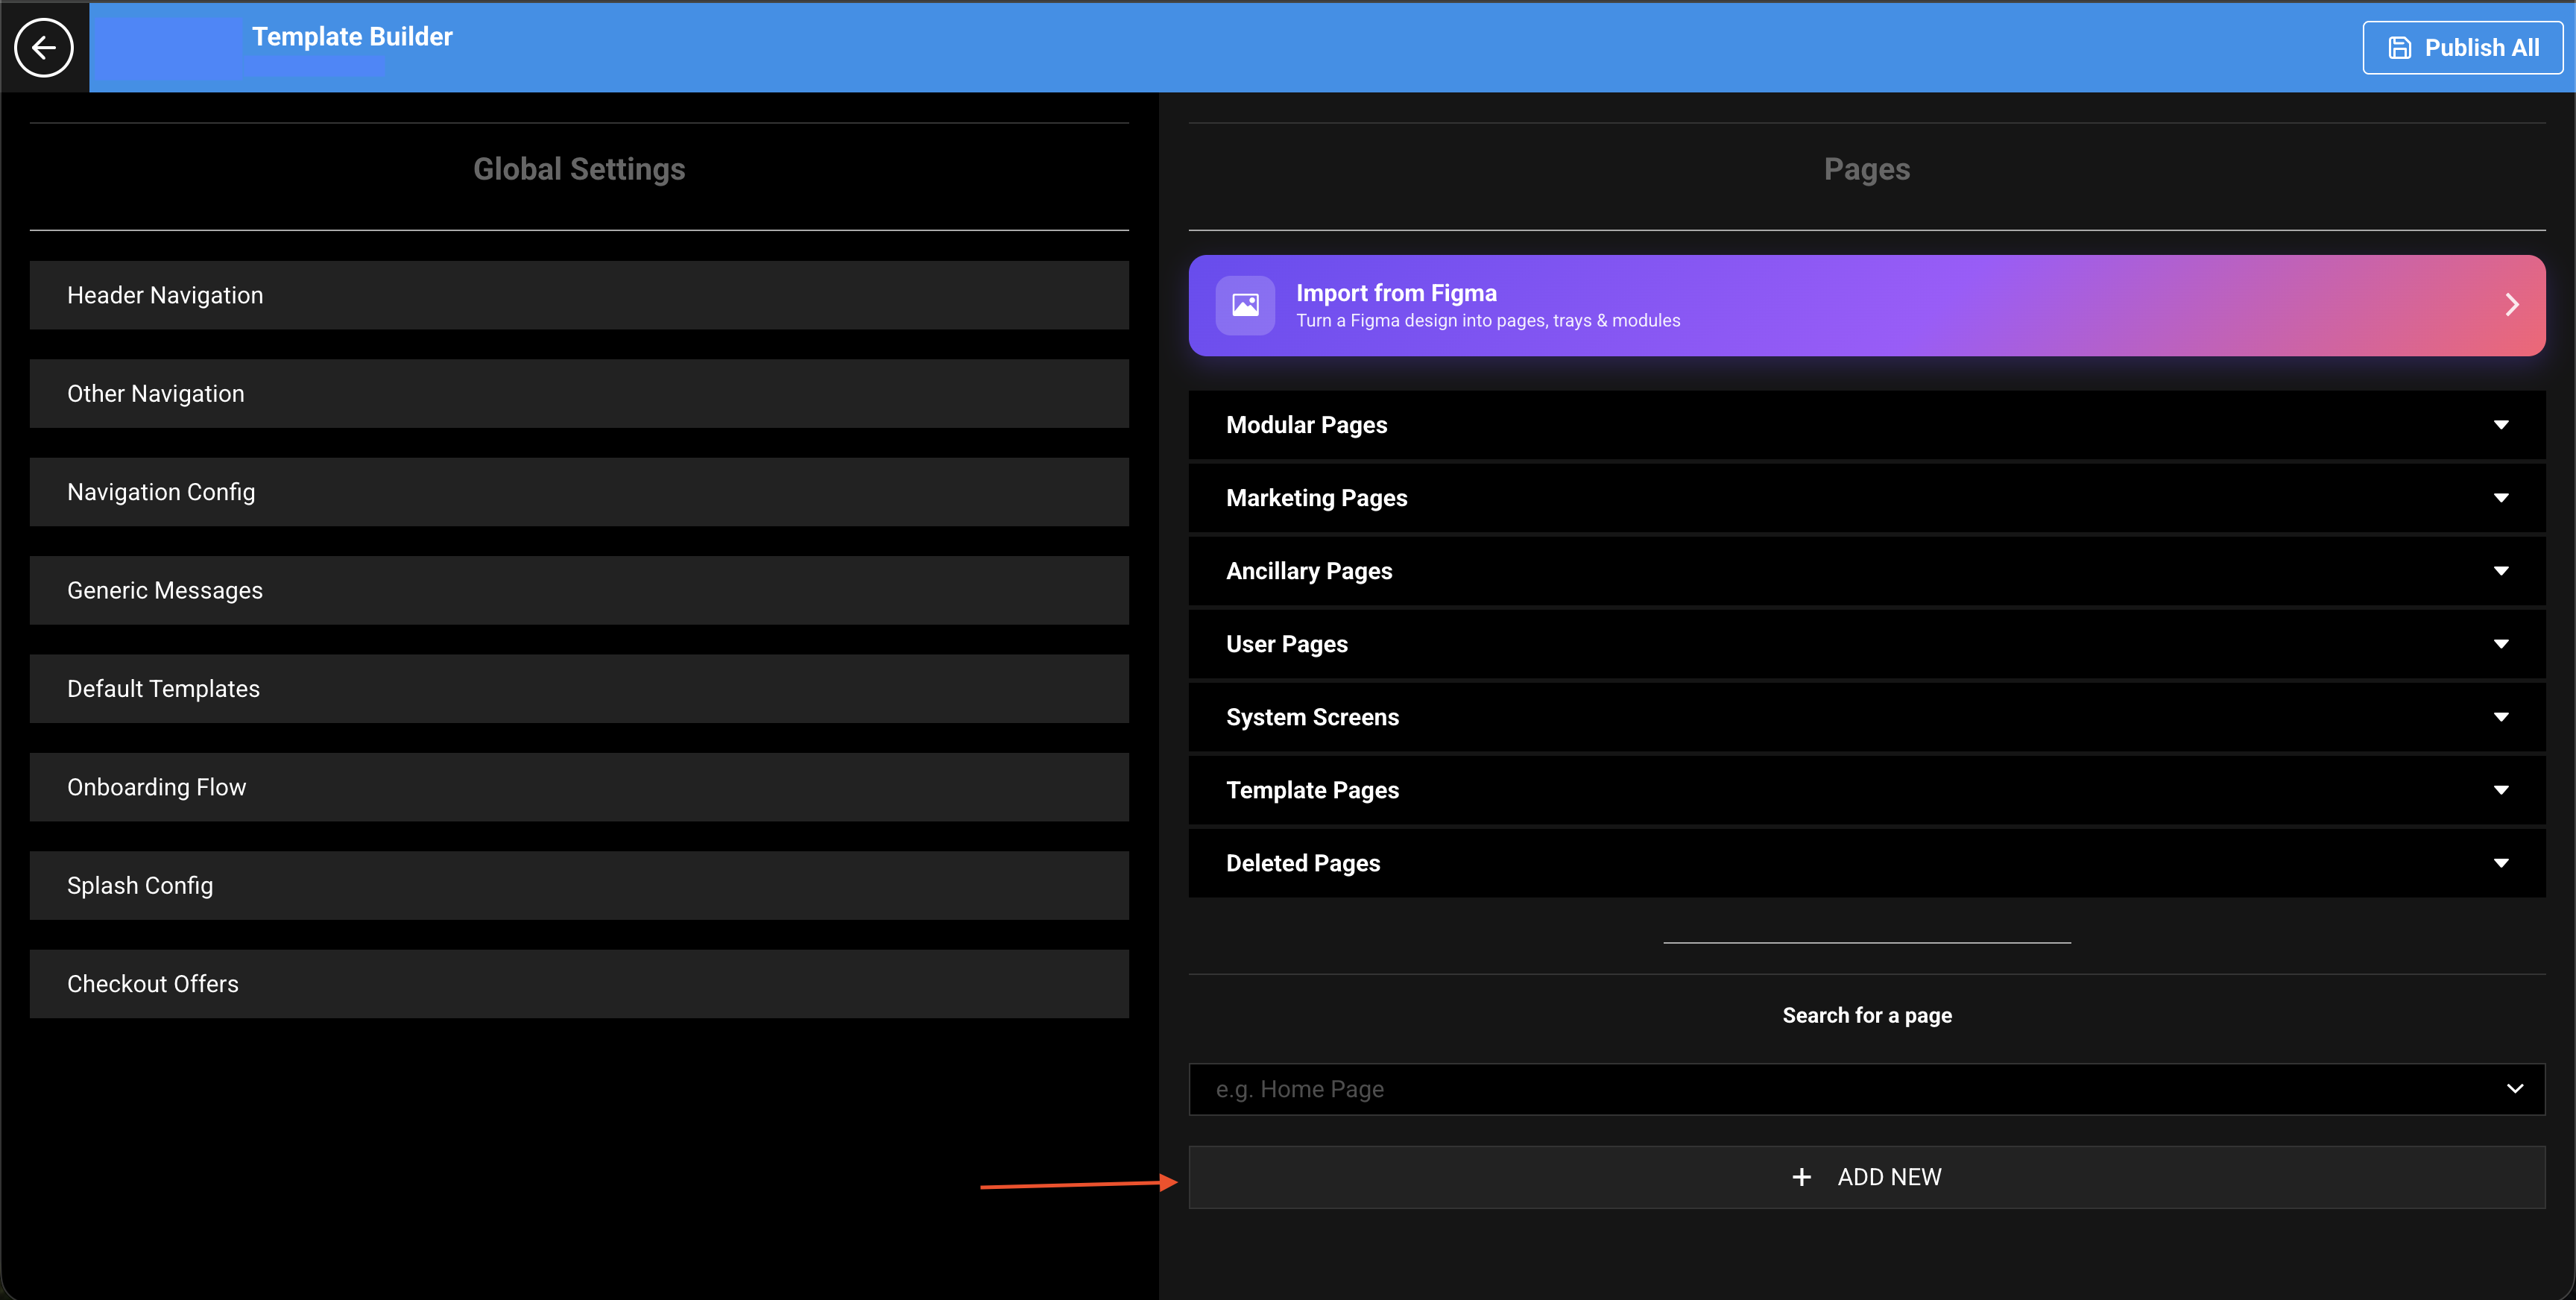
*Figure 2..1 Create a New Page - Click on + ADD NEW
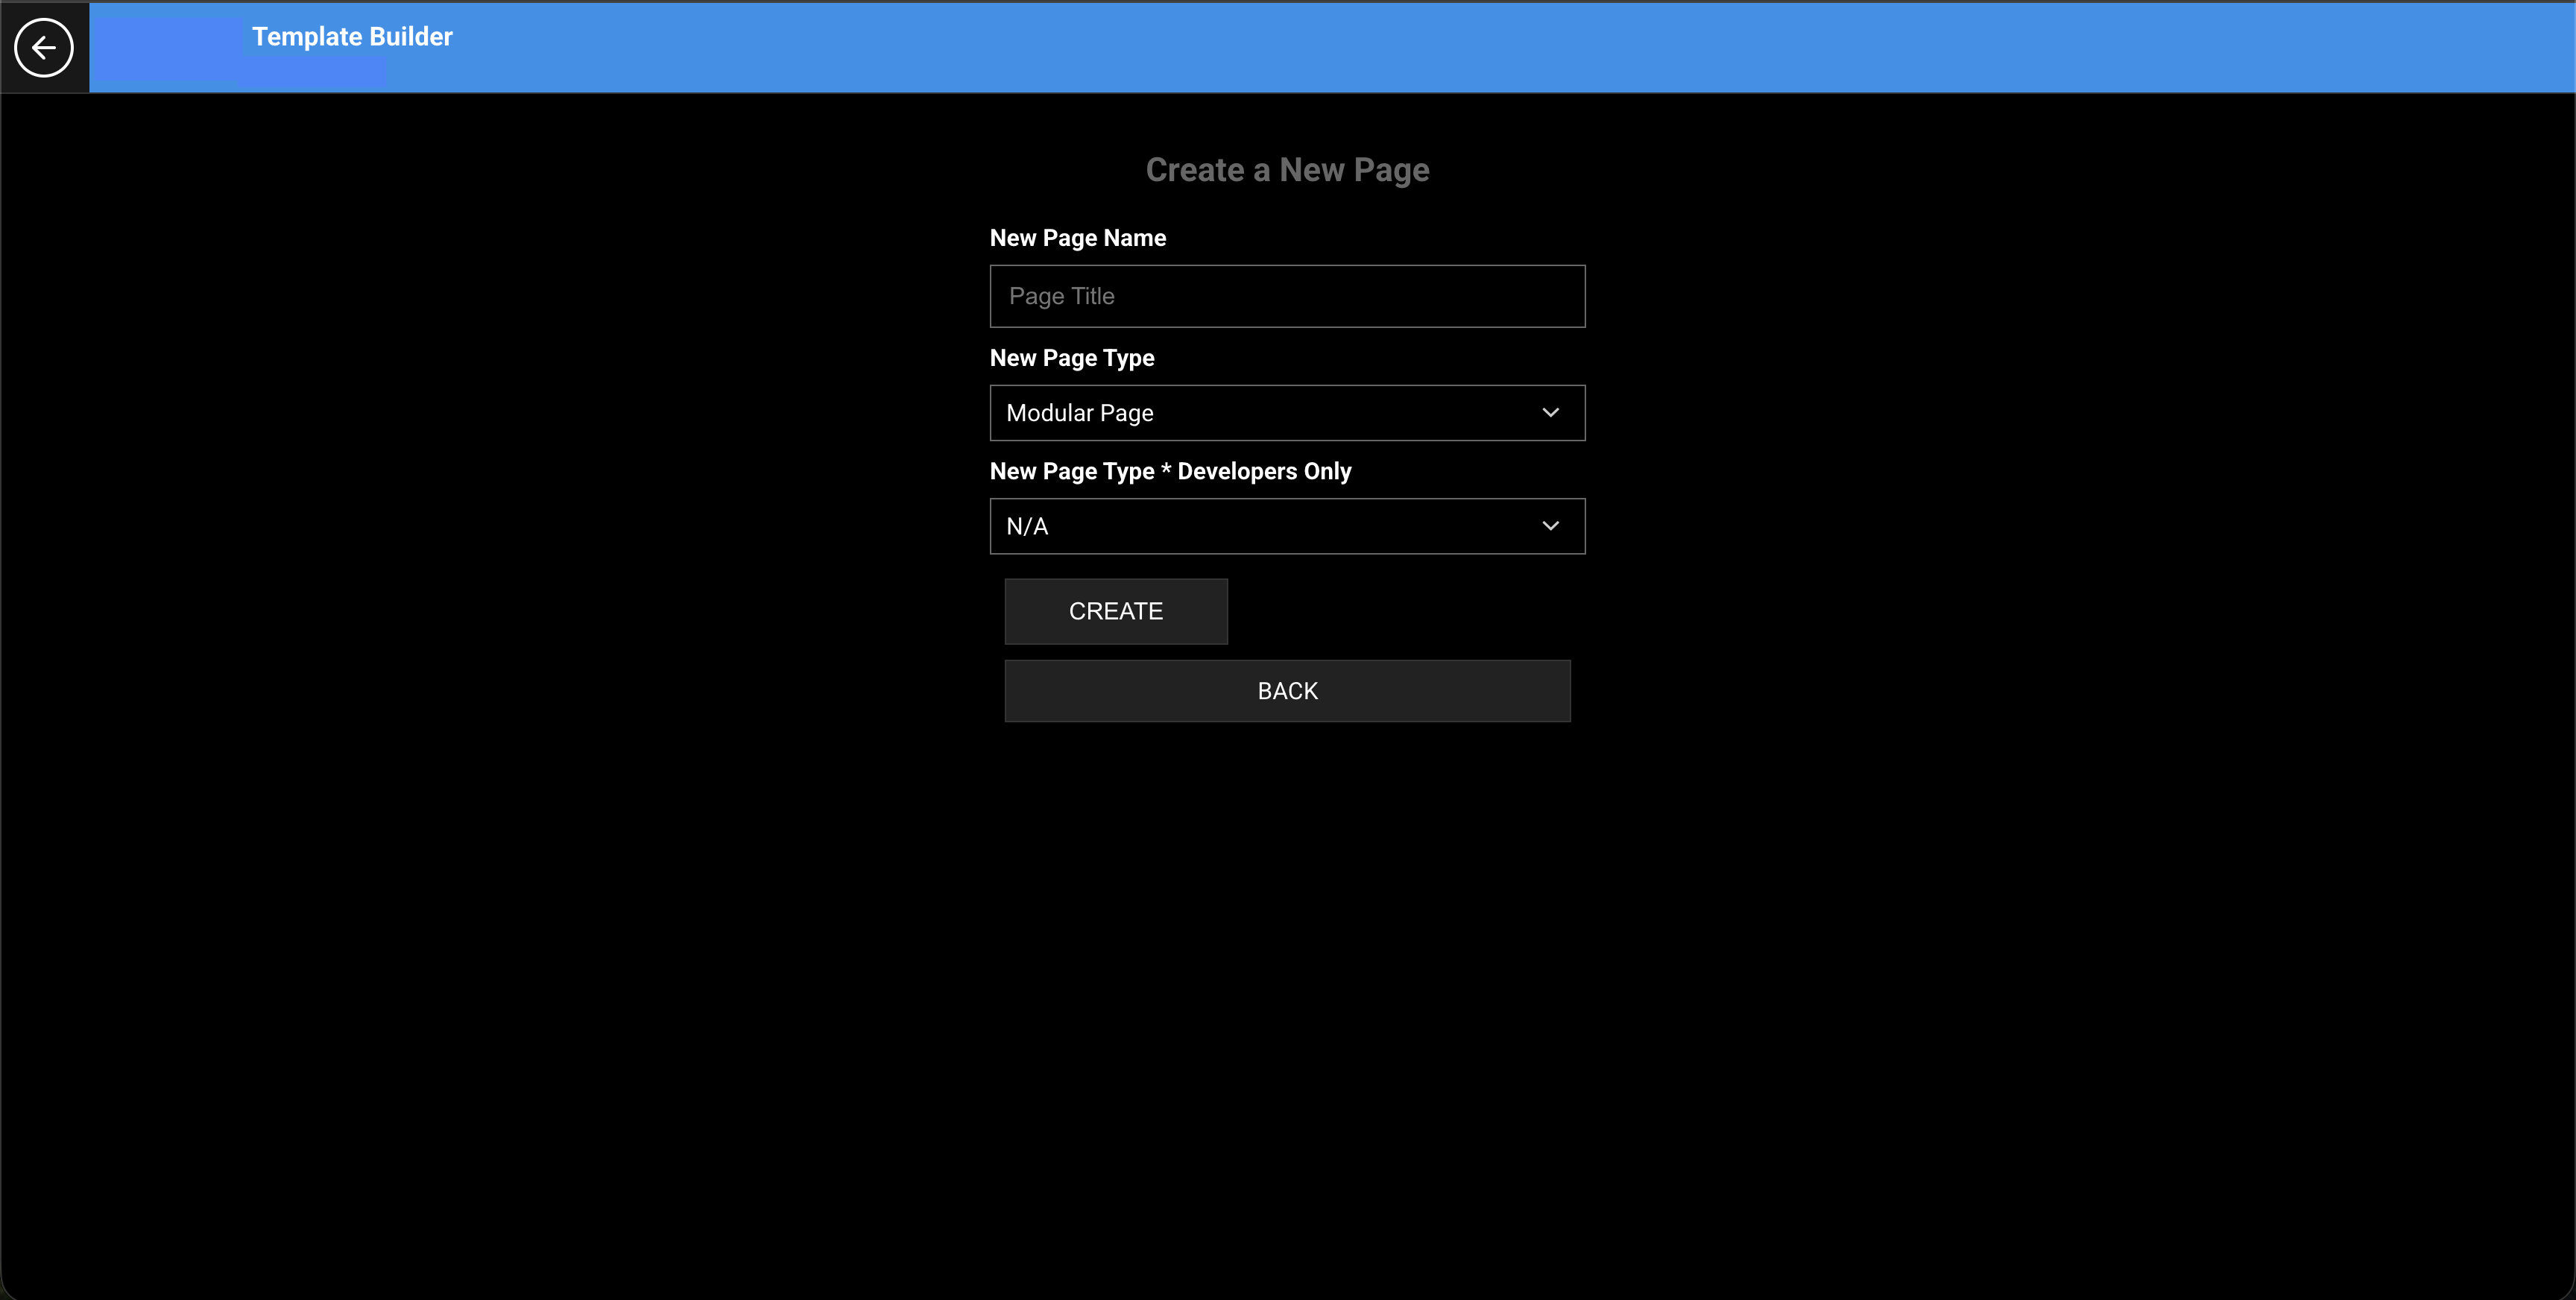
Figure 2..2 Create a New Page. Set New Page Name to Authentication, set New Page Type * Developers Only to System Screen, then select CREATE.
After create, Template Builder opens the page Settings screen.
Set the page path
- On Page Settings, set the page path to
/authentication(recommended) unless your site already uses a different auth path. - Confirm the page type is System Screen.
- Save page settings if prompted.
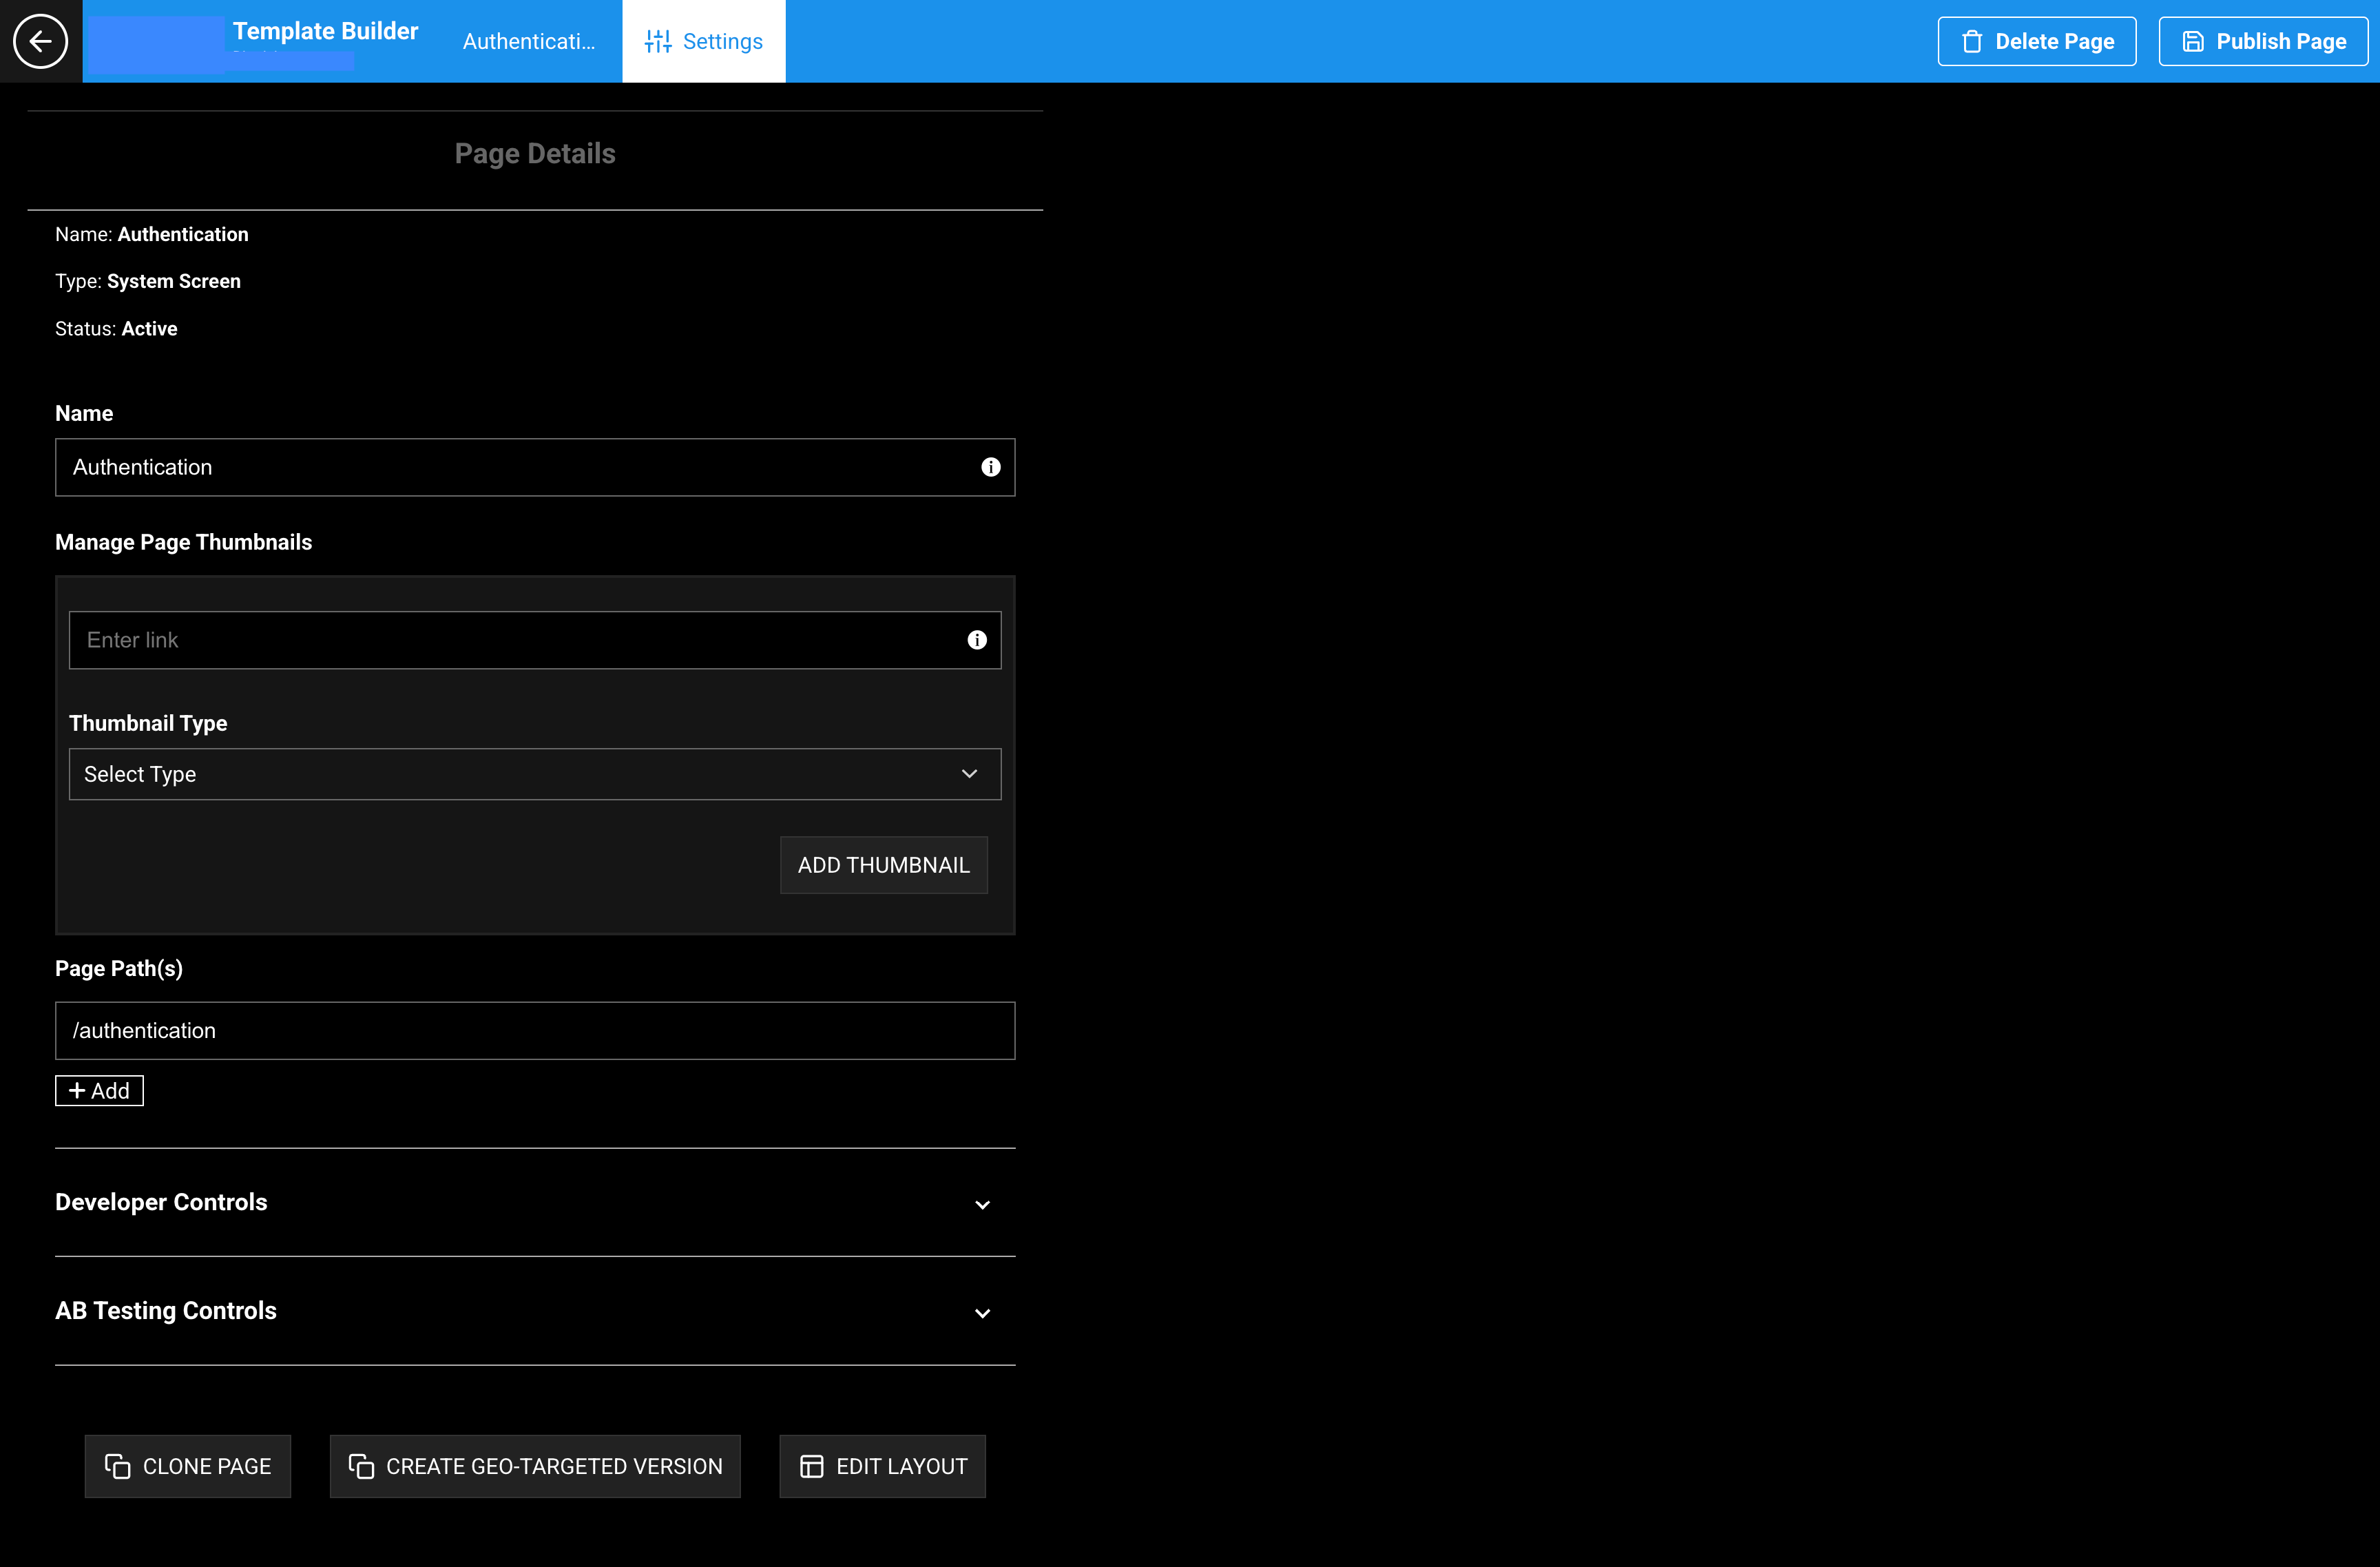
Figure 3. Page Settings. Set the path to /authentication so Sign In / Sign Up links and redirects resolve correctly.
Tip: Keep
/authenticationconsistent across environments. Many apps and web flows expect this path for login redirects.
Step 3: Add VL Authentication 01 to the layout
- Open the Authentication page.
- Select Edit Layout (or the equivalent layout editor for your Template Builder version).
- Select Add a New Module (or insert module).
- Because the page is a System Screen, the picker shows system modules.
- Search for or select VL Authentication 01.
- Insert the module into the page layout.
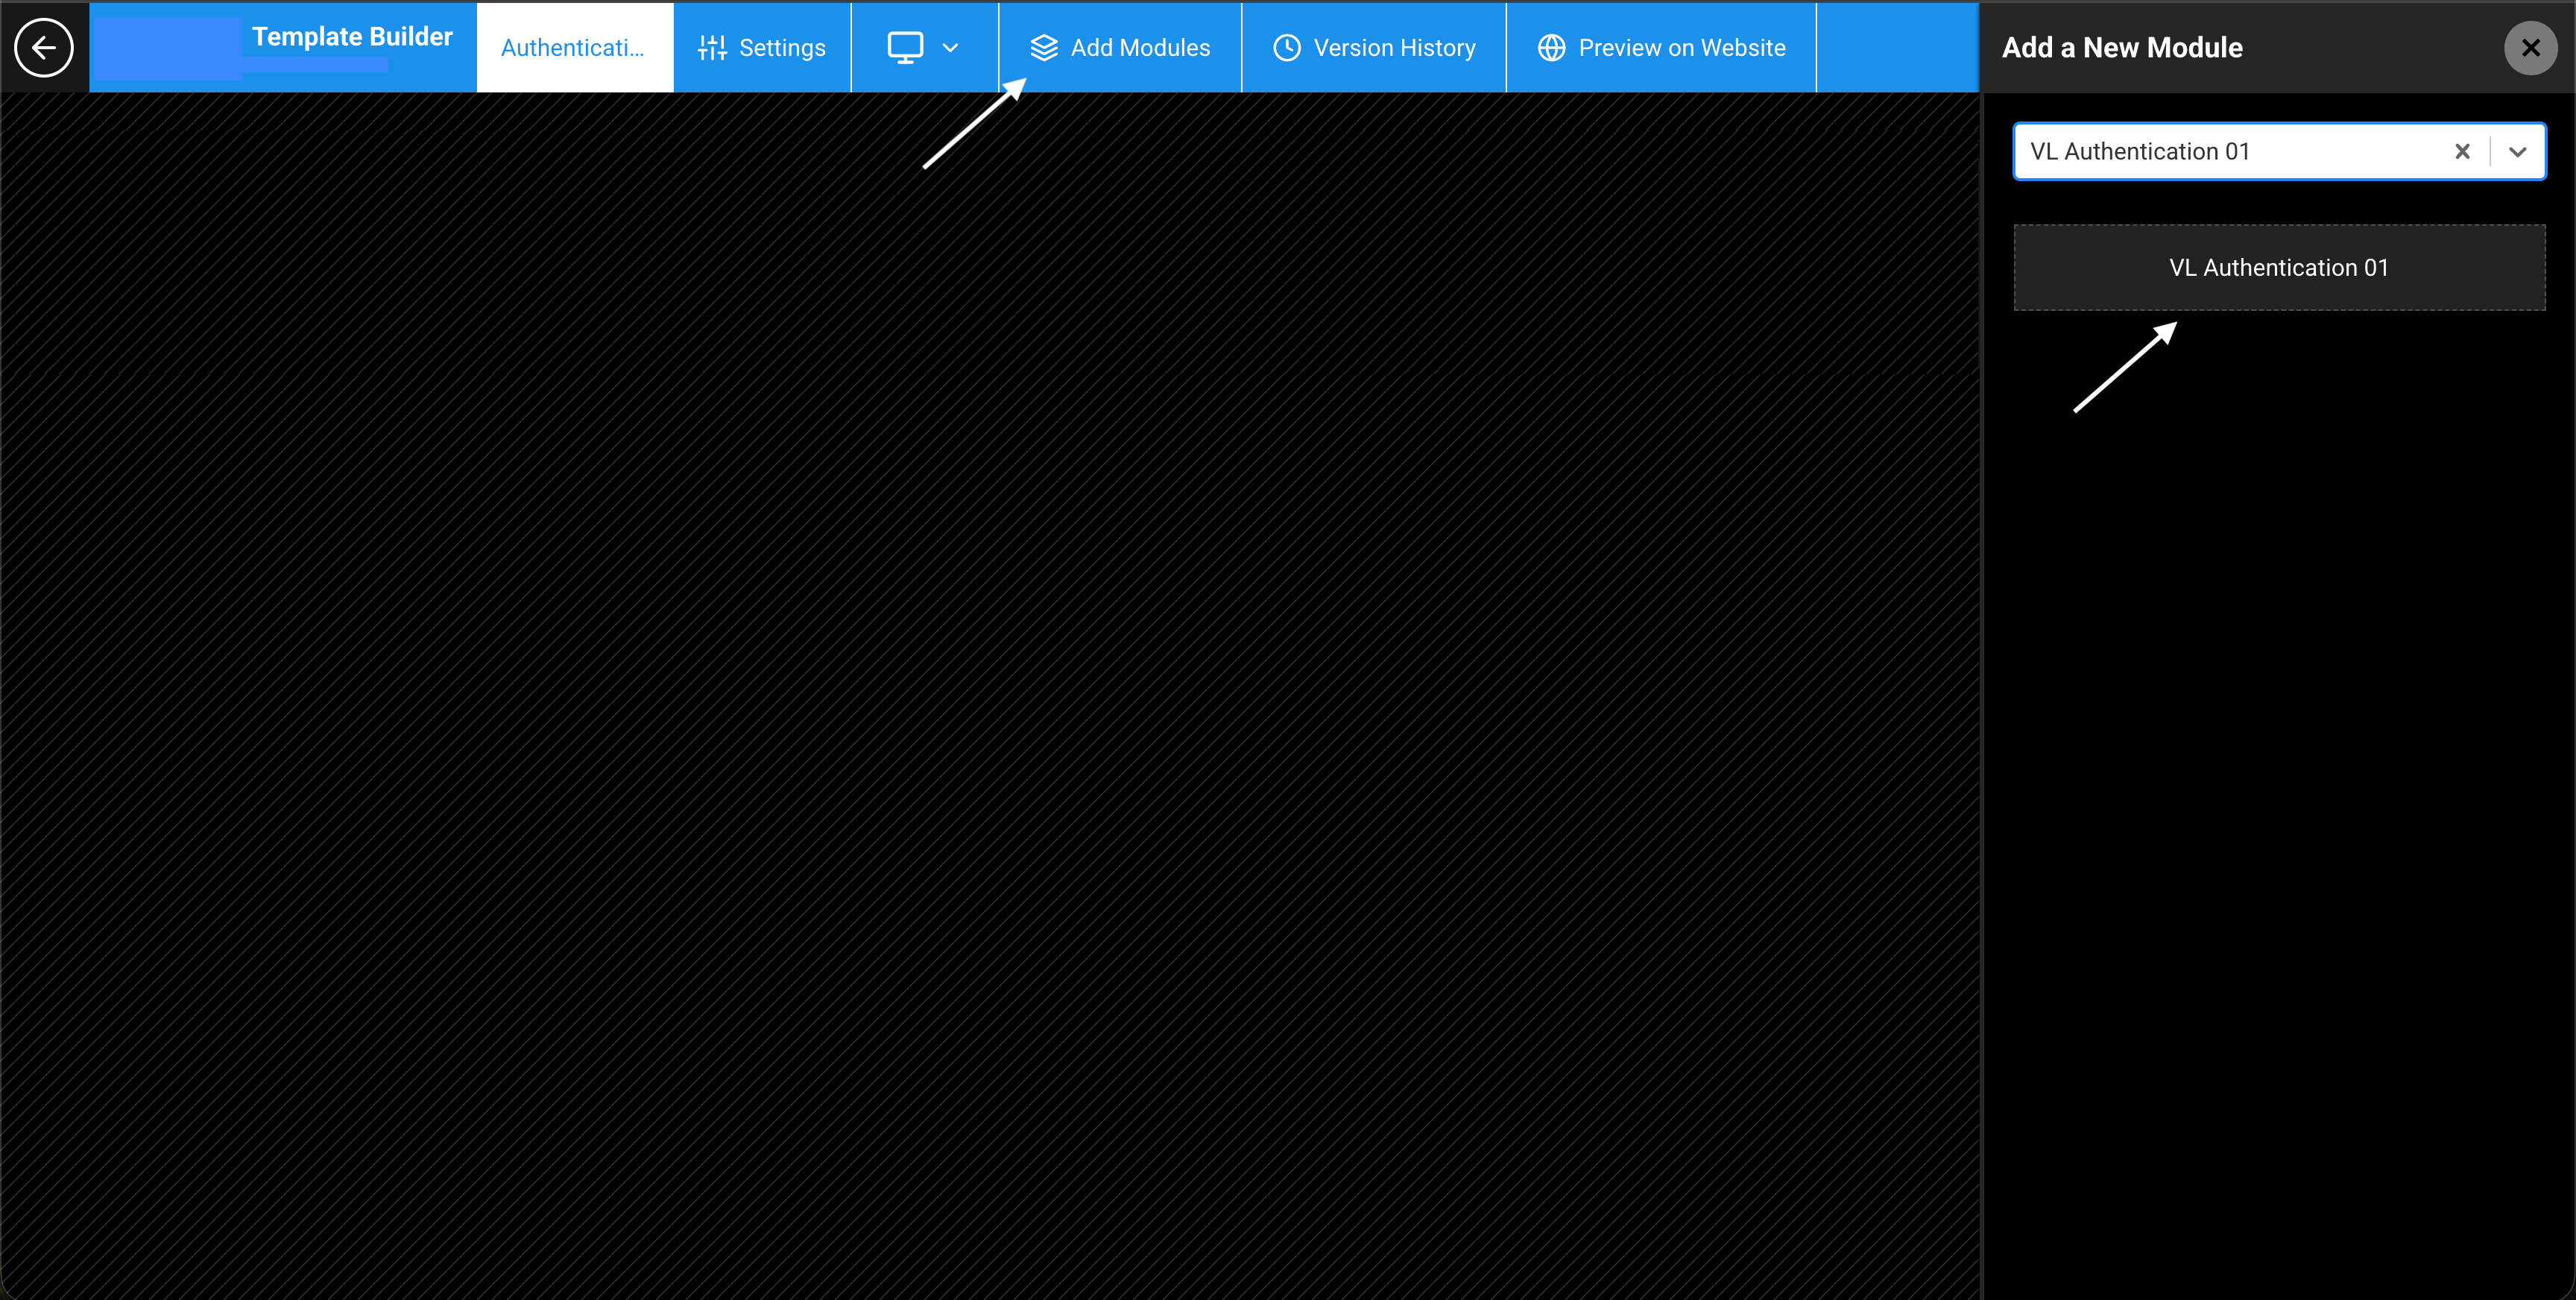
Figure 4. Edit Layout → Add a New Module. Search for and insert VL Authentication 01.
System Screens typically use a single primary system module. Avoid stacking unrelated content trays on this page unless your product design requires them.
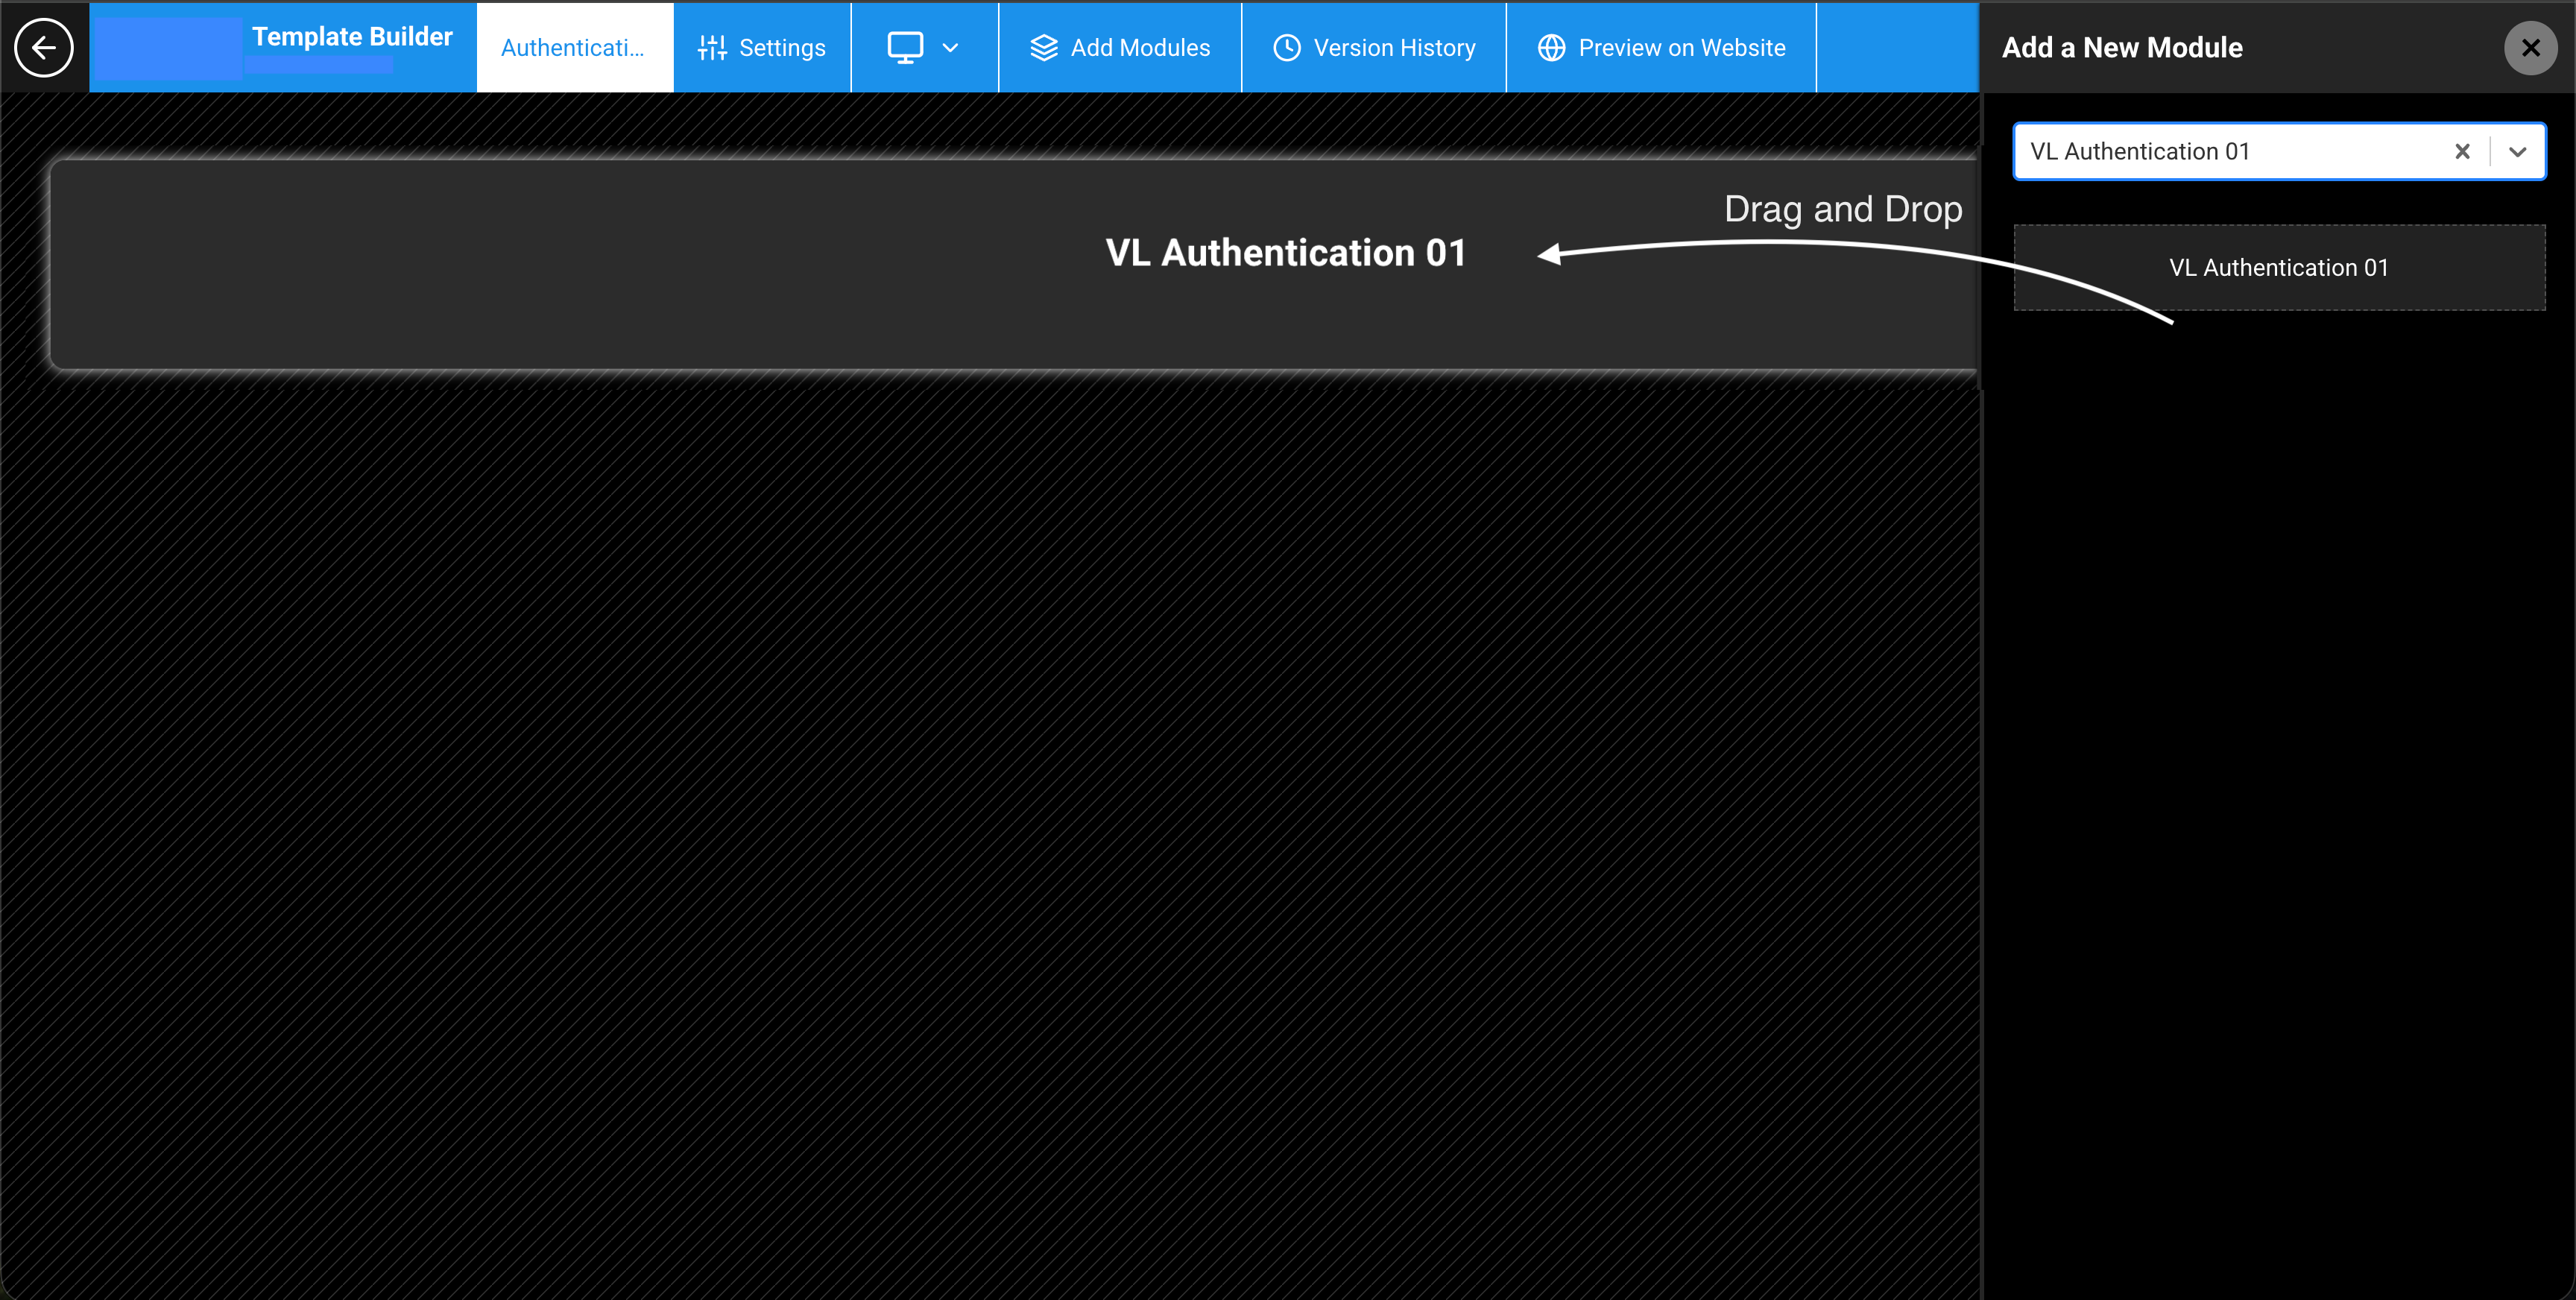
Figure 5. Authentication System Screen layout with VL Authentication 01 placed on the page.
Step 4: Configure Authentication Options
Open the VL Authentication 01 module settings. The first section is Authentication Options.
You can enable, disable, and reorder methods. Drag items within each group to change display order on supported platforms.

Figure 6. Open Module Settings
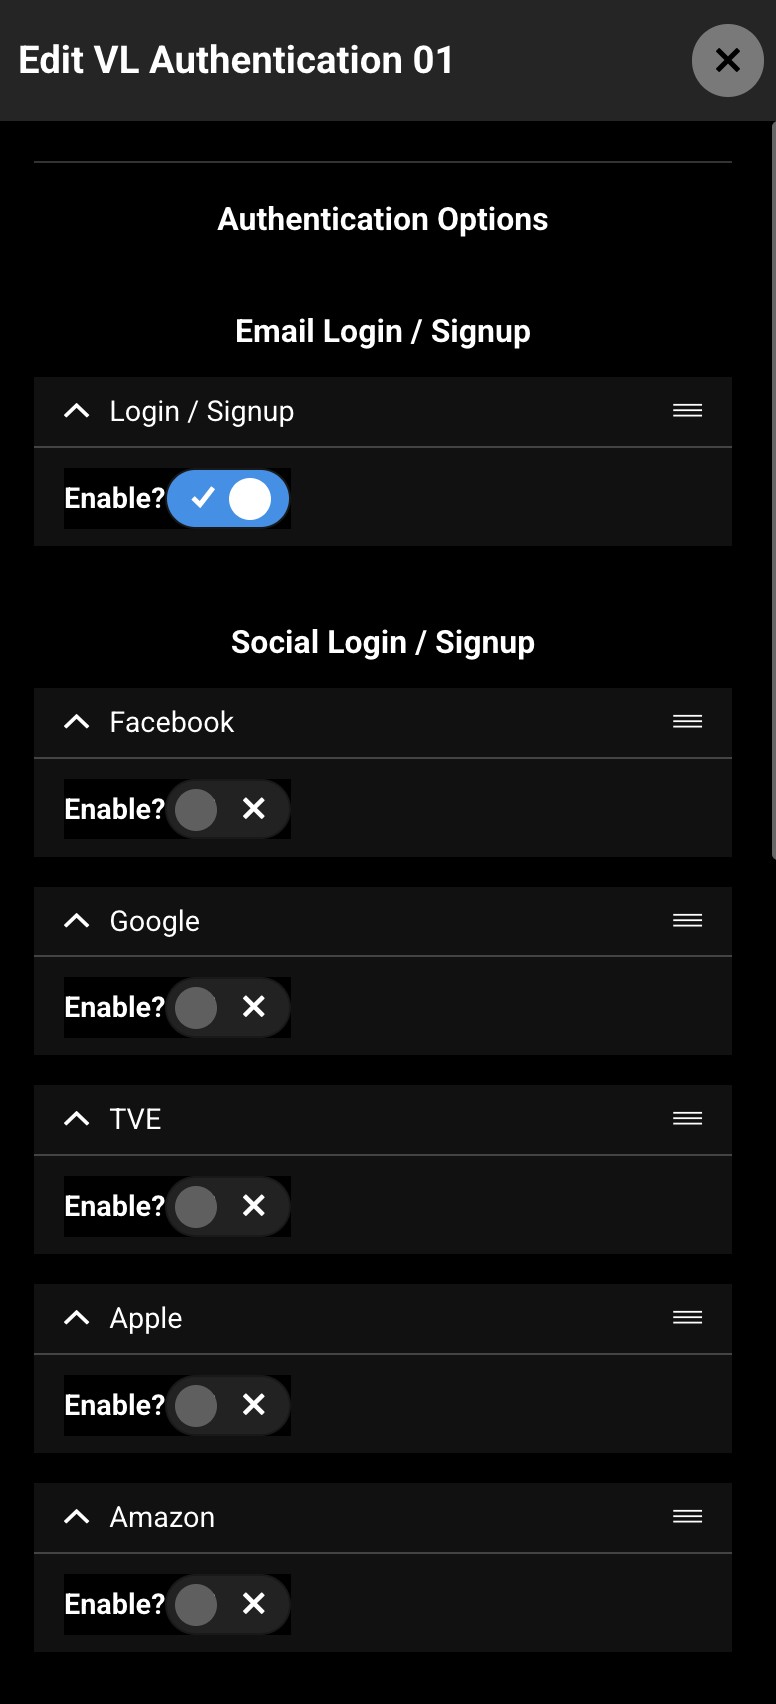
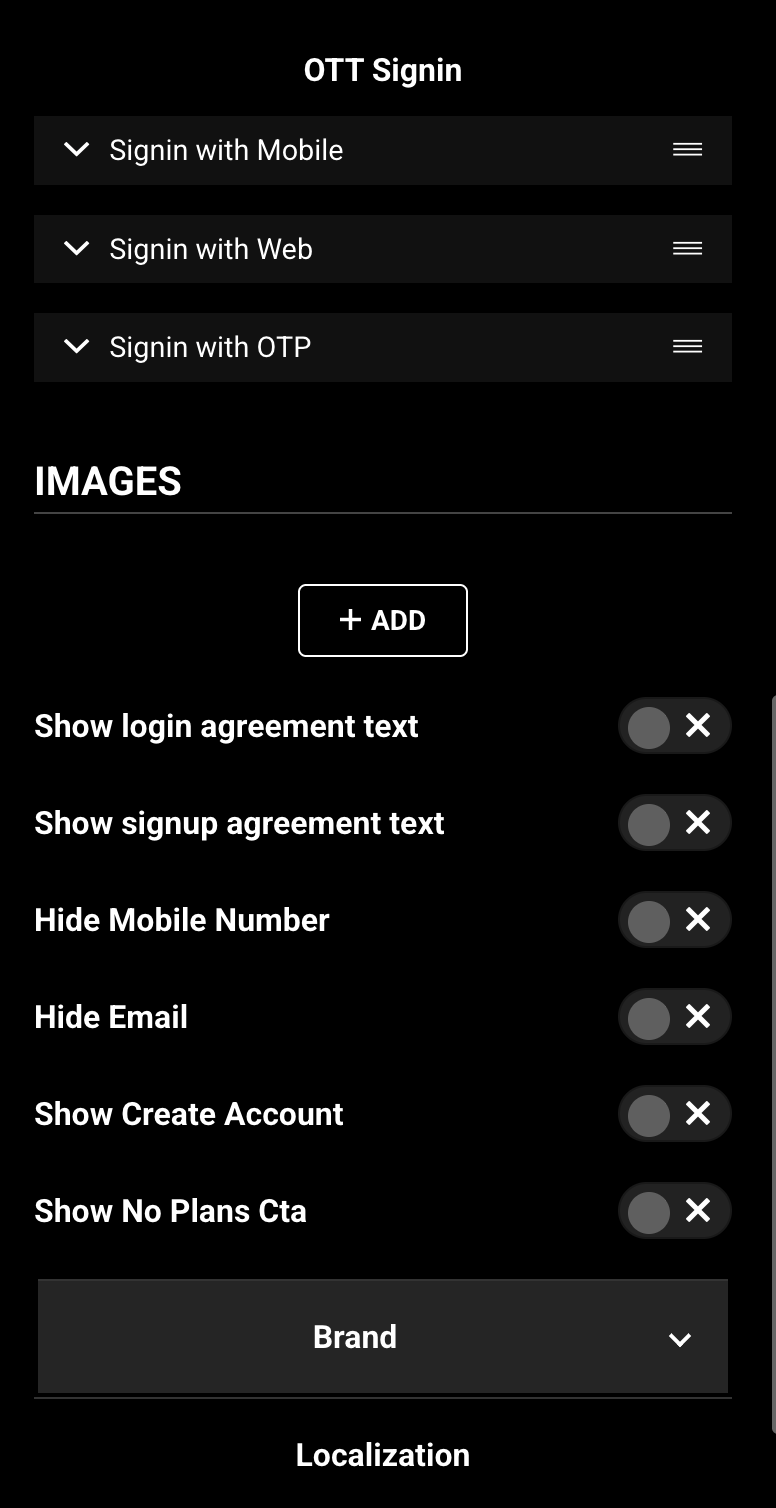
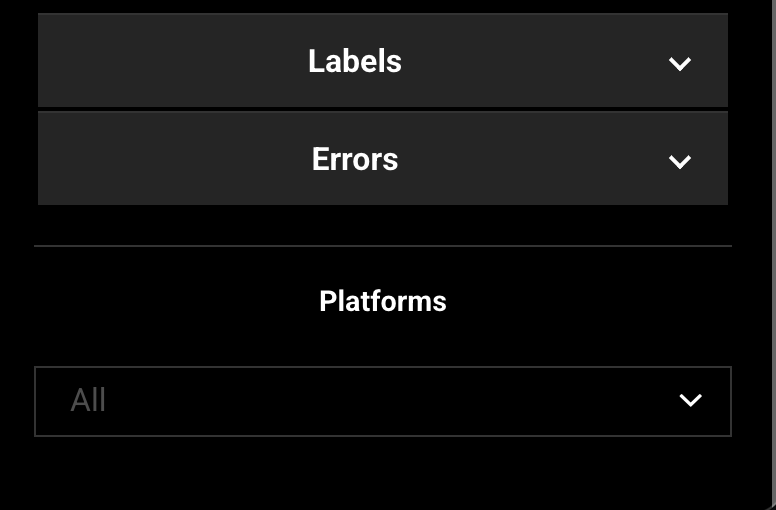
Figure 7. Module settings → Authentication Options. Enable Email Login / Signup, Social providers, and OTT Signin methods as needed. Drag to reorder.
Email Login / Signup
| Option | Description |
|---|---|
| Login / Signup | Adds the native email and phone sign-in and sign-up entry point. Customers enter an email or phone number and receive a one-time verification code (OTP). Enabled by default. |
Social Login / Signup
| Option | Description |
|---|---|
| Social sign-in option (used on supported platforms when configured). | |
| When enabled, Sign in with Google appears on the website login form. | |
| TVE | TV provider sign-in option. Also controlled from AppCMS → Service → Monetization Types where applicable. |
| Apple | When enabled, Sign in with Apple appears on the website login form. |
| Amazon | Social sign-in option (used on supported platforms when configured). |
Note — TVE
TVE sign-up / sign-in is also controlled from AppCMS → Service → Monetization Types (or the equivalent monetization settings in Tools). Use those toggles together with the module’s TVE option.
OTT Signin
| Option | Description |
|---|---|
| Signin with Mobile | Sign in from a TV or OTT device using the mobile app. |
| Signin with Web | Sign in from a TV or OTT device using a web browser and activation code. |
| Signin with OTP | OTP-based sign-in for OTT devices. |
These options primarily affect TV and OTT experiences. Enable the ones your device apps support.
Step 5: Configure Images and display toggles
Images
Under Images, add one or more image entries used on the Authentication experience (for example a side panel or hero on supported platforms).
For each image entry you can set:
| Field | Description | Example |
|---|---|---|
| Title | Image title / headline | Welcome to City Sports |
| Sub Title | Supporting headline | Live games and originals |
| Description | Longer supporting copy | Sign in to watch live matches and exclusive shows. |
| Image URL | Absolute URL of the image asset | https://cdn.example.com/auth-hero.jpg |
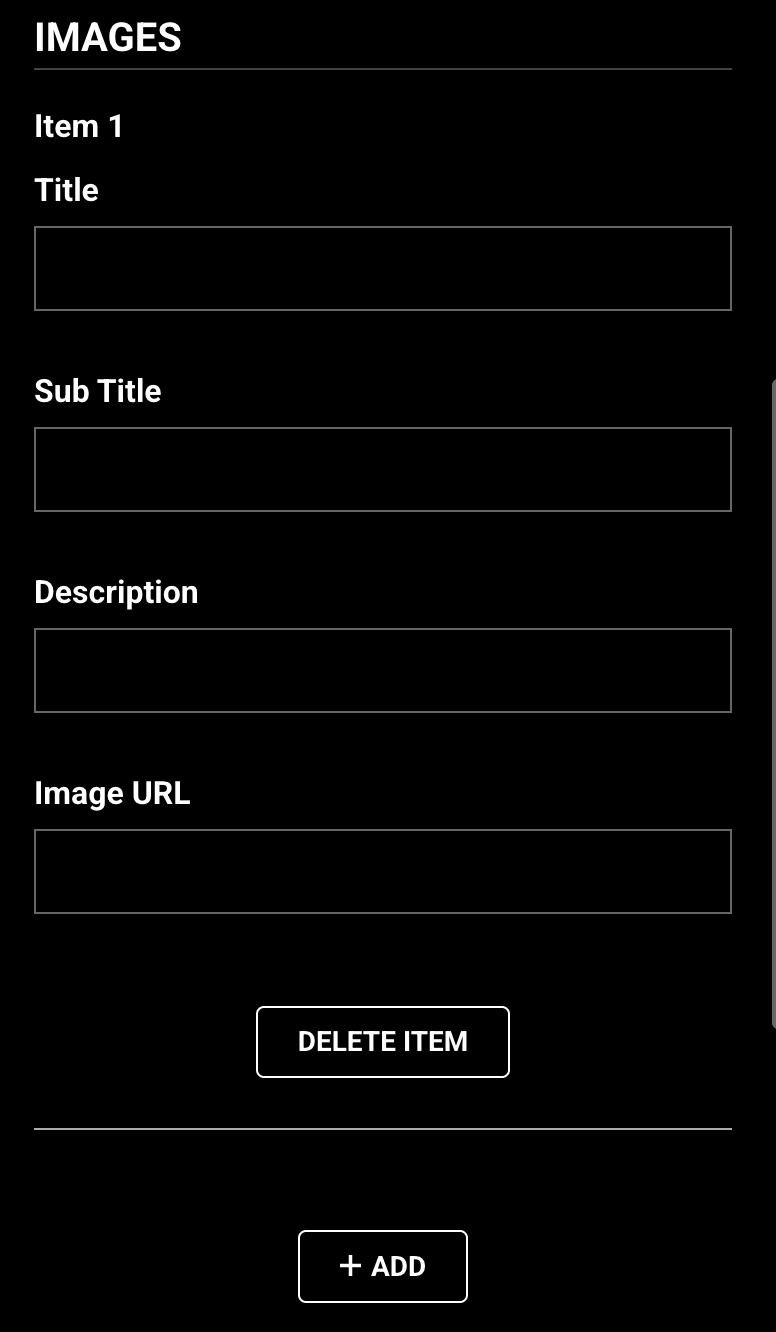
Figure 8. Module settings → Images. Add Title, Sub Title, Description, and Image URL for each Authentication visual.
Display toggles
| Setting | Description |
|---|---|
| Show login agreement text | Shows Terms / Privacy (or related) agreement text on the login path |
| Show signup agreement text | Shows agreement text on the sign-up path |
| Hide Mobile Number | Hides mobile-number entry (cannot be on if Hide Email is already on). On the website, this controls whether the phone country picker appears when the customer enters a phone number. |
| Hide Email | Hides email entry (cannot be on if Hide Mobile Number is already on) |
| Show Create Account | Controls create-account messaging where applicable on supported experiences |
| Show No Plans Cta | Controls a “no plans” style call-to-action where applicable on supported experiences |
Leave at least one of email or mobile visible. The form prevents hiding both at once.
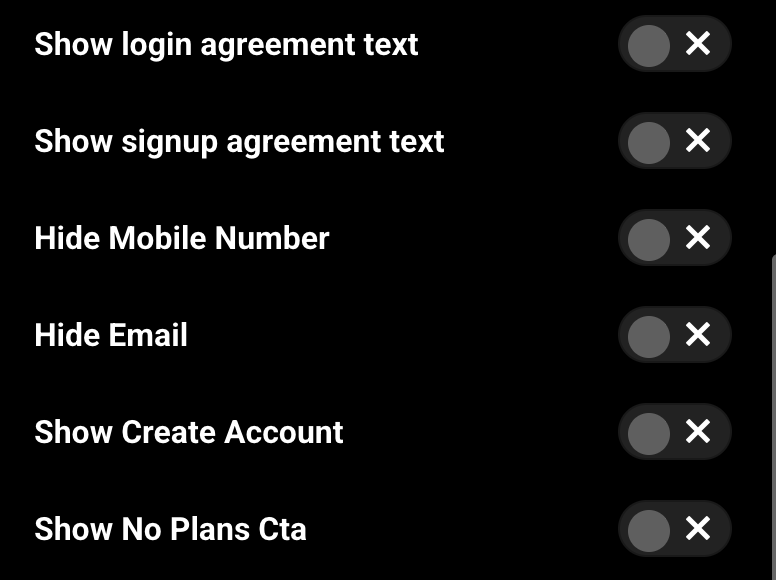
Figure 9. Agreement and input toggles. Use Show login / signup agreement text, and optionally hide email or mobile — but not both.
Step 6: Configure Brand colors
Expand Brand to set colors used by the Authentication module on the website and supported platforms.
| Setting | Description | Default (example) |
|---|---|---|
| Module Background Color | Page / module background | #0D2148 |
| Active CTA Color | Primary button / active CTA | #D2393B |
| Input Background Color | Email / phone / OTP input fields | #2B426E |
| Disabled CTA Color | Disabled button state | #FFFFFF |
| Text Color | Primary text on the module | #FFFFFF |
| Error Color | Validation and error messages | #FF0000 |
Colors can be changed with the color palette controls in Template Builder.
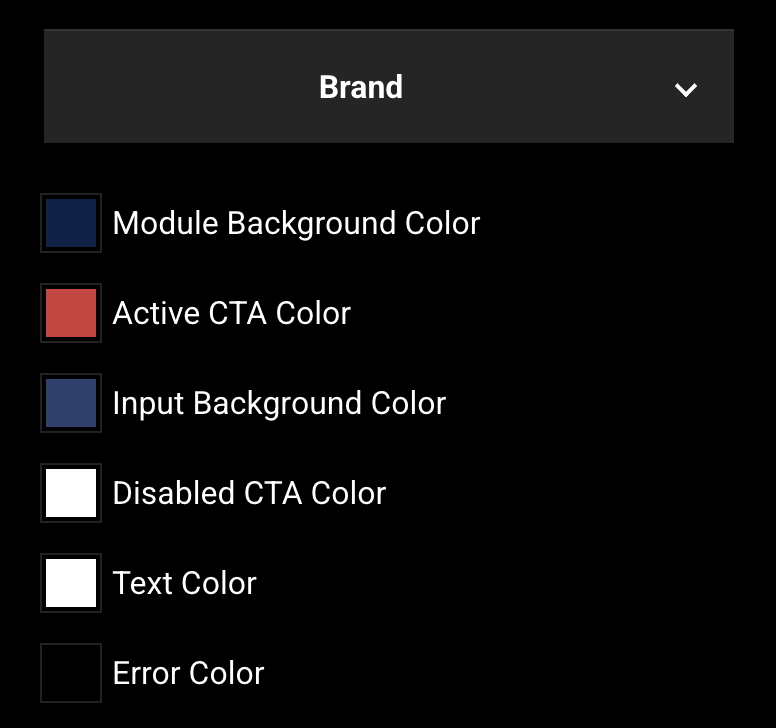
Figure 10. Module settings → Brand. Set background, CTA, input, text, and error colors to match your site brand.
Step 7: Configure Localization — Labels
Expand Localization → Labels to edit customer-facing copy. All of these strings are editable and can be localized per language when site localization is enabled.
Key labels include (not exhaustive):
| Label | What it controls | Default example |
|---|---|---|
| Create Account Title | Main heading on the sign-in page | Create an account or sign in |
| Create Account Subtitle | Instructions under the title. You can use $terms_of_service$ and $privacy_policy$ placeholders to insert linked Terms and Privacy text on the website. |
Enter phone or email to receive a verification code… |
| Email Text Field Placeholder | Input placeholder | Enter your email or phone number |
| Get Verification Code Button Title | Primary CTA before OTP | Get Verification Code |
| Verify Email / Mobile Title & Subtitle | OTP verification screens | Verify your Email Address |
| Resend Code Button Text | Resend OTP | Resend Code |
| Apple / Google Sign In Button Title | Social button labels | Sign In With Apple / Sign In With Google |
| Terms of Service Text / Permalink | Agreement link text and path | Terms of Service / /tos |
| Privacy Policy Text / Permalink | Privacy link text and path | Privacy Policy / /privacy-policy |
| OTT method titles & descriptions | Mobile App, Web Browser, Remote, Apple ID, Amazon ID | Device-specific sign-in instructions |
Edit only the strings you need for launch. Keep Terms and Privacy permalinks aligned with your published legal pages.
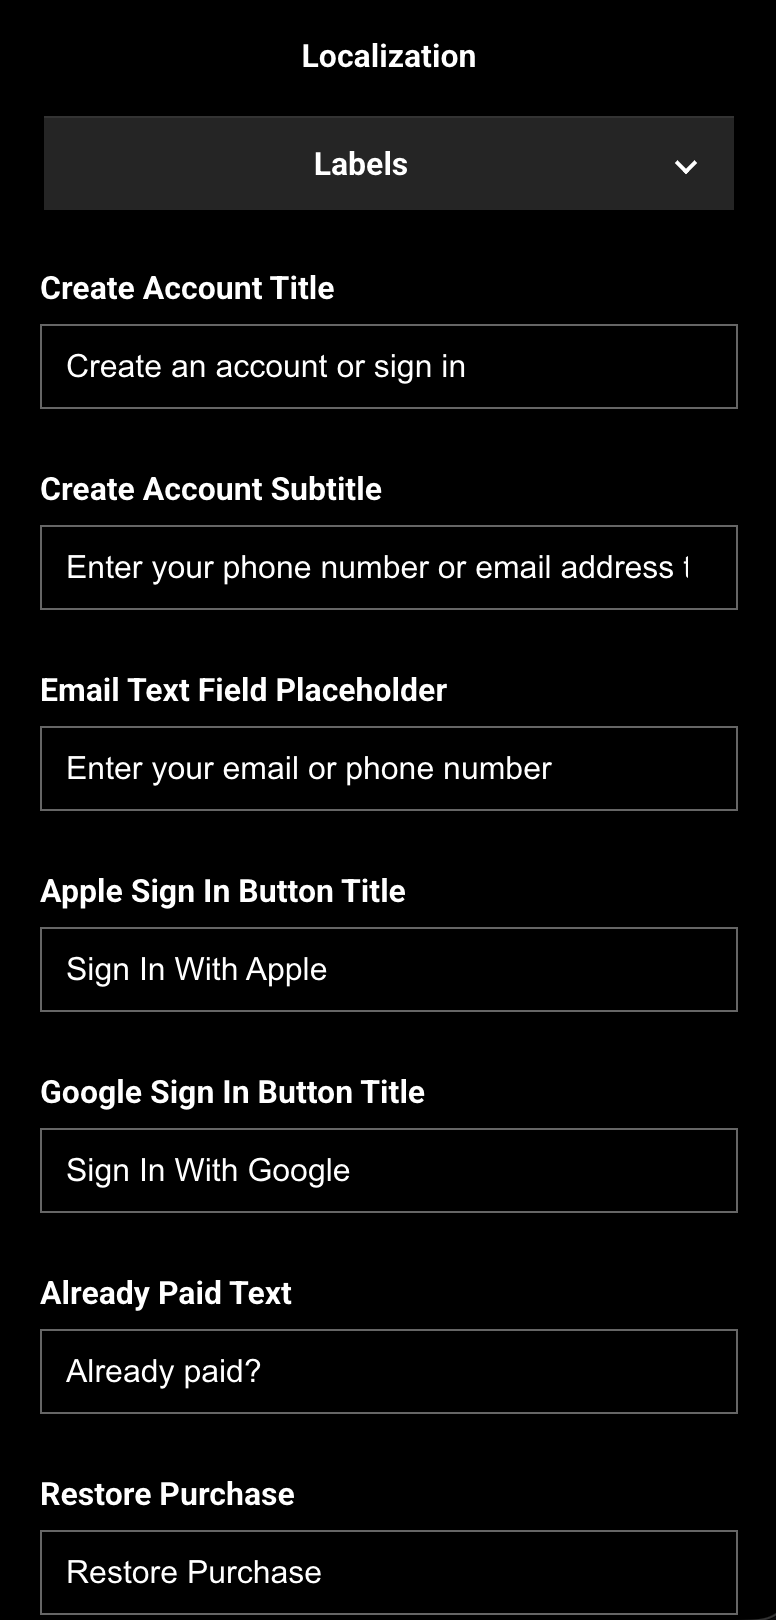
Figure 11. Localization → Labels. Edit titles, placeholders, CTAs, legal links, and OTT copy shown on Authentication screens.
Step 8: Configure Localization — Errors
Expand Localization → Errors to customize default error messages customers can see during sign-in / sign-up.
Examples of editable errors:
| Error | Typical use |
|---|---|
| Default error | Generic processing failure |
| SignIn / SignUp error (email not registered) | Unknown email |
| OTP mismatch / OTP expired / Verify OTP failed | Bad or expired verification codes |
| Email already linked / Phone already linked | Identity already associated with another account |
| Device limit exceeded | Too many concurrent devices |
| Cross country phone | Phone not allowed in the user’s region |
| Facebook / Google / Amazon errors | Social provider failures |
| Unverified email / phone | Identity not verified |
| Missing input / invalid format | Empty or invalid email, phone, or other fields |
Customize tone and language for your brand, but keep the meaning clear so support teams can diagnose issues.
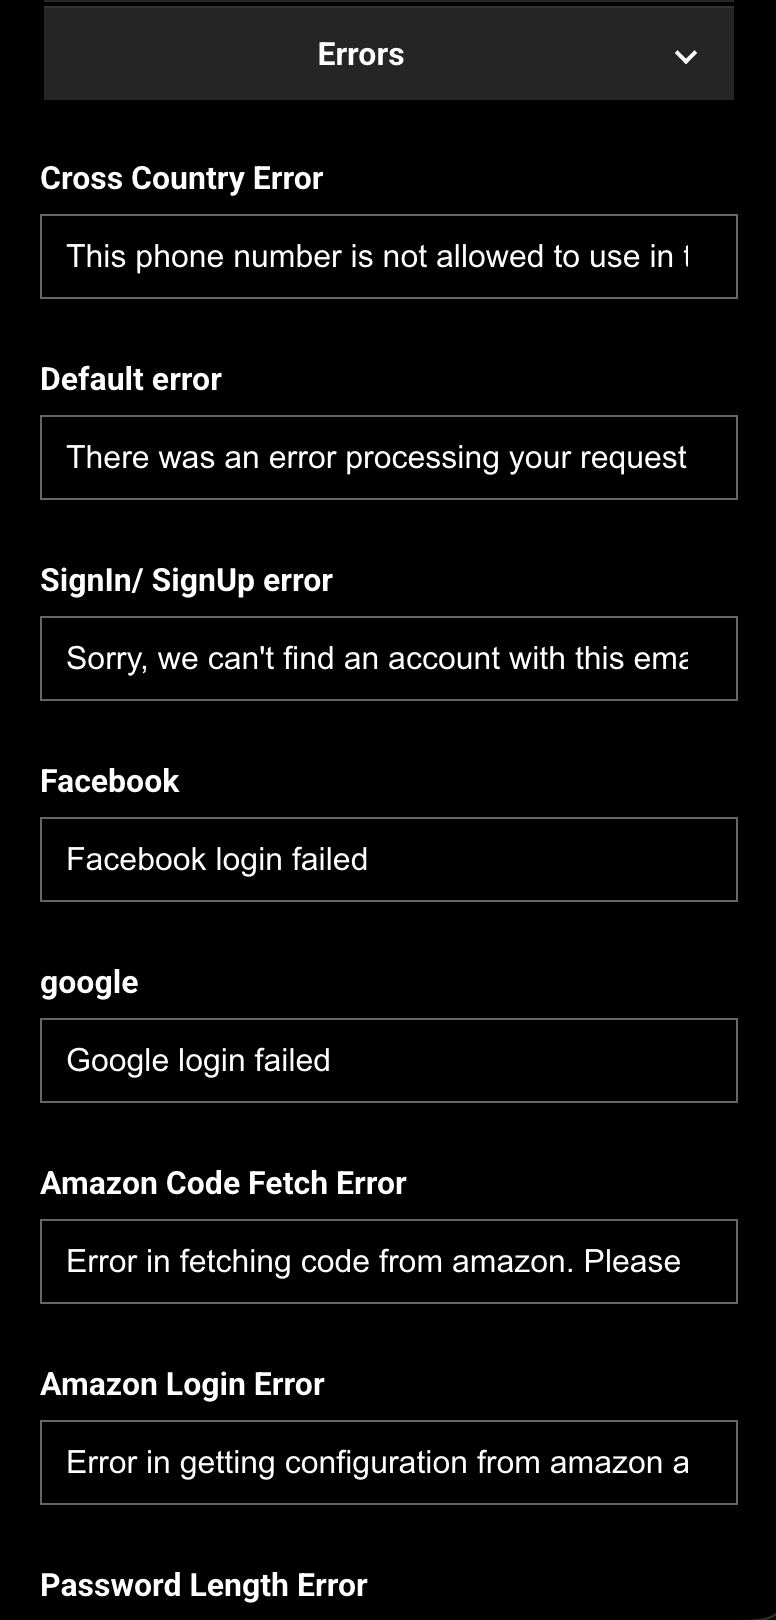
Figure 12. Localization → Errors. Edit the messages shown when OTP, email, phone, social, or device checks fail.
Step 9: Save and publish the Authentication page
- Save the module settings (apply / save in the module form).
- Review the page layout once more.
- Publish the Authentication System Screen.
Until the page is published, apps and web will not show your latest Authentication configuration.
.png)
Figure 13. Publish the Authentication page after you finish module configuration.
Changes can take several minutes to appear because of caching. To verify sooner, use a private window, another browser, or clear cookies and cache.
Step 10: How it looks on the website
After publish, open your site’s Authentication URL, for example:
https://www.example.com/authentication
Typical website layout
On the website, customers usually see:
- Heading — from Create Account Title (for example Create an account or sign in)
- Subtitle — instructions for email / phone verification, with optional linked Terms and Privacy text
- Email or phone entry — customers first select the entry control, then type their email or phone number
- Primary CTA — Get Verification Code (or your customized label)
- Social buttons — only for enabled providers (Google and Apple on the website)
- Agreement text — if login / signup agreement toggles are on
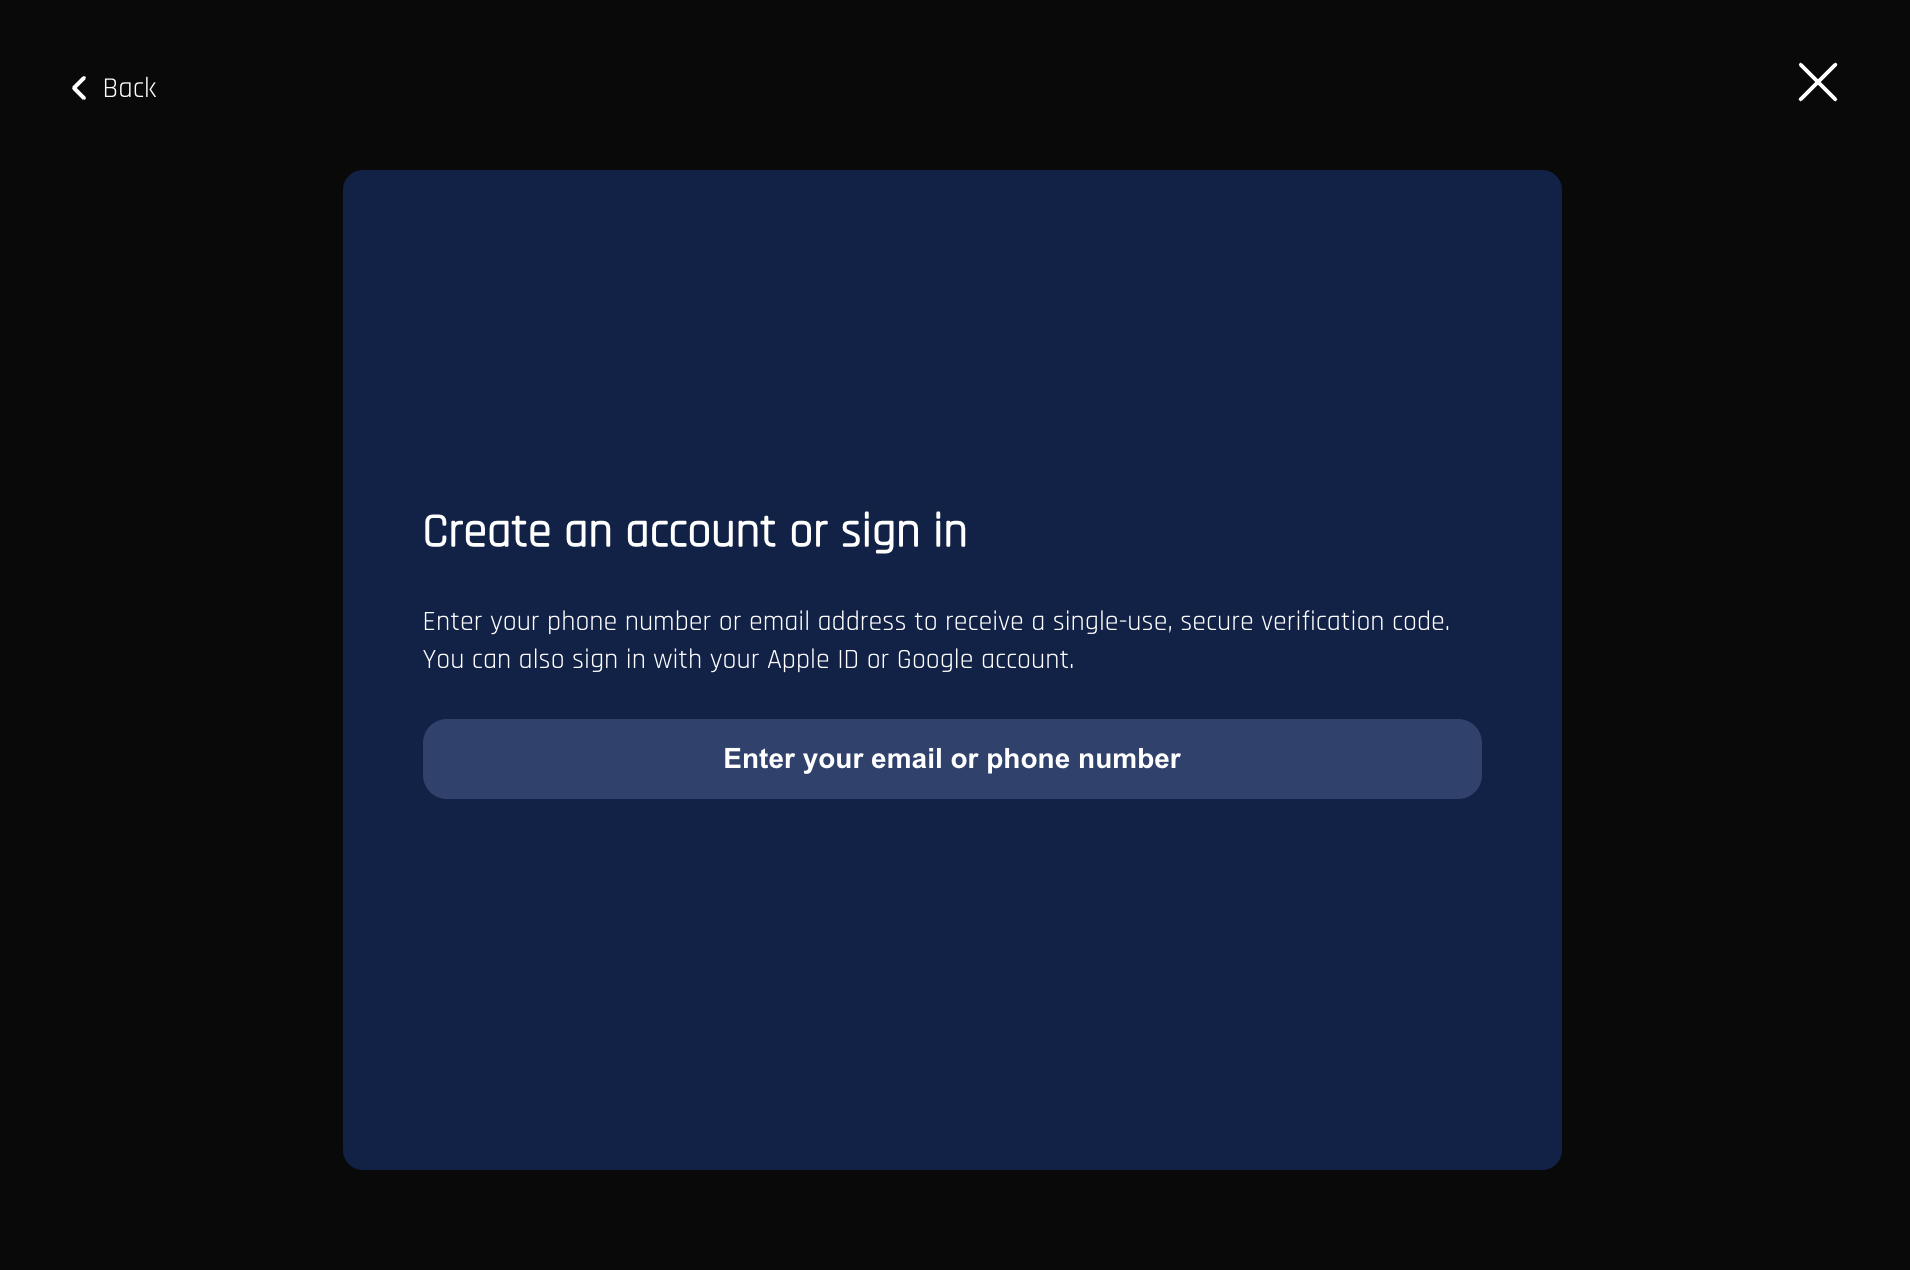
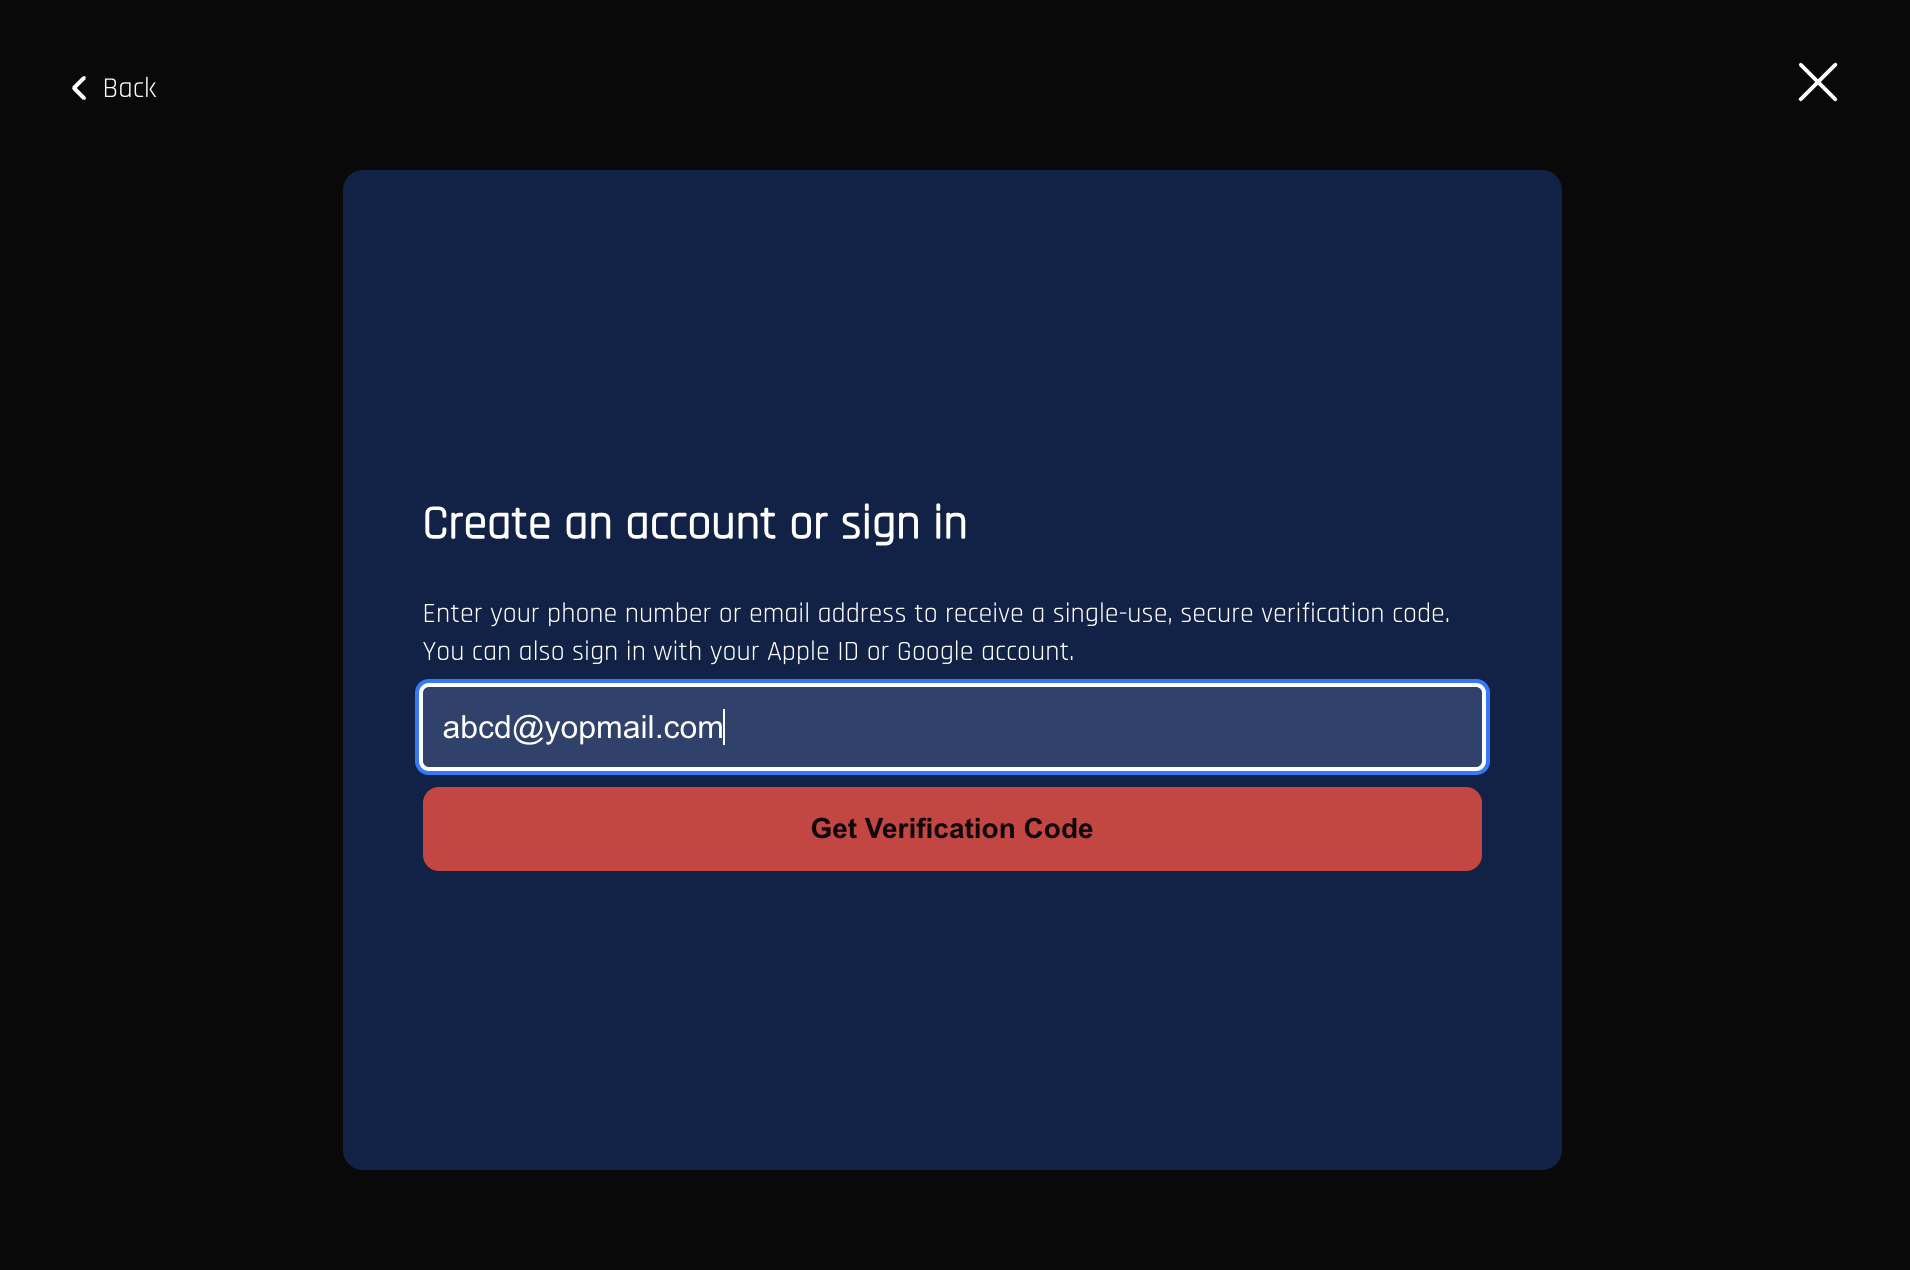
Figure 14. Website Authentication page (/authentication). Title, subtitle, email/phone field, primary CTA, and enabled social options.
OTP verification on the website
After the customer submits an email or phone number:
- The page switches to the Verify screen.
- Copy explains that a one-time code was sent.
- The customer enters the 6-digit code and selects Verify.
- They can Resend Code or choose Use a different Email / Mobile.
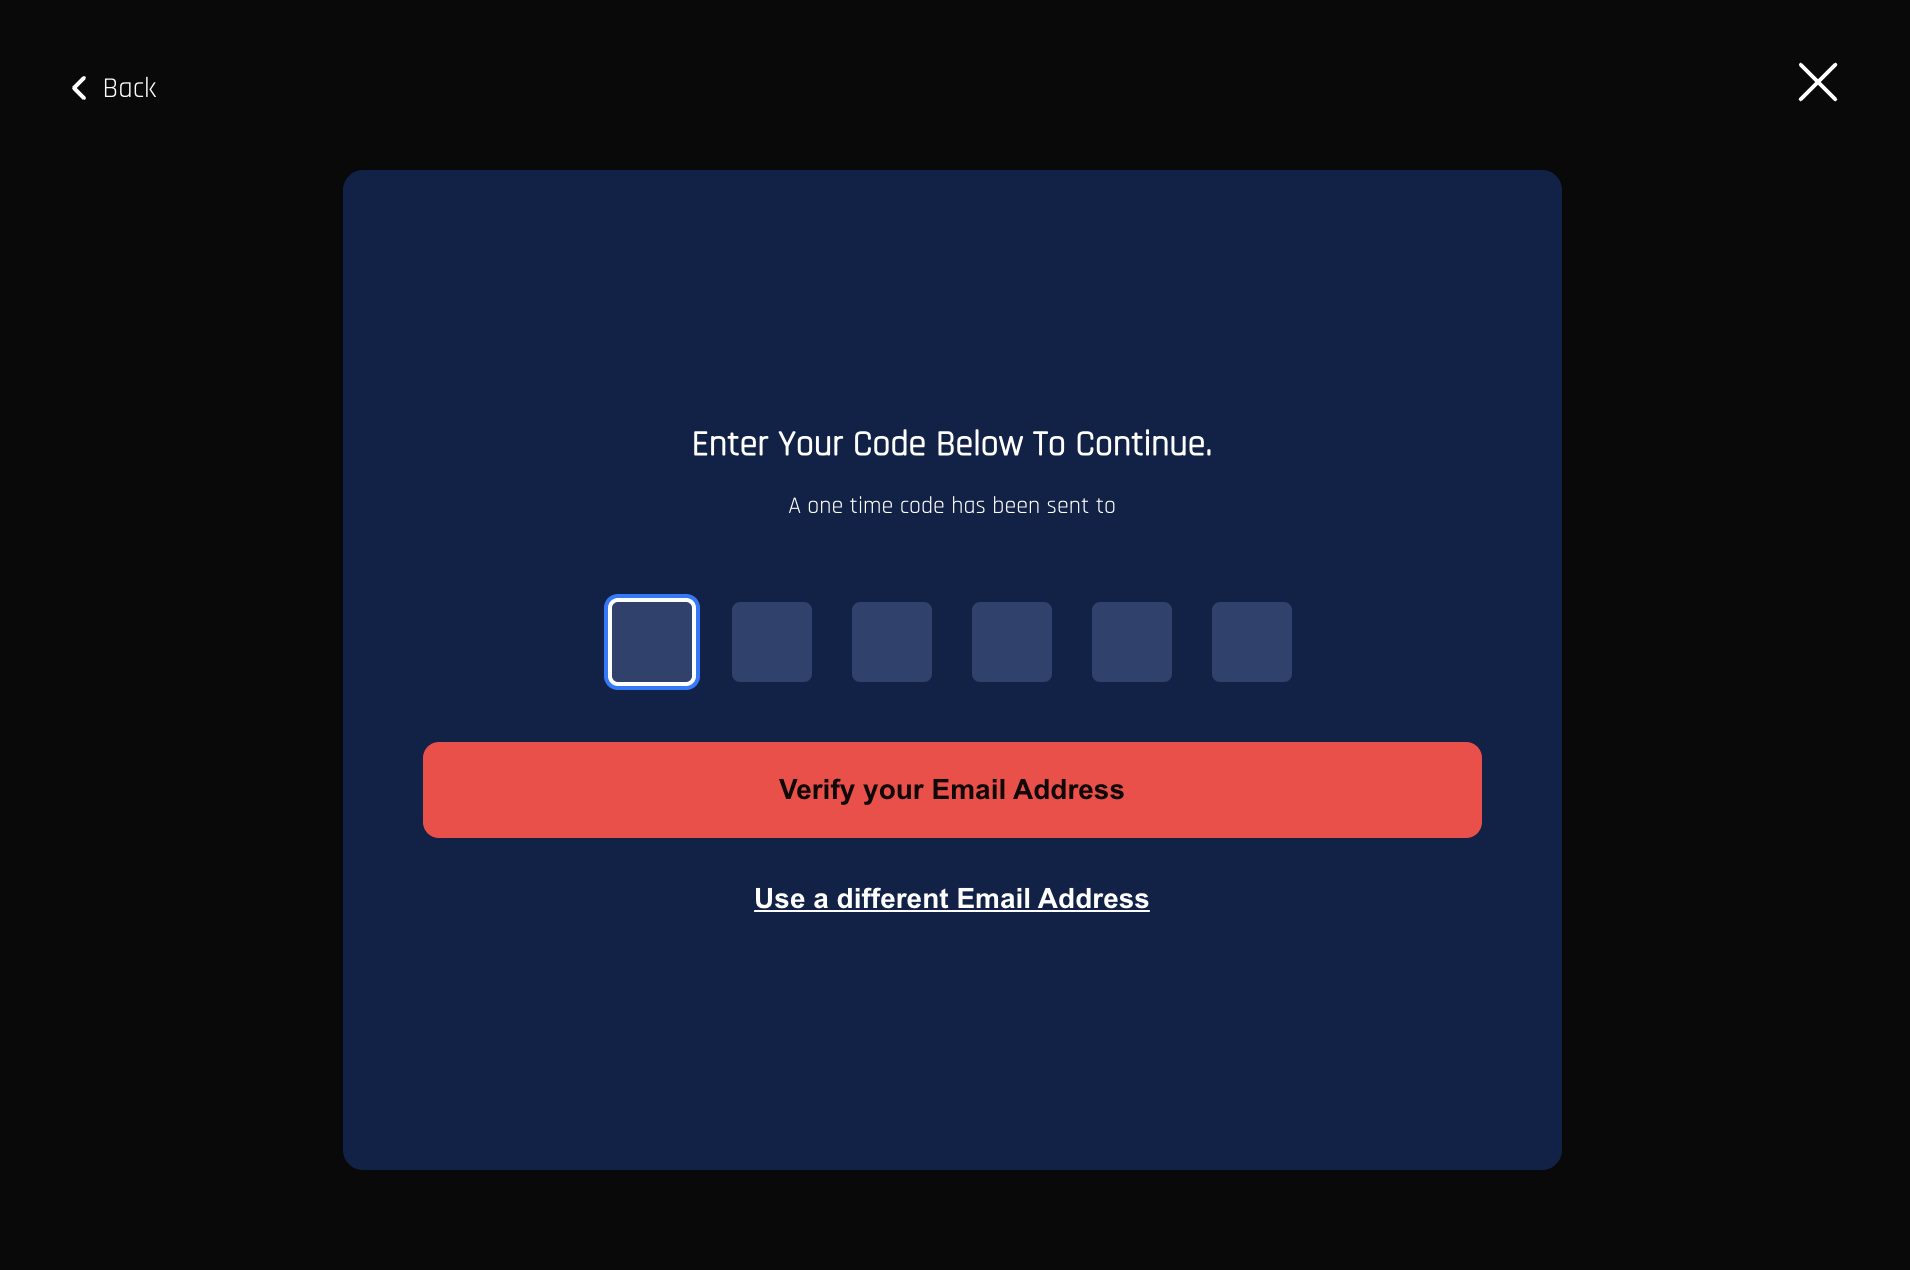
Figure 15. Website OTP verification. Enter the one-time code, verify, resend, or switch to a different email or phone.
After successful sign-in
Depending on your site setup, the customer may be sent to:
| Situation | Where the customer goes |
|---|---|
| VPPA consent is required and not yet accepted | Consent page (/consent) |
| Customer was in a device activation flow | Device activation page (/activate) |
| Customer was in a TV provider activation flow | TV provider activation page (/tveactivate) |
| Customer was in a Roku activation flow | Roku activation page (/rokuactivate) |
| Customer was redeeming a gift card | Redeem page (/redeem) |
| Profile is complete and customer is subscribed | Homepage (/) |
| Customer still needs onboarding (for example plans or profile) | Next step in your site’s onboarding flow |
If a customer who is already signed in opens the sign-in page again, they are typically taken to the homepage.
Link Sign In from the site
After you publish your Authentication page, customers need a way to reach it from the website. The Sign In link in your header, menu, or account area should open the same page path you set in Template Builder (for example /authentication).
Step 1: Confirm your Authentication page path
- Open Template Builder.
- Go to Pages and open your Authentication System Screen.
- Open Page Settings.
- Note the page path (for example
/authentication). - Confirm the page is published.
Use this exact path everywhere you link Sign In on the site.
Step 2: Update the header or main navigation
- From the Template Builder home screen, open Global Settings.
- Select Header Navigation (or Other Navigation if Sign In lives in a footer or secondary menu).
- Find the menu item used for Sign In (for example Sign In, Log In, or Account).
- Set Linked To to your Authentication page path only — for example
/authentication.
Do not add language codes or extra parameters to the URL unless your site specifically requires them. - Set Caption to the label customers should see (for example
Sign In). - Save and publish your navigation changes.
Step 3: Check the masthead (if your site uses one)
If your site header is built with VL Masthead or another header module:
- Open the page that contains the masthead (often Home or a global layout page).
- Open the masthead module settings.
- Find any Sign In / Log In / Account link settings.
- Point those links to the same Authentication path (for example
/authentication). - Save and publish the page.
Step 4: Verify on the live website
- Open your website in a private browser window (so you are not already signed in).
- Click Sign In from the header or account menu.
- Confirm you land on your Authentication page (for example
https://www.yoursite.com/authentication). - If the link goes somewhere else, go back to Step 2 or Step 3 and update the path.
Step 5: Check login prompts on protected content (if applicable)
If customers are asked to sign in when they try to watch content or open a subscriber-only page:
- Confirm those prompts also send customers to your published Authentication path.
- If they open a different page or show an error, work with your site admin or support team to align those redirects with
/authentication(or your chosen path).
Tip: Use one Authentication page path across the whole site. When header navigation, masthead links, and login prompts all use the same path, customers always see the sign-in experience you configured in Template Builder.
Verification checklist
- Authentication page exists as a System Screen
- Page path is
/authentication(or the path your apps expect) - VL Authentication 01 is on the layout
- Email / phone and required social options are enabled
- TVE is enabled in both the module and AppCMS monetization settings (if used)
- Brand colors and Images are set
- Labels and Errors are reviewed for launch language(s)
- Terms of Service and Privacy Policy permalinks resolve
- Page is published
- Website
/authenticationshows the expected UI - OTP (and social, if enabled) completes and redirects correctly
Troubleshooting
| Problem | What to check |
|---|---|
| VL Authentication 01 is not in the module list | Confirm the page type is System Screen (Developers Only page type). |
| Page was created but path is wrong | Open Page Settings and set path to /authentication. |
| Social button does nothing / shows config missing | Enable the provider in Authentication Options and complete site-level provider setup. |
| TVE option is on but TVE does not appear or fails | Enable TVE under AppCMS → Service → Monetization Types (or equivalent), then republish. |
| Cannot hide both email and mobile | Expected. Leave at least one identity input visible. |
| Labels do not change on the site | Save module settings, publish the page, and allow cache to clear. For localization, edit labels in the correct language. |
| Customer lands on consent after login | VPPA compliance is required for the site. Complete consent, or review compliance settings with your admin. |
| Customer goes to activate or redeem unexpectedly | They may have started from a device activation or gift-card flow before signing in. |
| OTP never arrives | Verify email/SMS delivery is configured for the environment; confirm the customer entered a valid address or number. |
Best Practices
- Use one Authentication System Screen at a stable path (
/authentication). - Enable only login methods you support end-to-end (credentials, apps, and support process).
- Match brand colors to the rest of the site so the auth wall feels intentional, not like a separate product.
- Keep legal links current — Terms and Privacy permalinks should point to published pages.
- Localize Labels and Errors when the site has multiple live languages.
- Test web and at least one OTT path before launch if OTT Signin options are enabled.
- Publish after every meaningful change — draft System Screens do not update production apps.
FAQs
Q. What page type should I use for VL Authentication 01?
System Screen (set under New Page Type * Developers Only when creating the page).
Q. What is the recommended page path?
/authentication.
Q. How do customers sign in on the website?
With email or phone using a one-time verification code (OTP). Google and Apple are also available when you enable them in Authentication Options.
Q. How do I turn on Google or Apple sign-in?
Enable the provider under Authentication Options → Social Login / Signup, ensure provider credentials are configured for the site, then publish.
Q. Where do I turn TVE on?
In the module’s Social options and in AppCMS service monetization / TVE settings.
Q. Can I change the order of social buttons?
Yes. Drag items within Authentication Options to reorder.
Q. Will changes appear immediately on the website?
Often within several minutes. Use a private window if you need to verify sooner.
Q. How is this different from VL Authentication 02?
They are separate modules with different layouts and website experiences. This article covers VL Authentication 01 only.
Important Information
- VL Authentication 01 must be placed on a System Screen page.
- Create the page as a System Screen, add the module, configure options, then publish.
- TVE depends on both module settings and AppCMS monetization configuration.
- Do not hide both email and mobile inputs.
- Labels and Errors under Localization drive most of the customer-facing copy on web, mobile, and OTT.
- After sign-in, customers may be routed to consent, activation, redeem, onboarding, or home depending on site setup.
Glossary
| Term | Definition |
|---|---|
| System Screen | Template Builder page type used for sign-in, checkout, search, and other system flows. |
| VL Authentication 01 | The Template Builder module documented in this article. |
| OTP | One-time password / verification code sent to email or phone. |
| Social Login | Sign-in via Google, Apple, Facebook, or Amazon (website shows Google and Apple when enabled). |
| TVE | TV Everywhere — authenticate with a TV provider. |
| OTT Signin | Device-oriented sign-in methods (mobile app, web browser activation, OTP on TV). |
| VPPA / consent | Privacy compliance step that can send customers to a consent page after sign-in. |
Contact Support
If you need help beyond this article, contact the ViewLift support team.
- Email: techsupport@viewlift.com
- Phone (US): +1-800-859-0420
- Phone (UK): +44-203-014-8921
Support hours: B2C requests are handled Monday to Friday. B2B support is available 24/7.