ViewLift Livestream Services
- 01 Apr 2024
- 14 Minutes to read
- Contributors


- Print
- DarkLight
- PDF
ViewLift Livestream Services
- Updated on 01 Apr 2024
- 14 Minutes to read
- Contributors
- Print
- DarkLight
- PDF
Article summary
Did you find this summary helpful?
Thank you for your feedback
ViewLift's Livestream Management
ViewLift has live encoders and distribution services where our CMS will do the heavy lifting of the live streaming process from receiving a live feed from the source (via supported protocols like RTMP/Zixi) + encoding + packaging + CDN + delivery to all your device platforms.
Supported Input Types for Encoding and Distribution & Specifications
Currently, we support the following types of input formats for events:
RTP
MediaConnect (Entitled Source)
HLS Pull
Use-case: You want to re-encode the output of another livestream or place a Content-Delivery-Network (CDN) on top of an existing Livestream.
Usage: You will provide an HTTP/HTTPS HLS live stream for the encoder to pull (GET) from. The encoder will attempt to pull the highest rendition possible for re-encoding and re-package the stream in an HLS output on a CloudFront CDN for delivery.
Input Specifications
The provided input HLS URL must be accessible at all times, so if there is a security token that expires eventually that will invalidate the stream, then this is not a case we can cover.
Video Codec: H.264 (AVC) | Audio Codec: AAC |
Note: The audio and video must be multiplexed into a single stream.
RTMP Push
Use-case: You have an encoder and need to push your single-bitrate RTMP feed to an endpoint.
Usage: You will push your RTMP feed to the primary and/or backup RTMP endpoints provided after creating your channel.
Note: If the primary feed fails, the backup feed will automatically transmit the data.
(Recommended) Input Specifications
Video
| Audio
|
RTMP Pull
Use-case: There is an RTMP source that you need to pull from and you want to re-encode it
Usage: You will provide an RTMP source for the encoder to pull (GET) from.
Input Specification: The provided input RTMP source must be available when starting the channel as we’ll connect to the upstream system and pull from it. If you provide two RTMP pull endpoints, make sure the two pulls are identical in the video resolution and bitrate.
(Recommended) Input Specifications
Video Codec: H.264 (AVC) | Audio Codec: AAC |
Note: The audio and video must be multiplexed into a single stream.
SRT (Listener / Caller)
In SRT, the two roles are listener and caller. The listener is the endpoint that waits for incoming connections. The caller is the endpoint that initiates a connection to the listener.
Here is an example of how to use SRT for a live event:
ViewLift as the SRT provider, will provide you with the SRT IP address and port number to push the stream.
Example:
IP Address: 44.178.95.32
Port: 5000Once you receive the IP and Port, you can create a live event object in Tools and share the details of the Video object URL for testing.
ViewLift will start the SRT listener and wait for incoming connections, set up the encoder. We will configure your SRT encoder to connect to the SRT listener: srt://44.178.95.32:5000.
We will start the encoder and then start your live event.
Note: There is no additional cost involved in using SRT.
RTP-FEC Push
Use-case: You have an encoder and need to push your single-bitrate RTP feed to an endpoint.
Usage: You will push your RTP feed to the primary and/or backup RTP endpoints provided after creating your channel.
(Recommended) Input Specifications:
Video
| Audio
|
ZiXi Push
Use-case: You have an encoder and need to push your single-bitrate broadcast to an endpoint.
Usage: You will push your broadcast to the primary and/or backup ZiXi endpoints provided after creating your channel.
(Recommended) Input Specifications:
Video
| Audio
|
IVS Push
A low-latency stream that will have RTMP as the input specification.
Use-case: You have an encoder and need to push your single-bitrate RTMP feed to an endpoint at the lowest latency possible.
Usage: You will push your RTMP feed to the primary and/or backup RTMP endpoints provided after creating your channel.
(Recommended) Input Specifications:
There are two types of channels for IVS Push, Standard and Basic; each with their input limitations.
Standard Quality 1920x1080 | Video
| Audio
|
Basic Quality | Video
| Audio
|
HLS Output Specifications
Currently, we only support HLS outputs on both HLS_PULL and RTMP_PUSH inputs. The output ladder is the same for both input groups.
Encoder Output Ladder:
Video
| Audio
|
Video
| Audio
|
Video
| Audio
|
Video
| Audio
|
Video
| Audio
|
Creating a Livestream Object
Livestreaming is an additional service, therefore the "Add New Live Event" button is initially deactivated. If you want to enable the service, please inform your project manager.
To create a Livestream object, from the Content module, click VIDEO > LIVE sub-tab > ADD LIVE > ViewLift LIVE Stream Services.
a. Select the region closest to your venue.
b. Select the protocol – either HLS_PULL or RTMP_PUSH.
Creating an HLS Pull Channel
If you’ve selected HLS_PULL as the protocol, enter the primary HLS URL. The secondary source URL is optional. The username and password of either are optional.
Reminder: The entered HLS URL/s must be accessible at all times otherwise the encoder cannot pull from the entered URL/s.
Select Archive (Live to VOD Conversion) if you want to archive the feed and convert it into a VOD object after the event. Reference the Advanced Features section.
Click CREATE to create the live stream channel in your desired region.

Creating an RTMP Push Channel
Set the Input Protocol to RTMP.
The stream key will be based on the prefix/suffix you provide here. The prefix will be part of the final RTMP URL and the suffix parts will be your stream keys. You will find your stream address and key information once the channel is successfully created when you check the live object.
It will be in the form of rtmp://IP_ADDRESS:PORT/PREFIX/SUFFIX, it can be broken into:
- The IP Address and Port will be created and assigned during creation and the prefix will be used as part of the address: rtmp://IP_ADDRESS:PORT/PREFIX will be the stream address.
- The suffix will be the stream key.
Please always keep the prefix/suffix (stream key and URL) alphanumeric and refrain from using any special characters, and if you need to delimit, use underscores.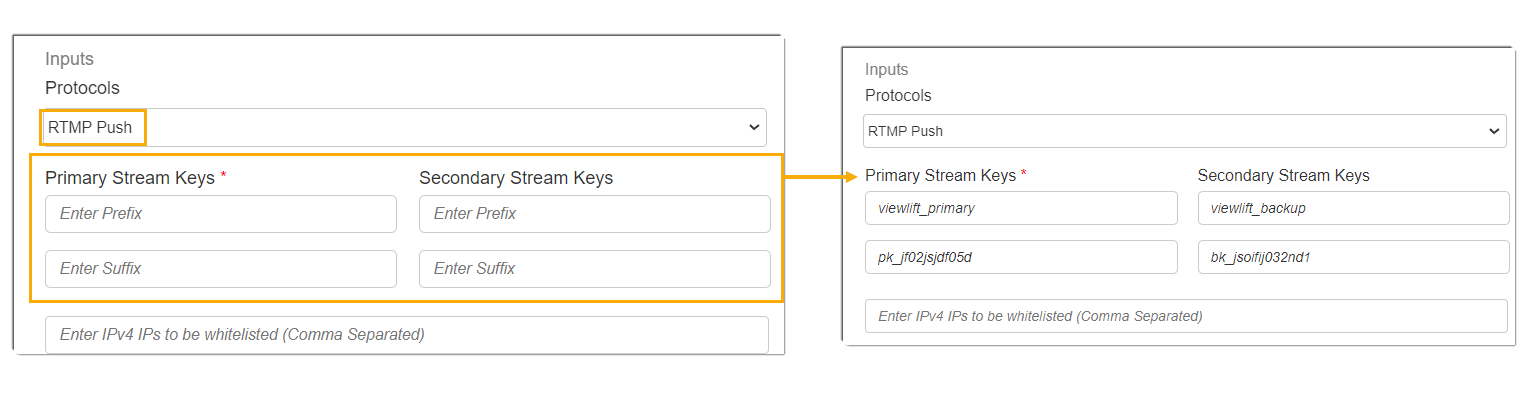
In the example screenshot above, it will create two endpoints using the stream ID (prefix) and stream key (suffix) you’ve provided:
Primary: rtmp://123.4.5.789:1935/viewlift_primary/pk_jf02jsjdf05d
Backup: rtmp://987.5.4.321:1935/viewlift_backup/bk_jsoifij032nd1

The IPv4 IPs to be whitelisted is an optional field.
a. Leaving it blank will allow anyone to push to the encoder. Defaults to 0.0.0.0/0
b. Entering an IP will lock the encoder to only accept input from a specific IP range depending on your CIDR block.
i. Always enter your public IP address.
ii. The IP(s) entered must be in the IPv4 CIDR format. Learn more: here and here.
Click Create to create the channel in your specified region.
Previewing Live Stream
Once you start the encoder and successfully send in the RTMP stream, you can preview it under Renditions and Mezz where the HLS URL is also located. If DRM, the output will be HLS and DASH (.mpd).
Creating an RTMP Pull Channel
Enter the primary HLS URL. The secondary source URL is optional. If your HLS stream has a username and password you can enter those fields, otherwise leave them blank.
a. Reminder: The entered HLS URL(s) must be accessible at all times otherwise the encoder cannot pull from the entered URL(s).
b. SSAI is not available for RTMP Pull protocol.
c. Archive (Live object to VOD conversion) is possible with this protocol, see more details under the heading Enabling Archive in Enabling Features.
Click Create to create the channel in your specified region.
Creating an RTP-FEC Push Channel
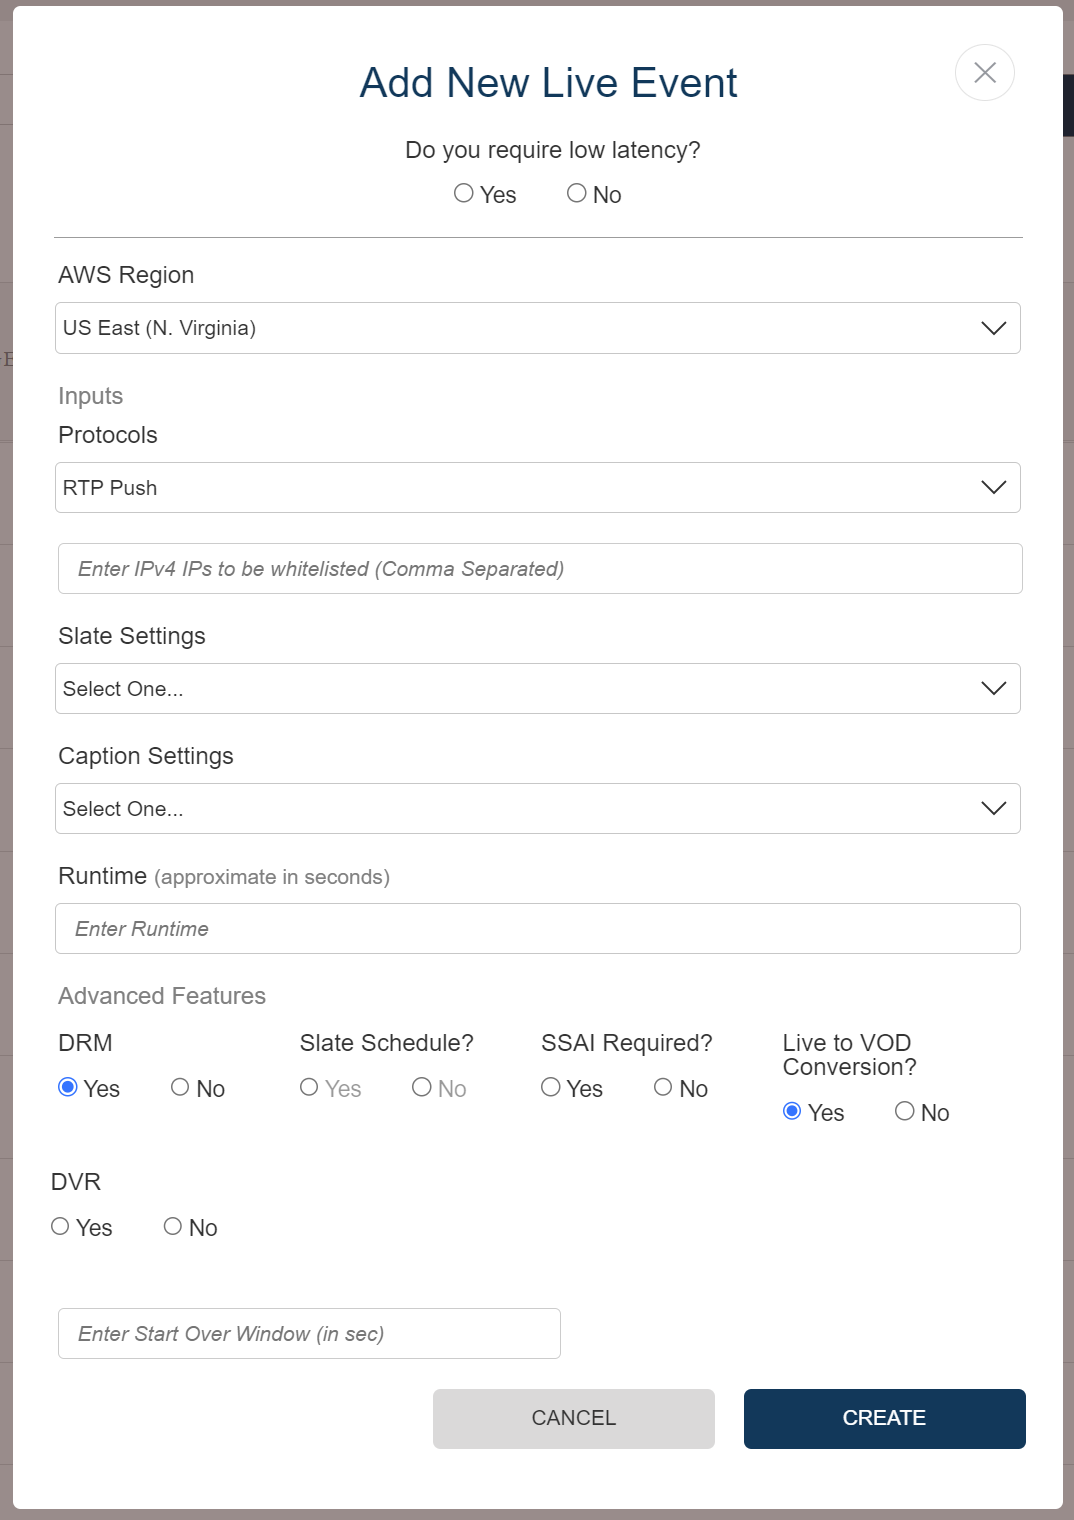
The IPv4 IPs to be whitelisted is an optional field.
a. Leaving it blank will allow anyone to push to the encoder. Defaults to 0.0.0.0/0
b. Entering an IP will lock the encoder to only accept input from a specific IP range depending on your CIDR block.
i. Always enter your public IP address.
ii. The IP(s) entered must be in the IPv4 CIDR format. Learn more: here and here.
The following additional features are available
a. SSAI is possible with this protocol, see more details in Enabling SSAI in Enabling Additional Features
b. Archive (Live to VOD Conversion) is possible with this protocol, for enabling archive and the other features, reference the Advanced Features section.Click Create to initiate the creation of the channel in your specified region.
Creating a Zixi Push Channel
Select ZIXI Push as the input protocol. The following fields will appear:
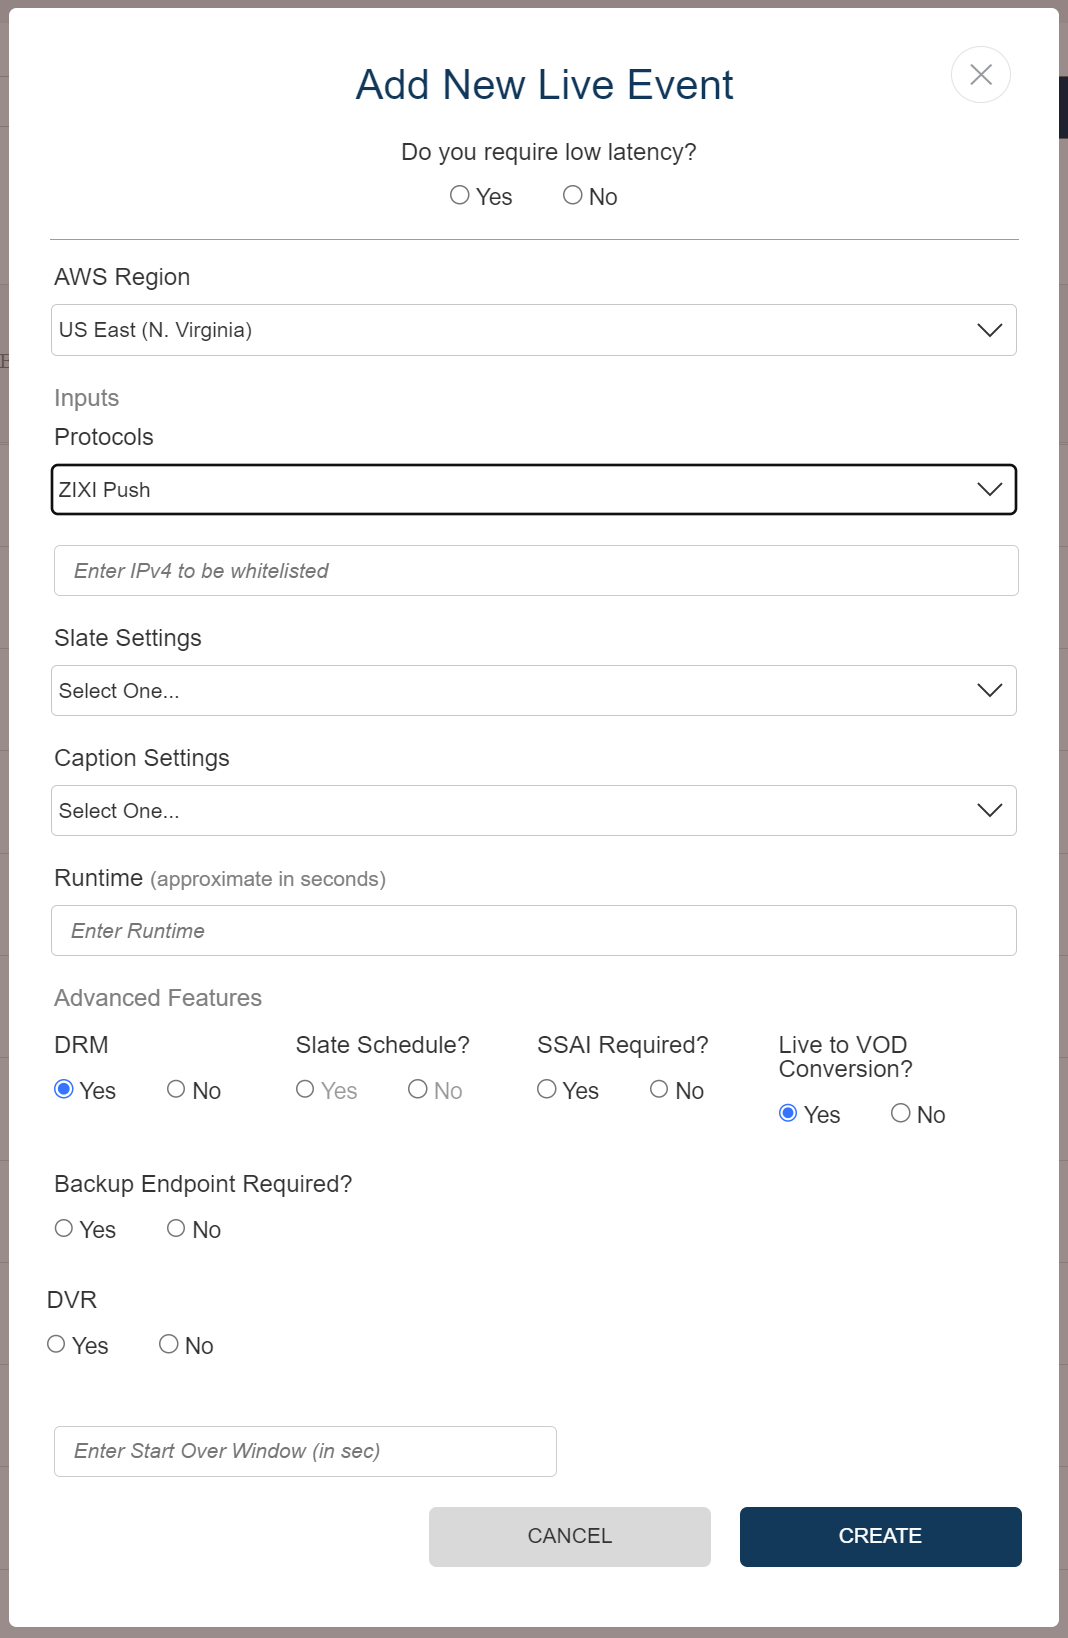
The IPv4 IPs to be whitelisted is an optional fields.
a. You can only enter one (1) IP CIDR block to the whitelist.
b. Leaving it blank will allow anyone to push to the encoder. Defaults to 0.0.0.0/0
c. Entering an IP will lock the encoder to only accept input from a specific IP range depending on your CIDR block.
i. Always enter your public IP address.
ii. The IP(s) entered must be in the IPv4 CIDR format. Learn more: here and here.
The following additional features are available
a. SSAI is possible with this protocol, see more details under the headings in Enabling SSAI in **Enabling Additional Features **
b. Archive (Live to VOD Conversion) is possible with this protocol, for enabling archive and the other features, reference the Advanced Features section.
4. Click Create to create the channel in your specified region.
Creating an IVS Push Channel
After clicking Yes to the above question at the top of the form, the form will switch to this view:
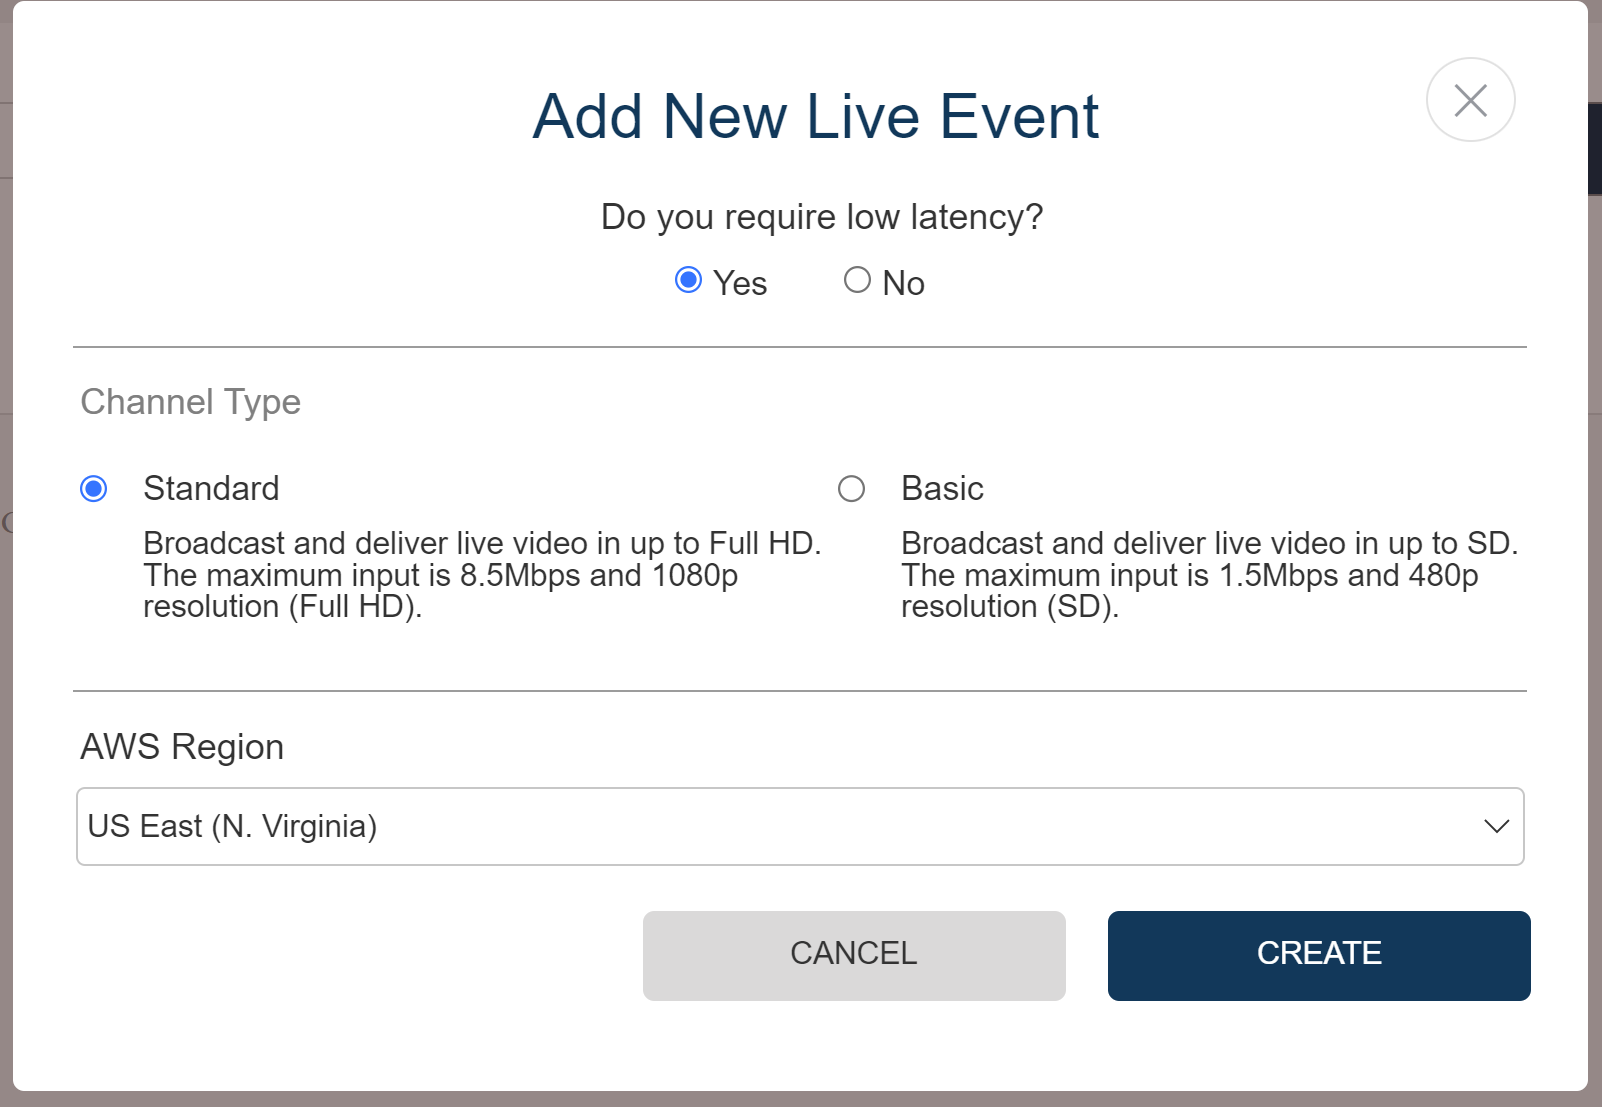
Choose either Standard or Basic channel:
a. Standard Channel: Broadcast and deliver live video in up to Full HD. The maximum input is 8.5Mbps and 1080p resolution (Full HD). This delivers near-instantaneous (10-30 seconds) streaming with consistent, minimal delay, but comes at a premium cost.
b. Basic Channel: Broadcast and deliver live video up to SD. The maximum input is 1.5Mbps and 480p resolution (SD).Click the region, currently, we only support three (3) regions: US East, US West, Europe (Ireland)
Advanced Features like SSAI, Archiving, DVR, and DRM are not available for this service.
Click Create to create this low-latency channel in your specified region.
Pushing an RTMP Stream via Software Encoder
In this example, we will be using OBS (open source solution) which you can download here: https://obsproject.com
Enabling Advanced Features
Live DRM
Enabling Live DRM requires a DRM implementation in place. This setup involves obtaining certificates from Apple (Fairplay), Google (Widevine - for Android), and Microsoft (PlayReady - for Windows). To learn more about DRM and its functionalities, please refer to our Digital Rights Management (DRM) article.
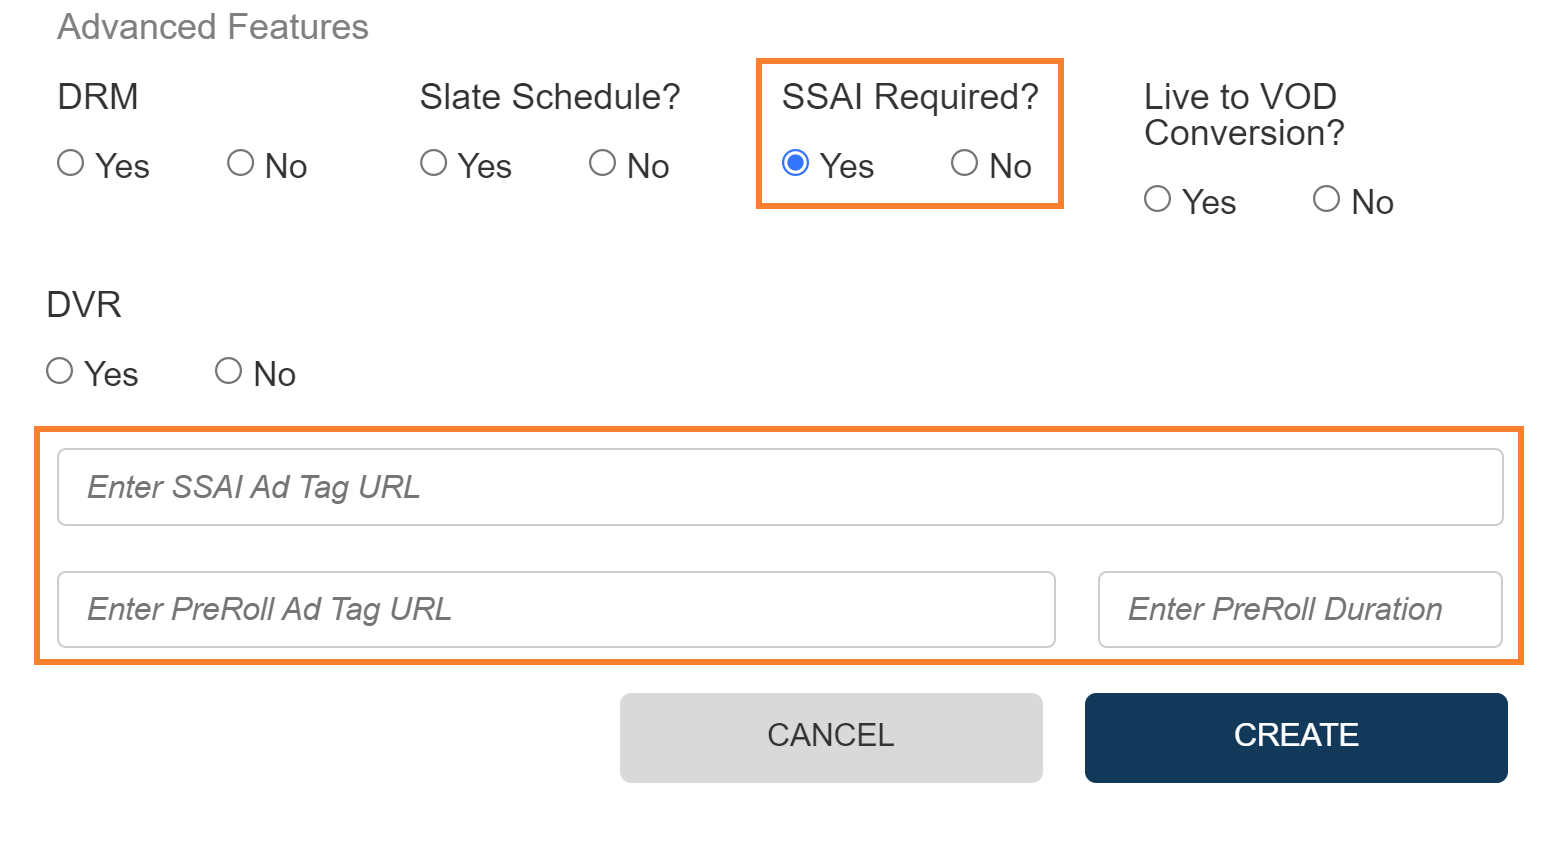
Enabling SSAI
SSAI Ad Tag URL is essential for running ads during the stream. SSAI is available with the following protocols:
RTP Push
ZiXi Push
Enter SCTE35Type and blanking Url with SRT_LISTENER.
NOTE:
If you choose "yes" for SSAI Required, you must enter the PreRoll Duration.
Enabling DVR
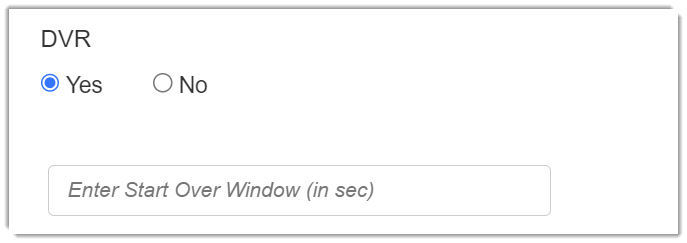
When DVR is enabled, users can watch the live stream from the current moment and have the option to rewind and go back in time.
To enable DVR, click Yes at the time of creating a live channel object. The DVR option should be enabled at the time of creating a live event as you cannot set the start-over time after creating the channel. In the Enter Start Over Window (in sec) field, provide the start-over time in seconds to go back to a time in the media. For example, 800s, 1000s, and so on. You can rewind to a maximum of two hours (7200s).
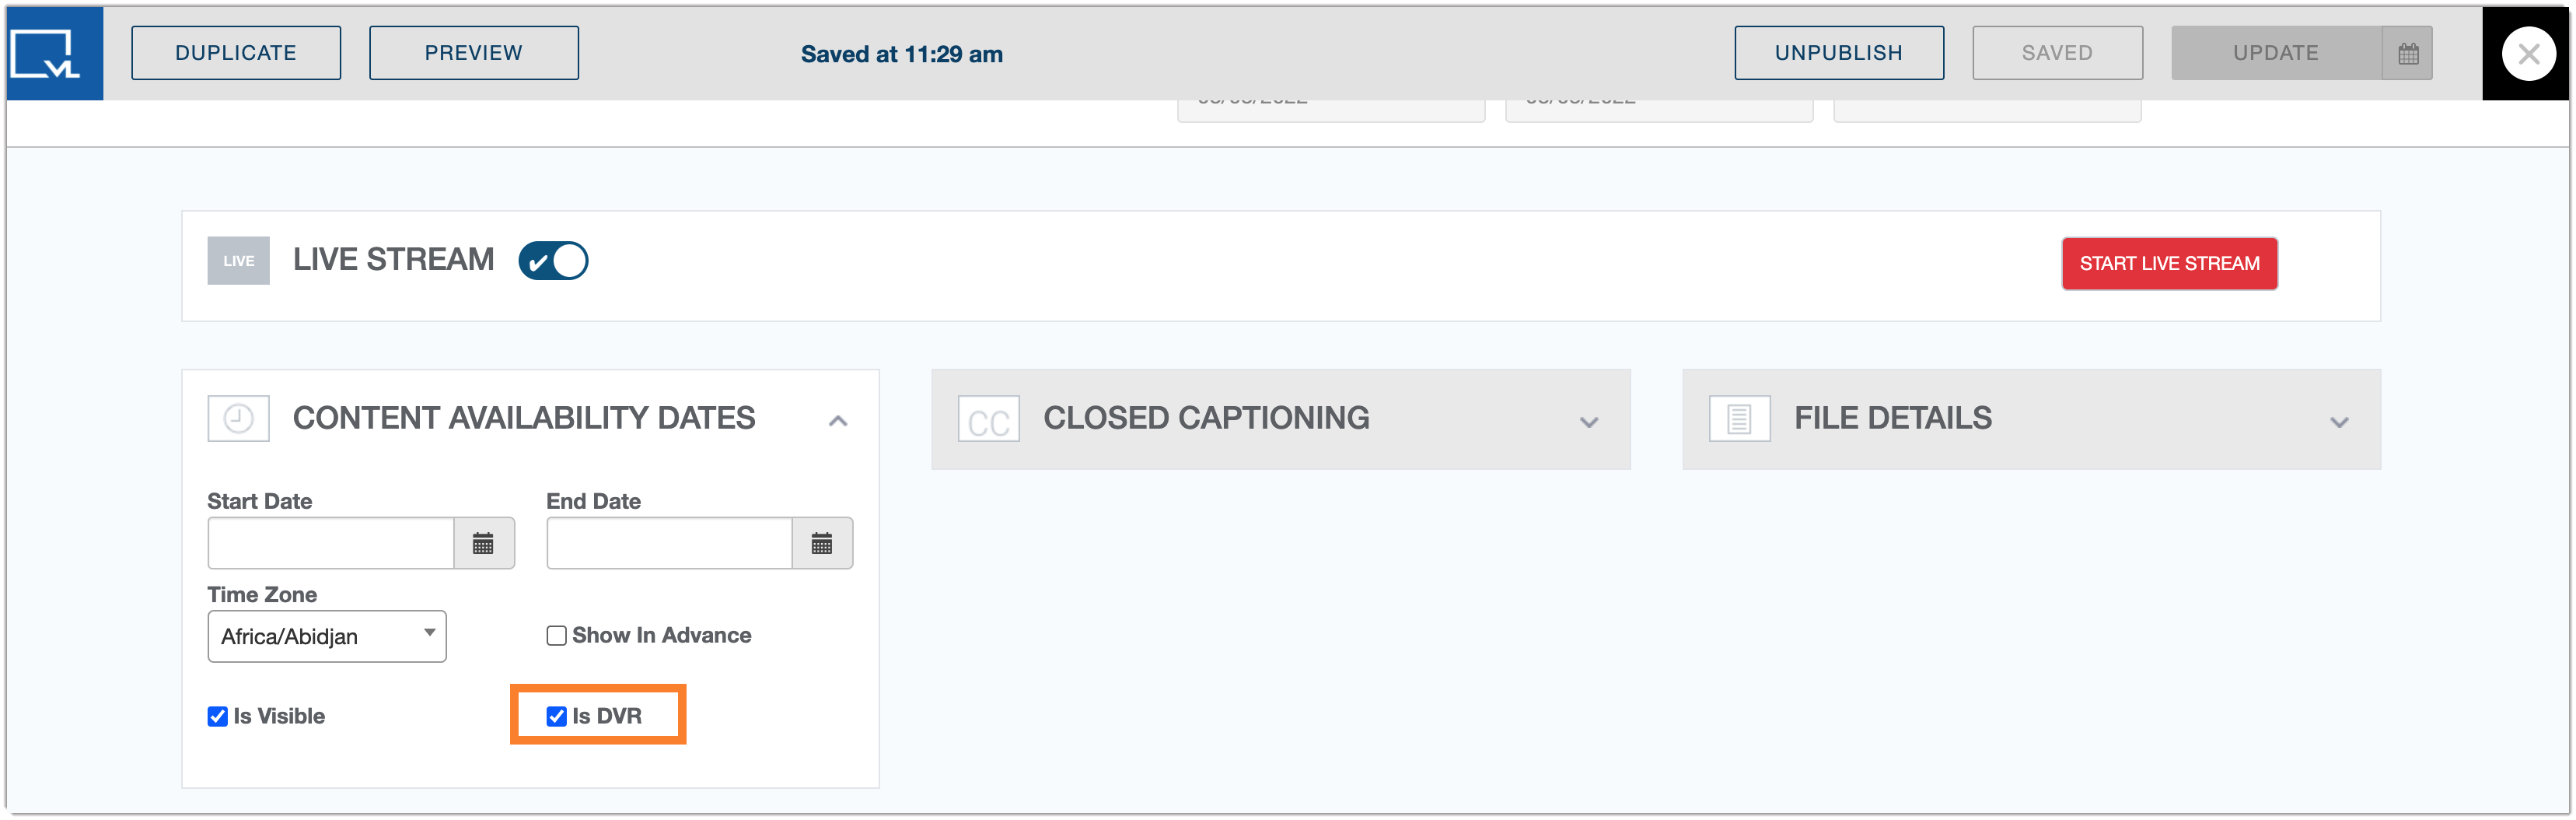
DVR in Content Availability Dates
Remember to select the Is DVR option in the Content Availability Dates section on the Livestreaming detail page in the Content module. You can uncheck the box if you want to turn off the feature later. The Content Availability module will display a countdown timer on the live object once the page is published, however, you don't need an active stream for the countdown timer to show. The countdown timer will always take precedence over stream playback. As long as the start date-time of the countdown timer is not reached, the countdown timer will show. Therefore even if they aren't sending a stream and there's no stream playback - the countdown timer will still show and take precedence.
To enhance your experience during a live event, please advise users to refresh the livestream page approximately 3-5 minutes after the event begins. This will enable DVR (Digital Video Recorder) functionality, allowing you to pause, rewind, and continue your live stream as needed.
Archiving a live stream
Both idle and active channels are counted toward your account's storage quota. Once the event has occurred and the channel is not being used anymore, please archive the unused objects, this will delete the channel and associated CloudFront as well.
Archiving is available with the following protocols:
RTMP Push
RTMP Pull
Zixi Push
RTP Push
HLS Pull
When enabling archiving, the objects will go to your S3 bucket in an HLS format.
You cannot use the same stream key for different Live events.
You cannot reuse an input point by editing it into another live stream via the Renditions&Mezz section.
The following will be the output ladder for the archive:
Video
| Audio
|
Video
| Audio
|
Video
| Audio
|
Video
| Audio
|
Video
| Audio
|
Accessing an Archive after an event
The Archive button will show up after a successful start and stop of a channel, assuming there was a valid input during that time between the start and stop:
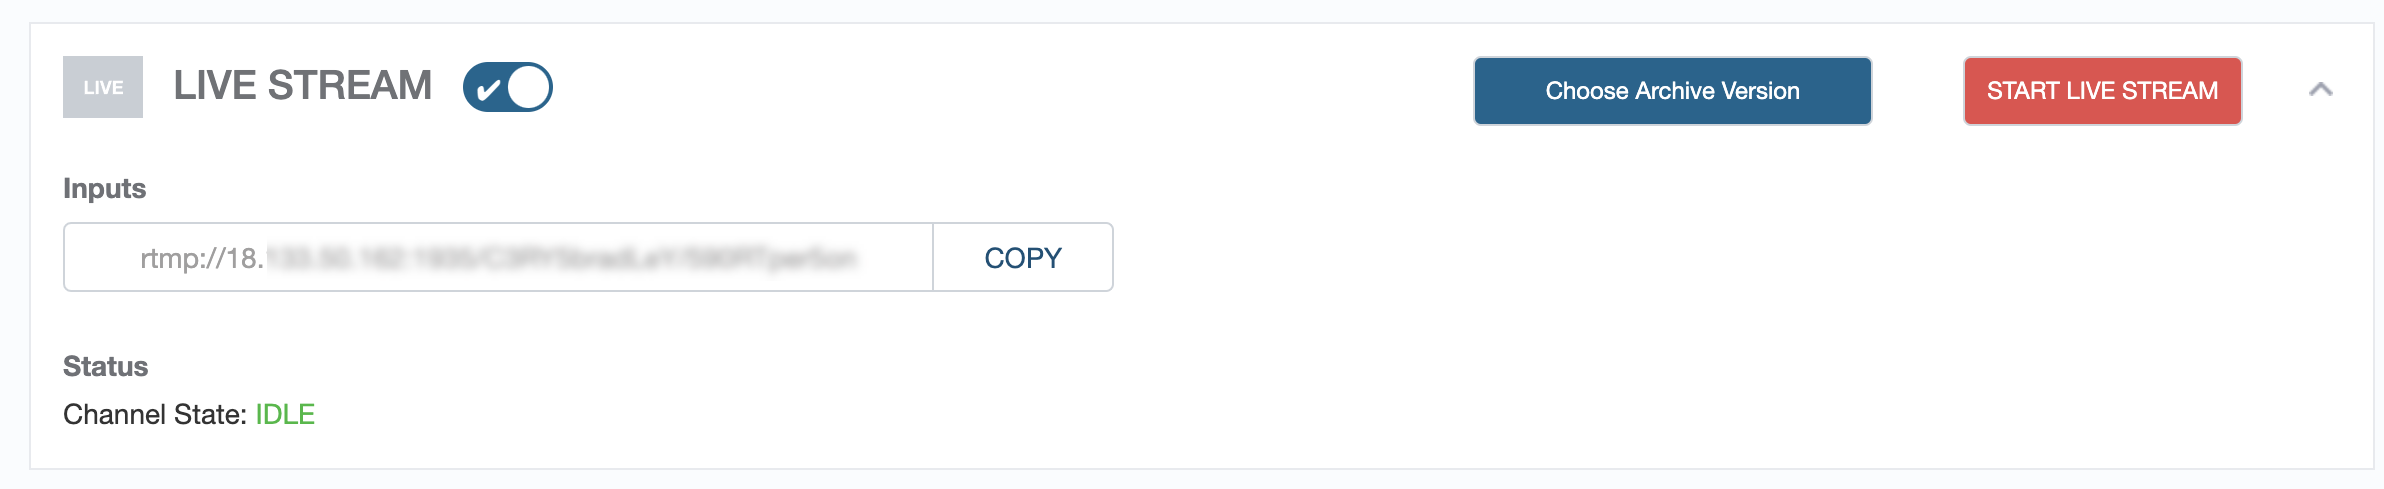
On selecting Choose Archive Version, a pop-up will appear allowing you to Preview the VODs, you can select one and check if it is the corresponding archive object you want to feature as VOD. Please use .m3u8 to convert to VOD.

After clicking Convert to VOD, you will be directed to the new VOD object with the HLS set in the Renditions and Mezz.
Checking on the Status of a New Live Stream Channel
After creating the channel, you will see a new object pop up in the content section. It will enter a “processing” state and if successfully created will appear to be editable.
Image 1: Processing State

Image 2: Successful creation of a live channel, you can modify the metadata items.

Image 3: Unsuccessful creation of a live channel.
A. In the event the channel fails to create, click on the Error tab, there the reason will be listed as to why the channel failed to create. If the error mentions "You have created as many push inputs as your current service limit of...", please contact techsupport@viewlift.com.
Managing a Live Channel
Notes:
Once the channel is created, we will disable the ability to start/stop the encoder until the CloudFront resource that is used to deliver the stream to your end-user is fully deployed.
You can find your output URL in the “Renditions and Mezz” section.
To start the channel, click “Start Channel” in the “Livestream” section. After clicking start, please check the channel status.
Channel States
State | Channel is... |
|---|---|
Idle | Offline |
Starting | Warming up |
Running | Ready for input |
Stopping | Shutting down |
Recovering | Channel had an error and is attempting to recover. |
b. After clicking start, the Archive and Livestream toggle will disable until the channel enters an “Idle” state.
3. To stop the channel, click STOP LIVE STREAM in the LIVE STREAM section.

Monitoring the Channel Alerts

What are alert states "CLEAR" and "SET"? | "SET" is raised when there is a missing input depending on the type of error. This means some issues that need to be resolved. "CLEAR" is raised when a "SET" issue has been resolved. |
What are the differences between "Type" and "Message"? | "Type" is more generic, whereas the "message" provides more details about what the issue is about. |
What are Pipelines? | Your live channel may have 1 or 2 pipelines depending on the type of channel you created and a number of inputs. For RTMP_PUSH there will always be 2 endpoints provided. For HLS_PULL there may be 1 or 2 depending on whether you also placed in the backup URL. |
Error: "Initial Probe is Taking Longer Than Expected" | Indicates that the stream couldn't be found. The reason the video/audio alerts were being set to clear is that our encoder is switching between the primary and backup input every 5 seconds as both of the pipelines had no inputs. When it does this - it clears the other pipeline inputs. If you do not use a backup pipeline, simply opt for a single RTMP endpoint, this way you can get a clearer alert section as the encoder will not swap between the primary and backup pipelines. |
Deleting a Live Channel
The channel must be in an “Idle” state to delete the channel. Click the Archive button on top to delete that live object, and click OK to confirm.
FAQs - Live stream
Q. How many concurrent live streams can be supported?
Streams are dependent on your storage quota but you can increase the limit.
Q. What is the delay in starting a live stream from the transcoding piece? (glass to glass)
Standard Live Encoding via Elemental: 20-30 seconds. Low-Latent Live Encoding: approx. 3 seconds
To learn more about the Livestreaming flow in ViewLift, please check out this video.
Related
Recommended Format for LIVE Video Ingest
About Digital Rights Management (DRM)
Was this article helpful?