Create an SSL encryption certificate for Jio platform
- 29 May 2024
- 3 Minutes to read
- Contributors


- Print
- DarkLight
- PDF
Create an SSL encryption certificate for Jio platform
- Updated on 29 May 2024
- 3 Minutes to read
- Contributors
- Print
- DarkLight
- PDF
Article summary
Did you find this summary helpful?
Thank you for your feedback
Learn how to create an SSL certificate for a client (app) in the ViewLift Tools system.
To set up an SSL certificate for a client, the following components are required:
- Private Key: A private key is a cryptographic key used to encrypt and decrypt data. It is crucial for securing the certificate and should be kept confidential.
- Certificate Signing Request (CSR) file: A CSR is a formal request sent to a Certificate Authority (CA) to obtain a digital certificate. It includes information such as the organization's details and the desired domain name.
- Private Key Password: A password is used to protect the private key from unauthorized access. It adds an extra layer of security and should be chosen carefully, following best practices for password strength.
- Public Key (CRT file): The public key, also known as a certificate file (CRT), is obtained by submitting the CSR to a CA. It contains the public key portion of the key pair and is used to verify the authenticity of the certificate.
- S3 Bucket: An S3 bucket is a storage service provided by Amazon Web Services (AWS). It can be used to securely store and manage the private key, CSR, and certificate files, ensuring their availability and durability.
Generate your private key and CSR file
Generate a new RSA key and a certificate signing request (CSR) by using OpenSSL and include all the required information, as well as prompting to save the password.
- Open a command prompt or terminal.
- Navigate to the directory where you want to generate the key and CSR. You can use the cd command to change directories.
- Run the following command:
openssl req -newkey rsa:2048 -keyout jio-exampletv.key -out jio-exampletv.csr - OpenSSL will prompt you to enter various details for the CSR. Respond to each prompt with the appropriate information. The common name (CN) is typically the fully qualified domain name (FQDN) of the website or app for which you are requesting the certificate.
- When prompted for a password, enter a secure password. Remember this password as it will be required to use the private key in the future.
- Once you have provided all the required information and the password, OpenSSL will generate the RSA key and the CSR. The private key will be saved in the file specified by -keyout, and the CSR will be saved in the file specified by -out.
- Verify that the key and CSR files are generated successfully in the directory you specified.
Create .CRT file
Create a CRT (certificate) file by using a CSR (certificate signing request) and a private key:
- Ensure that you have the following files in the same directory:
The CSR file (jio-myexampletv.csr in this example) - The private key file (jio-myexampletv.key in this example)
- Open a command prompt or terminal.
- Navigate to the directory where the CSR and private key files are located. You can use the cd command to change directories.
- Run the following command:
openssl x509 -req -in jio-myexampletv.csr -signkey jio-myexampletv.key -out jio-myexampletv.crt - Press Enter to execute the command.
- OpenSSL will use the private key and CSR to generate the certificate file (CRT). The generated CRT will be saved in the file specified by -out.
- Verify that the CRT file (jio-myexampletv.crt in this example) has been successfully generated in the directory.
Upload the cert file to an S3 bucket
To complete the setup process, the next step is to upload the jio-myexampletv.key, jio-myexampletv.csr, and jio-myexampletv.crt files to the designated S3 bucket. The S3 bucket path for this purpose is telecom-configuration/myexampletvtv/jio.
Once the files are uploaded, add the bucket path and other information in the AppCMS settings:
- Log in to the Tools CMS and navigate to AppCMS > Settings > PAYMENT CONFIGS section.
- Expand the payment configuration settings to access the advanced section.
- In the advanced section, you will find the Jio configuration settings.
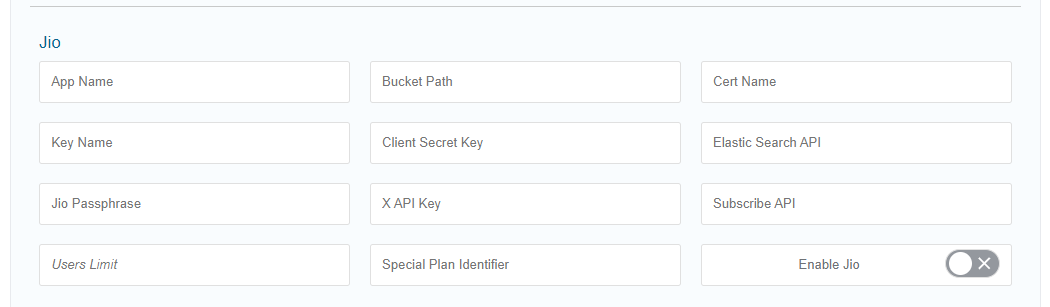
- Modify the following parameters within the Jio configuration:


- Bucket Path: S3 bucket path where the certificate files are uploaded. Example: telecom-configuration/myexampletvtv/jio
- Cert Name: Name of the uploaded certificate file (jio-myexampletv.crt in this example).
- Key Name: Name of the uploaded private key file (jio-myexampletv.key in this case).
- Jio Passphrase: Provide the passphrase or password associated with the private key to authenticate and access the certificate.
It is crucial to share the certificate files with the partner who needs access to them. They will also have to send these certificate files to Jio for further integration and authentication purposes.
By following these steps, you will upload the certificate files (jio-myexampletv.key, jio-myexampletv.csr, and jio-myexampletv.crt) to the designated S3 bucket path and make the necessary configurations in the AppCMS. You can then send your app's certificate files to JioConnect to complete the integration process with the Jio platform.
Was this article helpful?