Create an Article Page
- 12 Jan 2024
- 9 Minutes to read
- Contributors

- Print
- DarkLight
- PDF
Create an Article Page
- Updated on 12 Jan 2024
- 9 Minutes to read
- Contributors
- Print
- DarkLight
- PDF
Article summary
Did you find this summary helpful?
Thank you for your feedback
Use the article editor in Tools CMS to publish text-based articles quickly and efficiently. Read on to learn more.
To create a new article, log into your ViewLift TOOLS account. From the top main menu, click CONTENT. Under the Content section, click ARTICLES from the content-type sub-menu, then click + ADD ARTICLE.
This will bring up the following dialog. To import articles using an RSS feed, click the RSS button, to manually create an article, click Create Article.
Prerequisite
Articles have to be initially enabled from the backend settings to be able to publish them.

Ingest articles via RSS
You can import content from an RSS feed destination of any website, blog, or social media platform. If the RSS feed requires a username and password, you will need to remove the authentication to ingest it.
The XML parser in the CMS will read the file and parse the individual metadata objects in the XML into article objects. You can import articles into the CMS library once or regularly if the RSS feed is updated often.
- To add articles via RSS, from the Articles tab, click Add Article > RSS.
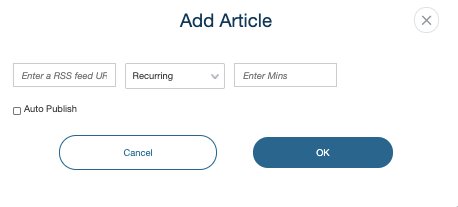
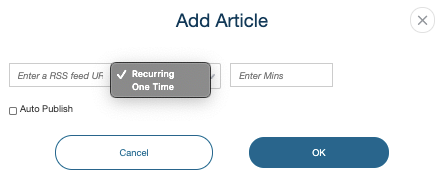
- In the "Enter a RSS feed URL" field, add the absolute URL of the RSS feed you want to connect to. If you only want to import the content from the feed once, select "One Time" in the next drop-down menu. If you wish the ingest to be recurring, choose Recurring from that drop-down, and then choose the frequency of recurring ping in the "Enter Mins" field.
- If you want the articles you import from an RSS feed to be added to the platform as drafts, leave the Auto Publish checkbox unchecked. If you want all RSS-ingested articles to be published immediately, select Auto Publish.


Once you have set all of these feed values, click OK.
Create an article manually
To create an article manually on demand, when you get to the ADD ARTICLE step, click on the Create Article key.
This opens up a blank article template page:

Main
| Field | Description |
|---|---|
| Headline | Remove the auto-generated numeric identifier. Editorialize this field using upper and lower case style rules. |
| Permalink | The PERMALINK should have the following guidelines:
|
| Author | The AUTHOR field is customer-facing as articles should get either proper name or staff attribution. |
| Categories | Categories are a way to organize and present your content in a higher-level, genre-centric way. You can use categories to drive what content surfaces in a carousel or a tray. You can also add a SEE ALL function at the end of a tray to bring a user to a generated landing page of all articles associated with that category. This requires a few settings on the tray level, after the category exists. To choose from an existing category, click inside the category box and left-click on the category you wish to add, once you have used your up/down arrows to highlight it in blue. You can choose from existing, or add new categories to an article. There is no limit to how many categories you add. To add a new category, type the term into the category box and hit Enter. To use a pre-existing category, click inside the category box, type the first letter, and choose from the option that appears in the drop-down. To remove a category, click the x in the lower-left corner of that category term. |
| Tags | You can choose from existing, or add new tags to an article. There is no limit to how many tags you add. Think of these as subjective, drilled-down detail elements to help users find your articles with site search and organize your content. You can also use tags to drive what content surfaces in a tray or carousel. To choose from an existing tag, click inside the tag box and left-click on the tag you wish to add; once you have used your up/down arrows highlight it in blue. To add a new tag, click inside the tag box, and start typing the name of your new tag. We suggest you use upper and lower-case style rules for this. Once you finish typing the tag name, left-click on the text highlighted in blue. Now there is a new tag added to your article and added to the tag set of your platform. You can remove a tag by clicking the x in the lower-left corner of that tag. |
| Lead | Compose the first lead-in sentence for the article. |
| Description | Write a longer summary of the article. |
| Content Model | Attach the subscription model for the article. |
| Published Date | The date on which the article was first published. |
| Updated Date | The date on which the article was last updated. |
| Archived Date | Article archived date (if applicable). |
Uploading images
Upload images for your articles here. Once you publish an article, you can curate it on the desired trays in the Template Builder and publish the page. The images will then appear on those trays and in search results on the front end.
The minimum required image for any article is a 16:9 aspect radio and the suggested dimensions are 1920 pixels x 1080 pixels in size. But you can add a thumbnail of each aspect ratio (i.e. 16:9, 32:9, 1:1, etc.) from the respective image modules in the MANAGE IMAGES section. The images that you upload should be cut to the proper dimensions. The Viewlift TOOLS platform will not crop your images for you. This goes for image assets across the platform.
Other image aspect ratios and their use cases:
- 32:9 OTT: If you wish to use our 32:9 Carousel, each article must have a 32:9 image set within the Manage Images module.
- 1:1 Square: If your service includes audio-only content (such as podcasts or music, for iOS/Android-only presentation), your audio-only content should have an image associated.
More on imagery guidance:
Asset Image Management and Specs
BODY COPY
The meat and potatoes of your article live inside the Body Copy module. Left-click on it to expand the section to display a WYSIWYG text editor. You can write and format text as you would in a word processor such as Microsoft Word.
From adding images, code snippets, Twitter cards, syntax highlights, custom fonts, photo galleries, and iframe, the editor can handle it all.

Text tools and description

| Text tool icons (from left to right) | Description |
|---|---|
| Image file uploader | Upload one or more images at a time from your local directory, or you can paste images from your local clipboard. This means that you can copy images from the web or from your computer's hard drive and paste them into the text editor. |
| Find and replace |  To find text in a text editor:
To find and replace text in a text editor:
Options
|
 Select All Select All | Selects all text and image objects displayed in the text editor. |
Bold | Bolds the selected text. |
 Italics Italics | Italicizes text to give particular emphasis to a word or phrase. |
 Strikethrough text Strikethrough text | Renders text with a strikethrough, or a line through it. |
 Underline text Underline text | Underlines the selected character/word/phrase. |
 Angle brackets Angle brackets | To enclose single-line code or markup, tags and other elements. |
 Subscript and Superscript Subscript and Superscript | Create subscript and superscript text. Click the Tx option to undo a subscript and superscript operation. |
 Indentation Indentation | Control the indentation of text. Use the right indent to move the text to the right side of the screen. Use the left indent to unident a selected block of content. |
 Undo / Redo Undo / Redo | Undo or redo an action. |
 Font size Font size | Click on the drop-down icon to view a predefined font size list. |
 Font type Font type | Choose from a set of predefined fonts. |
 Text background Text background | Change the background color of the selected text. |
 Text highlighter Text highlighter | Highlights the selected text (slightly larger (perhaps by 0.5 pixel) than the Text background highlighter. |
 Paragraph alignment Paragraph alignment | Align paragraphs to left, right and center and justify. |
 Insert link Insert link | Add a hyperlink by highlighting a word/phrase and clicking the Link icon. |
 Insert image Insert image |  Reference the image URL you want to add from the web. Reference the image URL you want to add from the web. |
 Insert comment Insert comment | Places a block of text in italics like a comment from someone and a vertical line on the left for effect. |
 Insert video Insert video | Paste a video URL from the web. Embedding is not supported. |
 Insert codeblock Insert codeblock | Paste your code into the editor, then place the cursor on the code text, and click . The text will change into a codeblock, then choose the correct programming language. |
 Insert HTML snippet Insert HTML snippet | Use HTML snippet to embed Twitter, YouTube, or other social content in your article. - Go to the social media platform where the content is hosted and copy the embed code. - Paste the embed code into your article. |
 Insert symbols Insert symbols | Insert special characters and symbols. |
 Insert line separator Insert line separator | Add a line separator. |
 Insert page break Insert page break | Insert a page break. |
CONTENT AVAILABILITY DATES
Specify the start and end dates for which you want an article to be available online. Note that the date settings are optional. The time zone is the time zone in which you want to make the content available on your site. Select the Show in Advance box to display a countdown timer to the set Start date and time.
If the checkbox is unchecked, the content will be available only when you publish the page live.
SEO
Please follow best practices here: VL SEO Best Practices.
VERSION HISTORY
Review any edits/changes to the article page here. The data will display the user account, time, and date as well as the status of the editing or publishing activity. If you wish to revert to an earlier version of the page editing, click on the gear icon for the chosen version and then click on the REVERT option.
PUBLISH ARTICLE
The fields with a red asterisk (*) are required to publish an article. Even though the body copy is the most important part of the article, the minimum required fields are title, permalink, author, description, and images. When you're happy, click PUBLISH to publish immediately or use the scheduler option to publish at a later date and time.

CURATE ARTICLE
You can manage the curation and placement of articles, from AppCMS > Edit Template Builder > Pages. The Live Preview tray and the VL HighlightTray are the typical modules to add articles into a tray on a page, for example, the Home Page (or any other page). The other trays you can use are VL LandscapeTray, VL Vertical Tray.
Open the module settings and provide a title. You can populate articles on an Article tray by setting the Content Selection mode to Manually Curate or Programmatically Generate.
Manually curate: Search and manually choose the articles you want to add to a tray.
Programmatically Generate: Programmatically generate articles based on tags/ categories.
In the Thumbnail Type, choose the image aspect ratio to define the proper height and width of the thumbnail on the tray (the available options are 16:9, 3:4, 32:9, etc).
Select Enable Sharing flag, if you want to allow sharing articles.
Once you have curated the article, click Publish to publish the page in Template Builder.
TEMPLATE PAGE FOR ARTICLE
The Article Template page (under Template Pages) is required to show the Article page. The Template Pages are typically preconfigured for you in the Template Builder during your onboarding. It is the VL Article Detail module which defines the layout for Article pages.

Was this article helpful?