Introduction
An article is a written content object for news, features, recaps, interviews, and other editorial stories. You create the article in ViewLift Tools, write and format its body in the Editor, then place it on site pages and detail layouts in Template Builder.
This article explains how to create an article, complete its metadata and body, publish it, and place it on the site.
Purpose
The purpose of this article is to help you:
- Create a new article object in ViewLift Tools
- Complete the metadata, images, article body, and other settings required for publication
- Add an optional photo gallery to the article
- Know how to place the article on trays and which Template Page renders it
Scope
This article covers:
- Creating an article in ViewLift Tools → Content Management → Article
- Completing the article object (metadata, images, monetization, availability, Editor, photo gallery, SEO)
- Publishing or scheduling the article
- The required Template Builder points for trays and the Article Template Page
Prerequisites
Before you begin, ensure you have:
- Access to ViewLift Tools with permission to create and publish article content
- Access to Template Builder
- A 16:9 thumbnail image (recommended 1920 × 1080 px), already cut to size — Tools does not crop images for you
- Your article copy and metadata ready: title, description, author, tags, and categories
- Any inline images, gallery images, or videos you plan to use
Example used in this article
Throughout the steps below we use one running example — an article called Championship Final — How City United Won the Title. Replace the sample values with your own.
Step 1: Open Article in ViewLift Tools
- Log into ViewLift Tools.
- From the main menu, open Content Management.
- In the content type selector at the top of the list, choose Article.
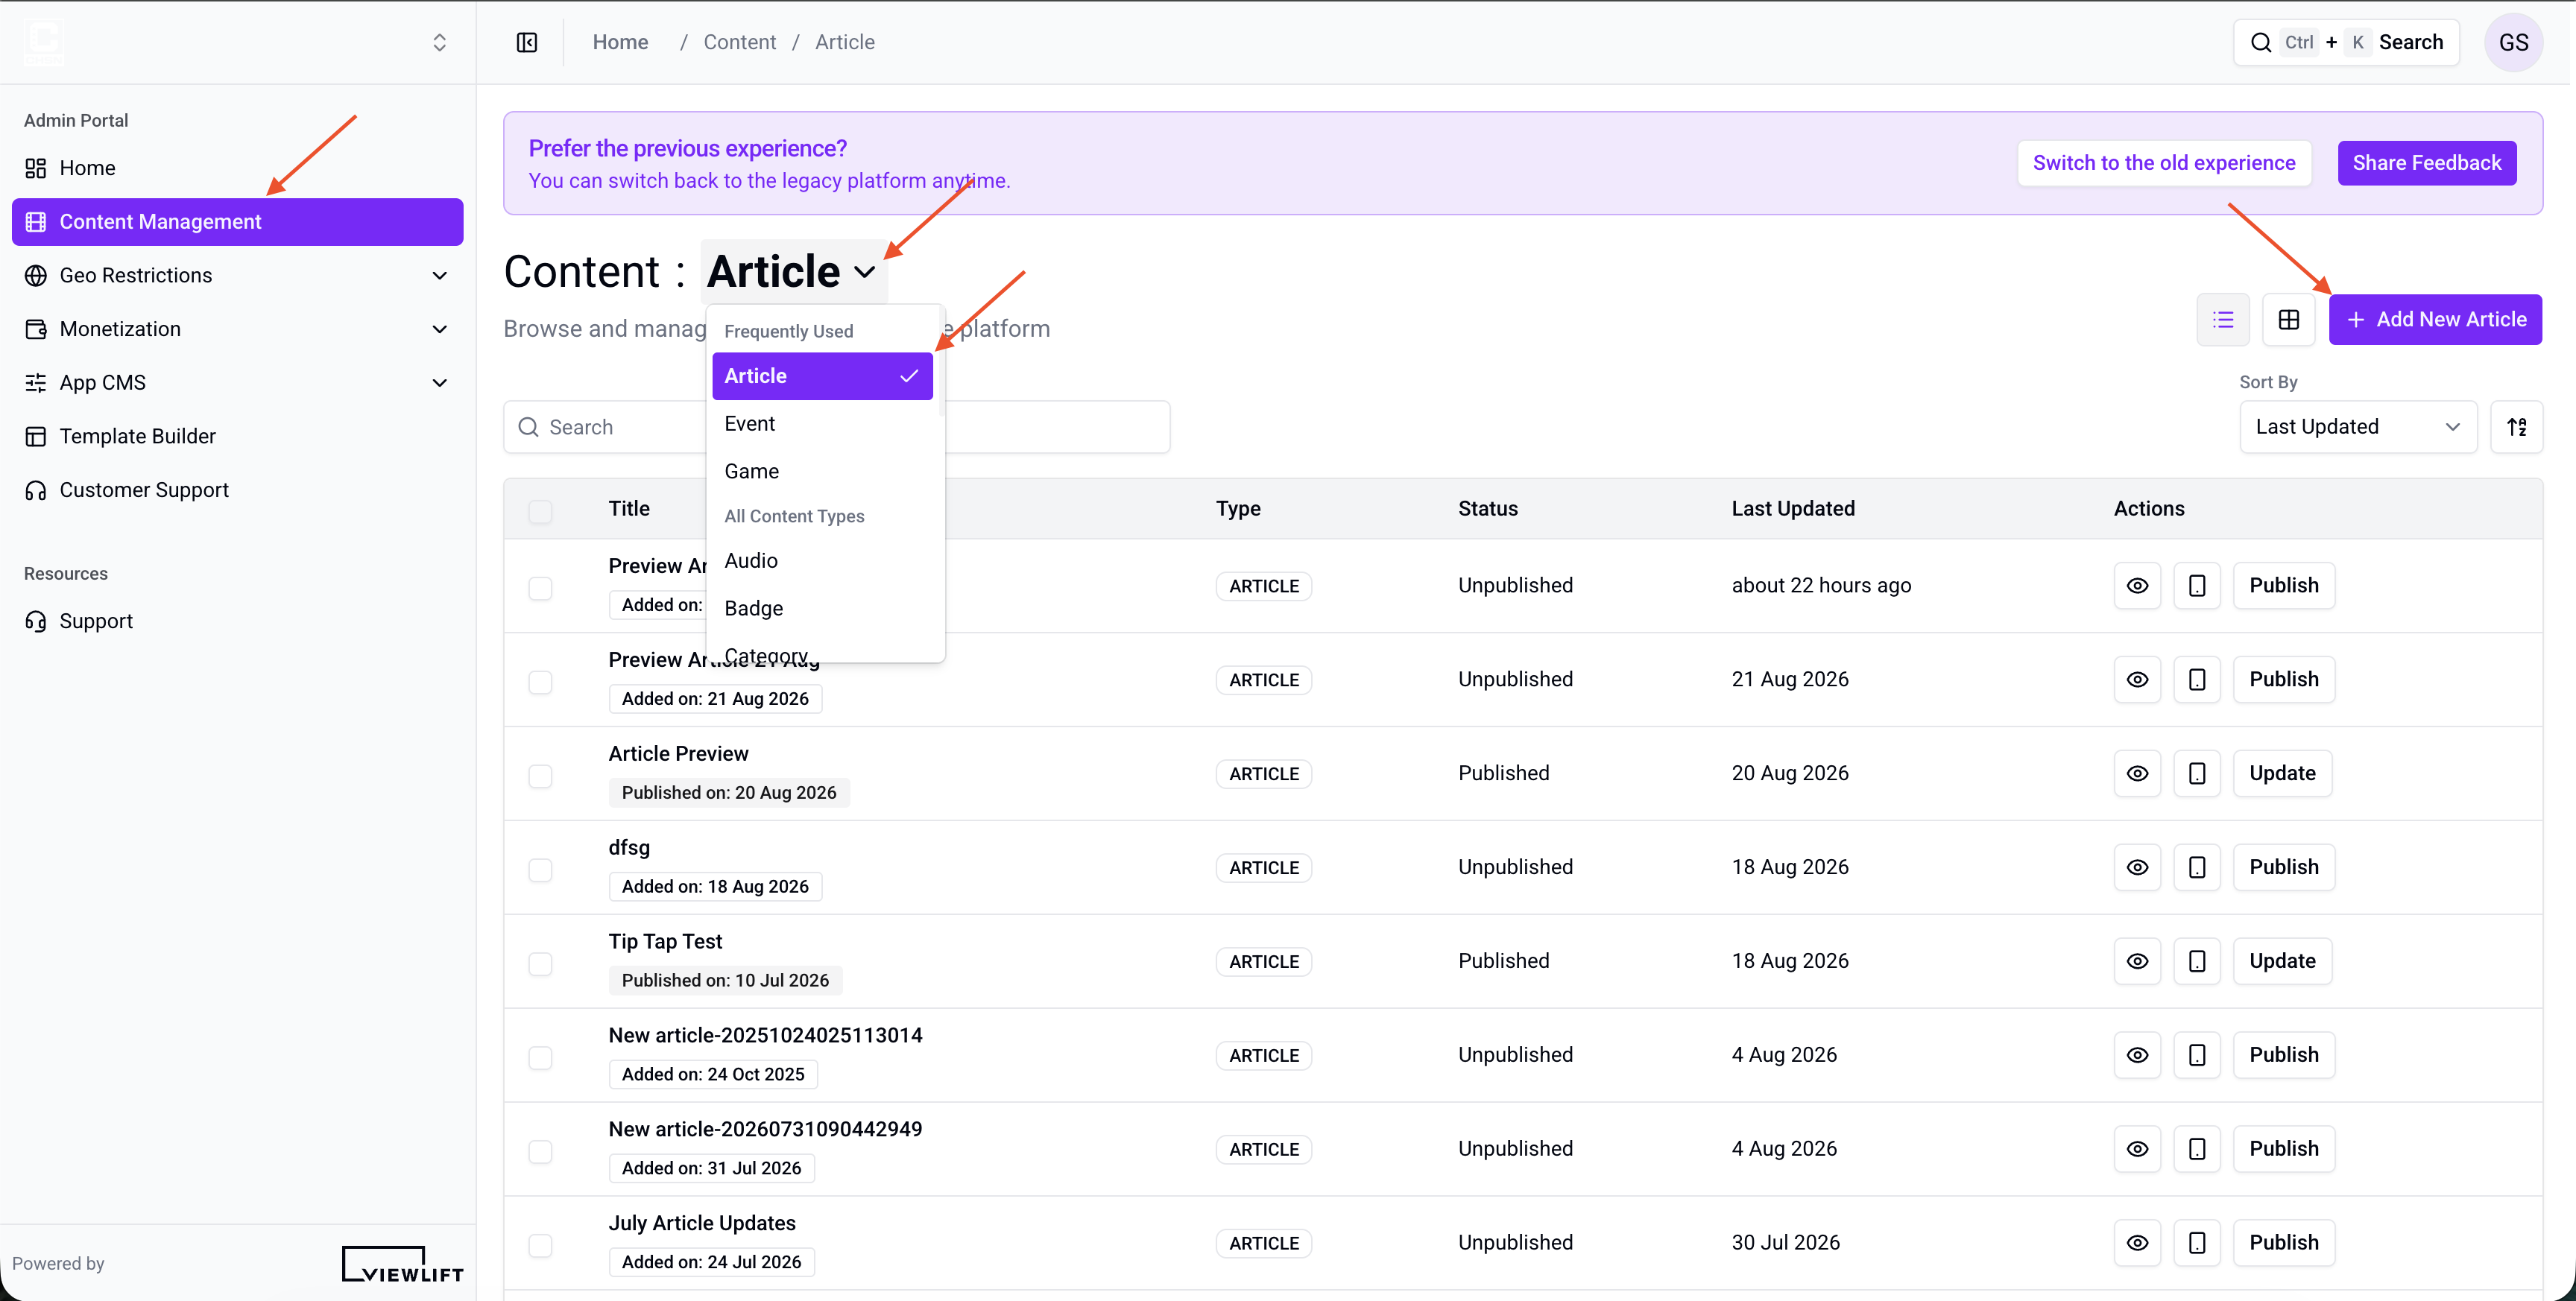
Figure 1. ViewLift Tools → Content Management → Article. Use the content-type dropdown to select Article, then click + Add New Article.
The Article list shows existing article objects. You can search by title, tag, or category.
Step 2: Create an Article Object
- On the Article list, select + Add New Article.
- The Create New Article dialog opens.
- Enter a Title (required). Example:
Championship Final — How City United Won the Title. - Optionally enter a Description.
- Select Create.
Tools creates the article as a draft and opens the article editor.
Permalink is not set in this dialog. It is generated on the detail page — editorialize it before you publish.
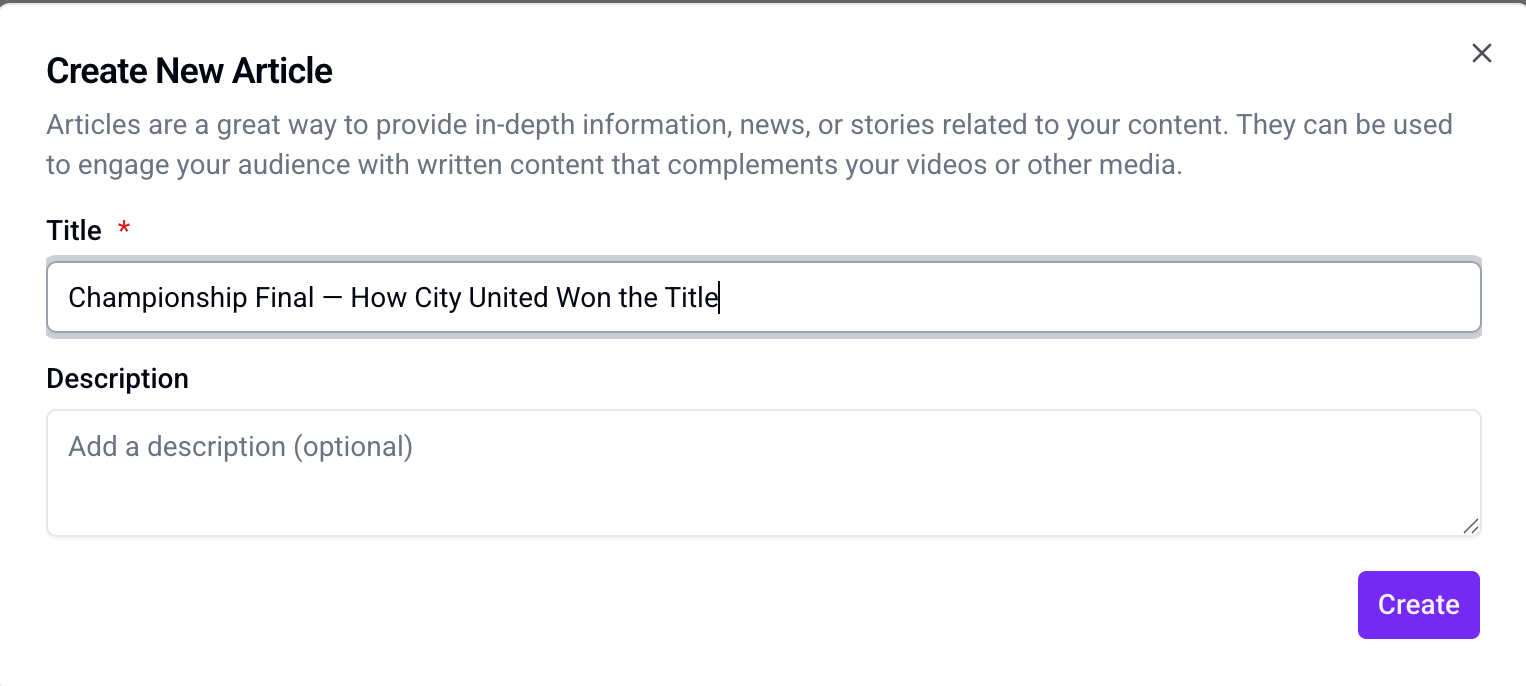
Figure 2. Create New Article dialog. Enter a Title (required) and an optional Description, then select Create.
Step 3: Complete Content Metadata
Open the article. The detail page sidebar groups the tabs as follows:
- Basic Details — Content Metadata, Manage Images, Monetization
- Additional Metadata — Metadata & Macros
- Other Details — Availability & Scheduling, Editor, Photo Gallery, SEO, Version History
Start with Content Metadata.
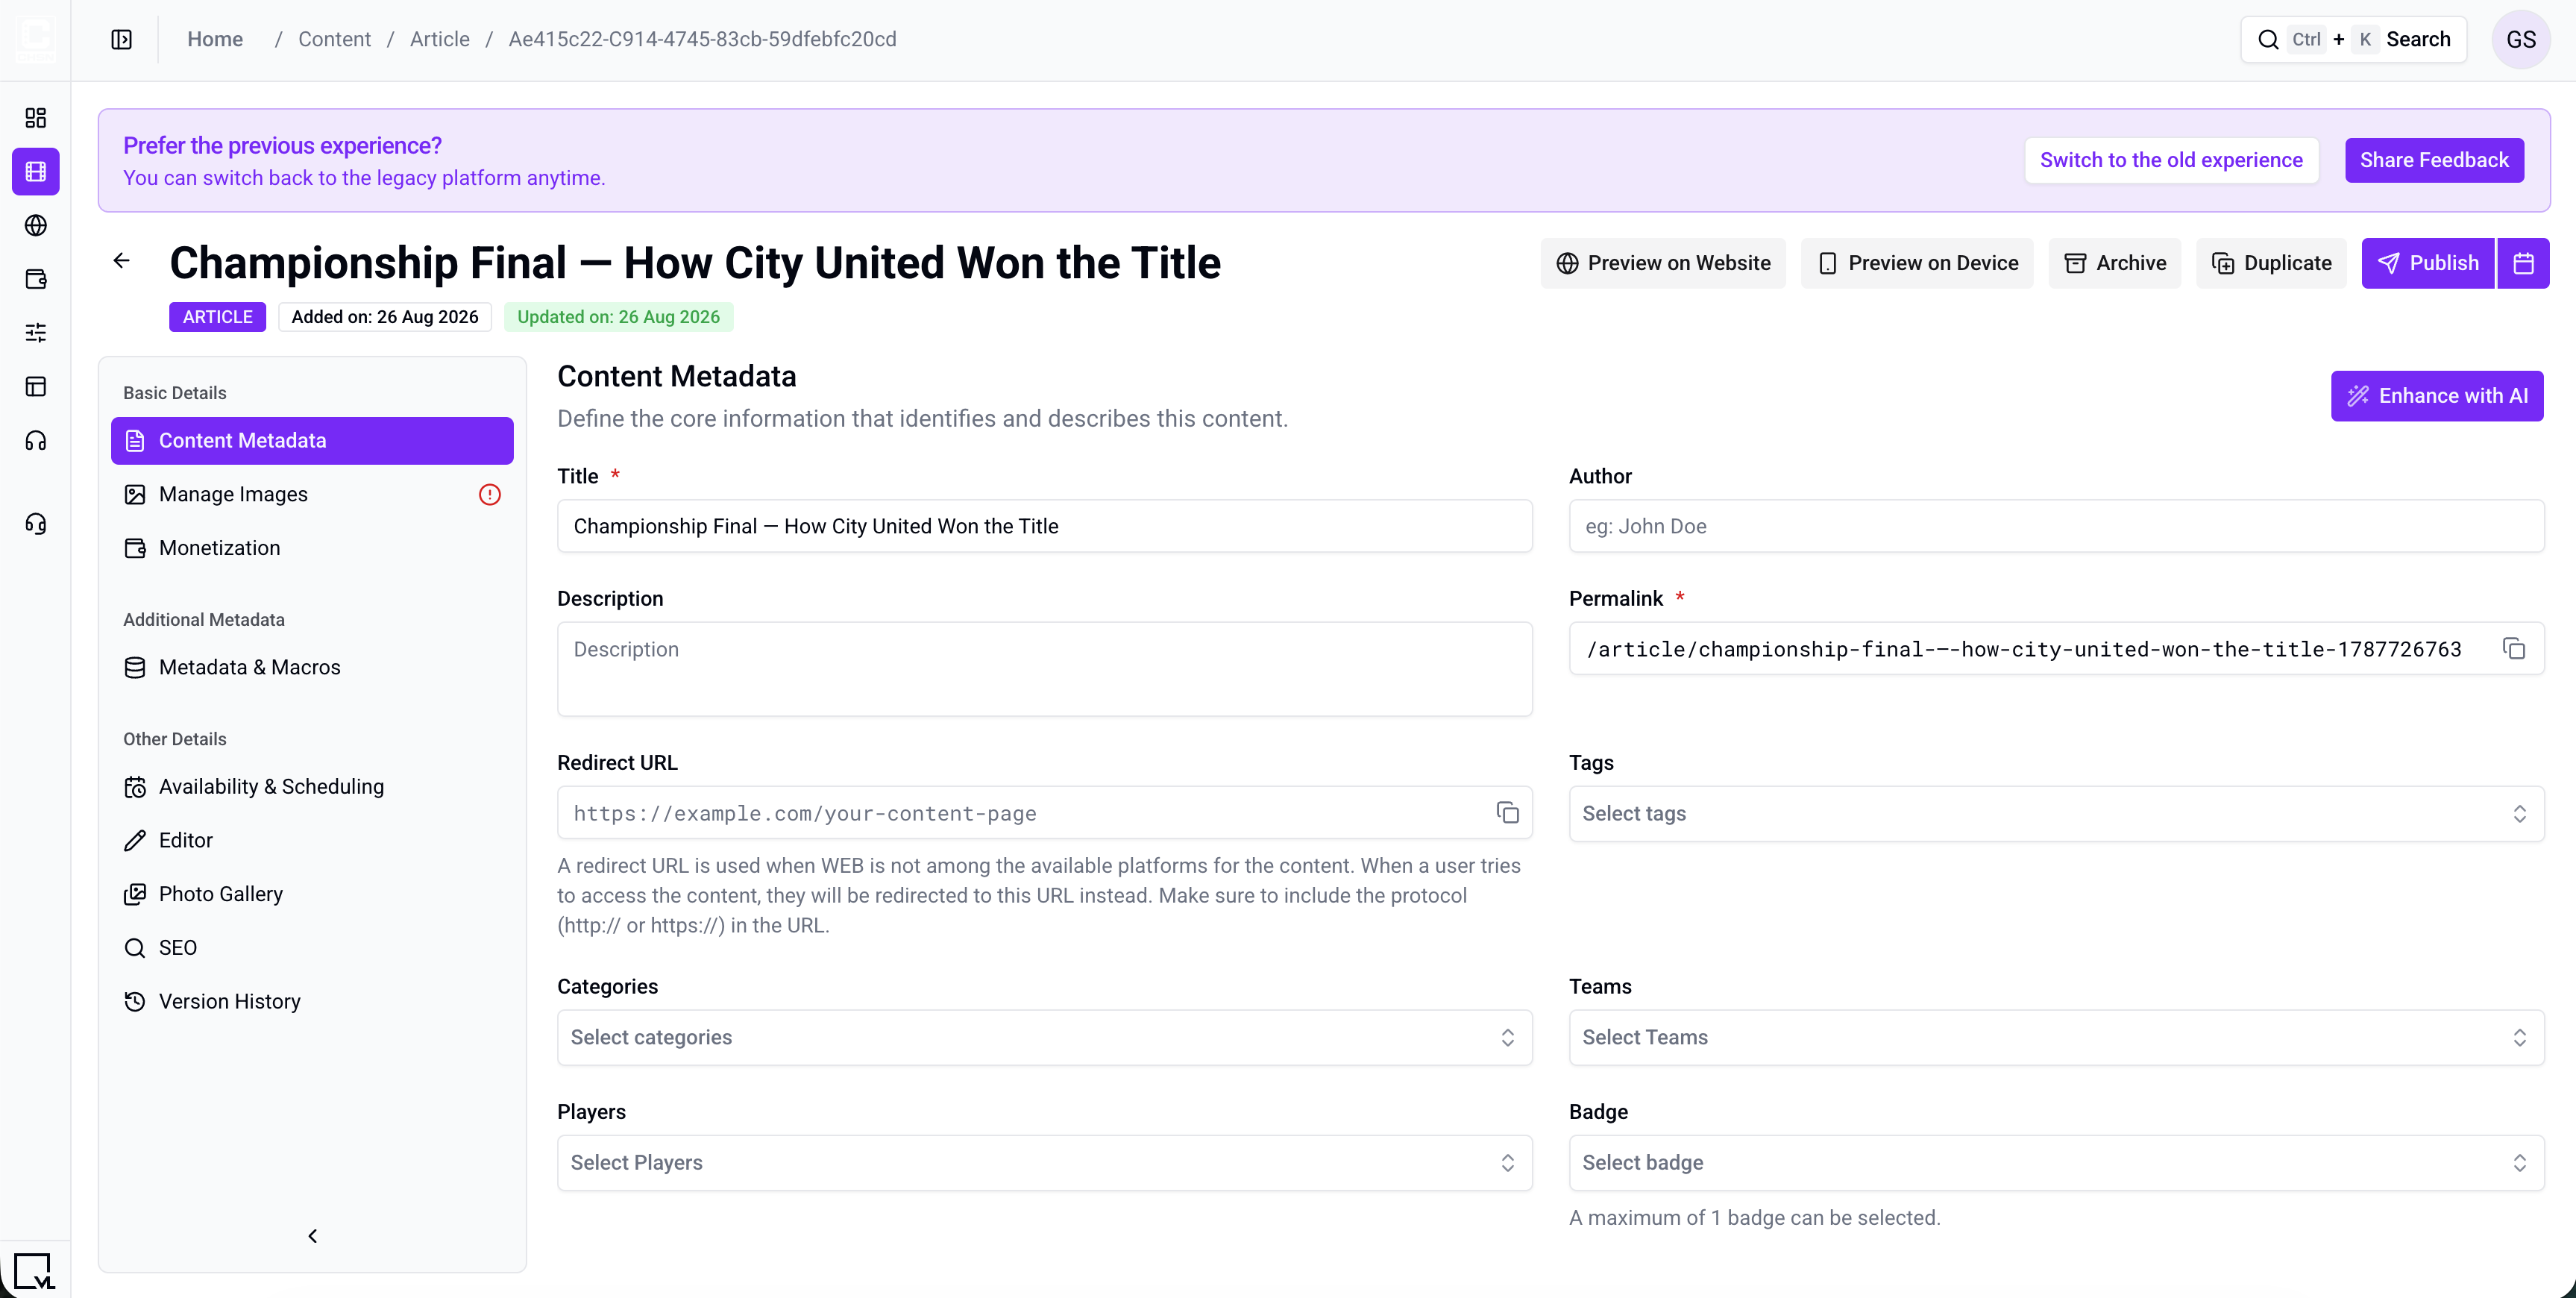
Figure 3. Article detail page, Content Metadata. Required fields are Title and Permalink.
| Field | Required | Description | Example |
|---|---|---|---|
| Title | Yes | Customer-facing headline shown on the article and in discovery. | Championship Final — How City United Won the Title |
| Permalink | Yes | URL path for the article. See the permalink guidelines below. | /championship-final-city-united-title |
| Description | No | Short summary shown in discovery and on supported article layouts. | Inside the decisive moments and tactical changes that delivered City United’s championship. |
| Author | No | Customer-facing writer or staff attribution. | Sports Desk |
| Redirect URL | No | Sends users to another URL when WEB is not among the available platforms. Include http:// or https://. |
https://example.com/championship-final |
| Tags | No | Detailed keywords used for search and programmatic trays. | championship, city-united, final |
| Categories | No | Higher-level editorial grouping used for trays and landing pages. | Match Reports |
| Teams | No | Links existing Team objects to the article. | City United |
| Players | No | Links existing Person objects to the article. | Alex Moore |
| Badge | No | Visual badge that can appear on the article thumbnail. | Featured |
A Network field can also appear when networks are configured for the site.
Article does not have Parental Rating, Quick Settings, or an editable External ID field.
Permalink guidelines
Use the same rules as other content types:
-
Start with a slash (
/) -
Use lower-case letters
-
Do not use spaces or special characters except dash (
-) or underscore (_); dashes are preferred -
Do not leave whitespace before or after the path
-
Keep the URL concise and descriptive (about 59 characters is a useful target)
-
Remove auto-generated numeric identifiers when you editorialize the path
-
Good:
/championship-final-city-united-title -
Avoid:
/Championship Final_Article_12345
You can change the permalink later if you need a better URL.
Step 4: Manage Images
Open Manage Images.
The 16:9 Landscape image is required to publish. Recommended size: 1920 × 1080 px. Upload images already cropped to the correct aspect ratio. Tools does not crop images for you.
| Image slot | Typical use | Recommended size |
|---|---|---|
| 16:9 Landscape (required) | Primary thumbnail on trays, search, and the article page | 1920 × 1080 px |
| 1:1 Square | Square grids and some mobile layouts | 1200 × 1200 px |
| 32:9 Ultra-Wide (OTT) | Required if you use the 32:9 carousel | 3840 × 1080 px |
| 3:4 Portrait | Poster-style featured placements | 1200 × 1600 px |
| 9:16 Vertical | Mobile-first experiences | 1080 × 1920 px |
| 4:3 Standard | Legacy and editorial layouts | 1600 × 1200 px |
| 2:3 Portrait | Compact posters and listings | 800 × 1200 px |
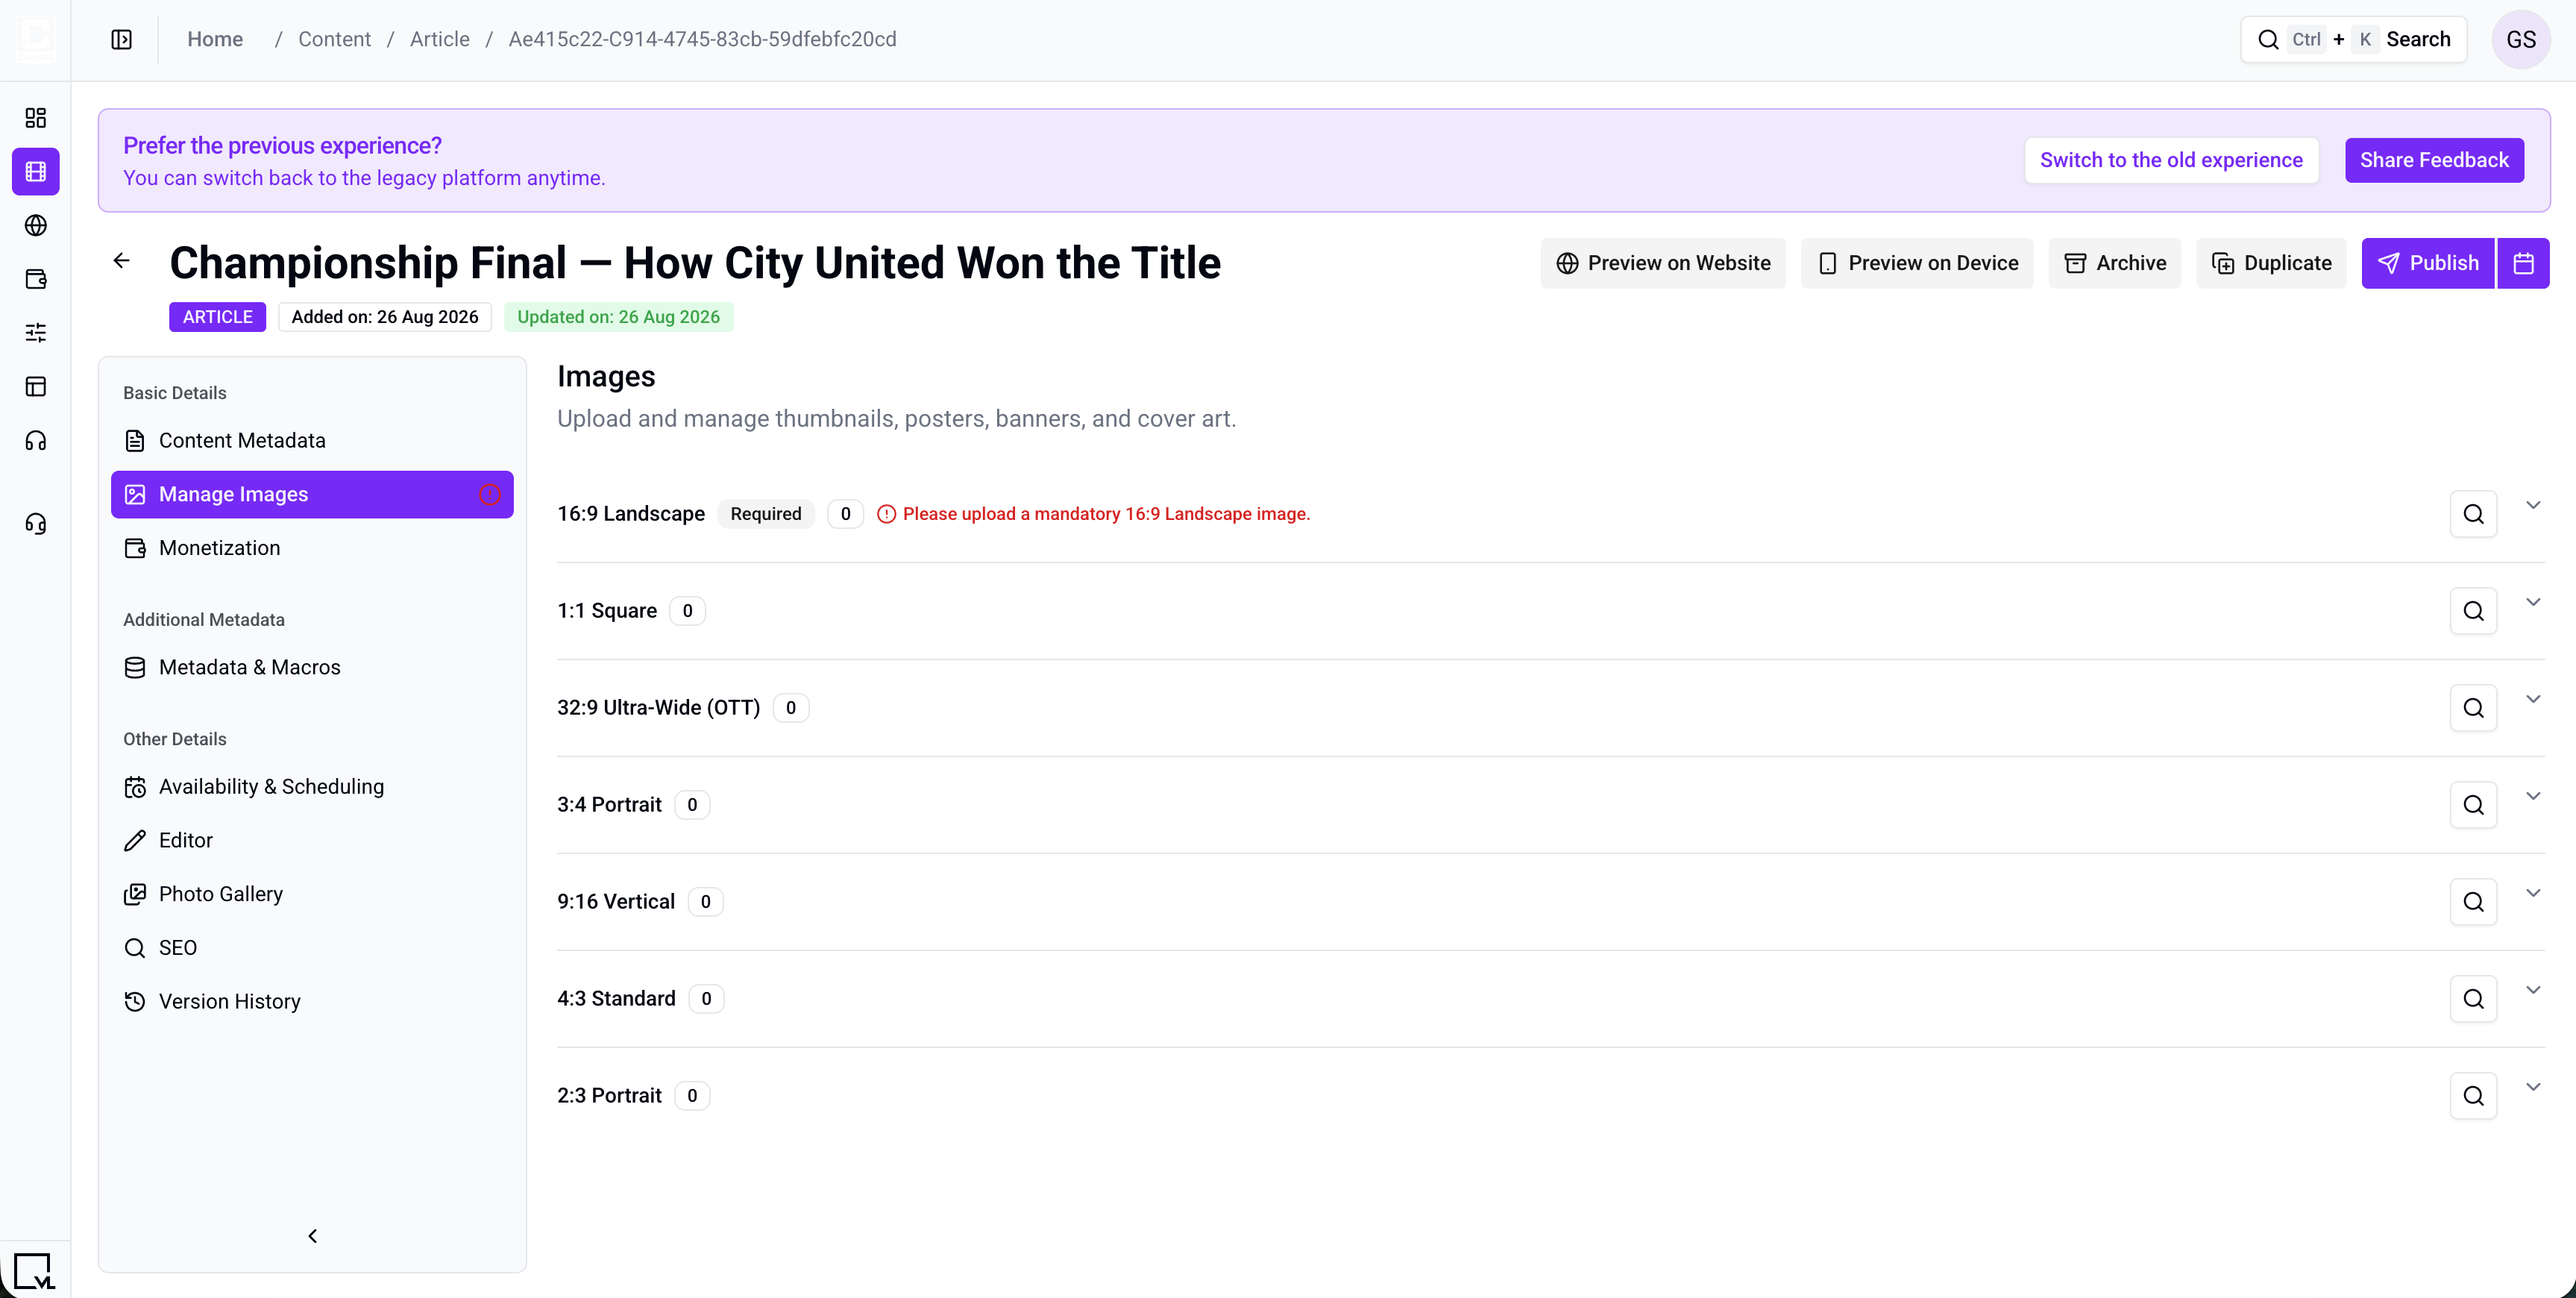
Figure 4. Manage Images. 16:9 Landscape is required to publish. Upload each image at the ratio in which it will be displayed.
These images are the article’s thumbnails and banners. Images placed inside the article body are added separately in Editor.
Step 5: Write the Article in Editor
Open Editor.
The editor placeholder is Add Content Here. Write or paste the article body, then use the toolbar to format it.
Current editor capabilities include:
- Paragraphs and Heading 1–6
- Font family, text color, and highlight color
- Bold, italic, underline, strikethrough, and inline code
- Bullet, numbered, and task lists
- Left, center, right, and justified alignment
- Links, tables, blockquotes, code blocks, and horizontal rules
- Image upload
- Image gallery and image grid
- Media insertion from an embed URL or from the VOD library
- Undo, redo, and clear formatting
- Add and format the body copy.
- Insert images or media where needed.
- Select Save at the bottom of the Editor tab.
Tools calculates the article read time from the saved body content.
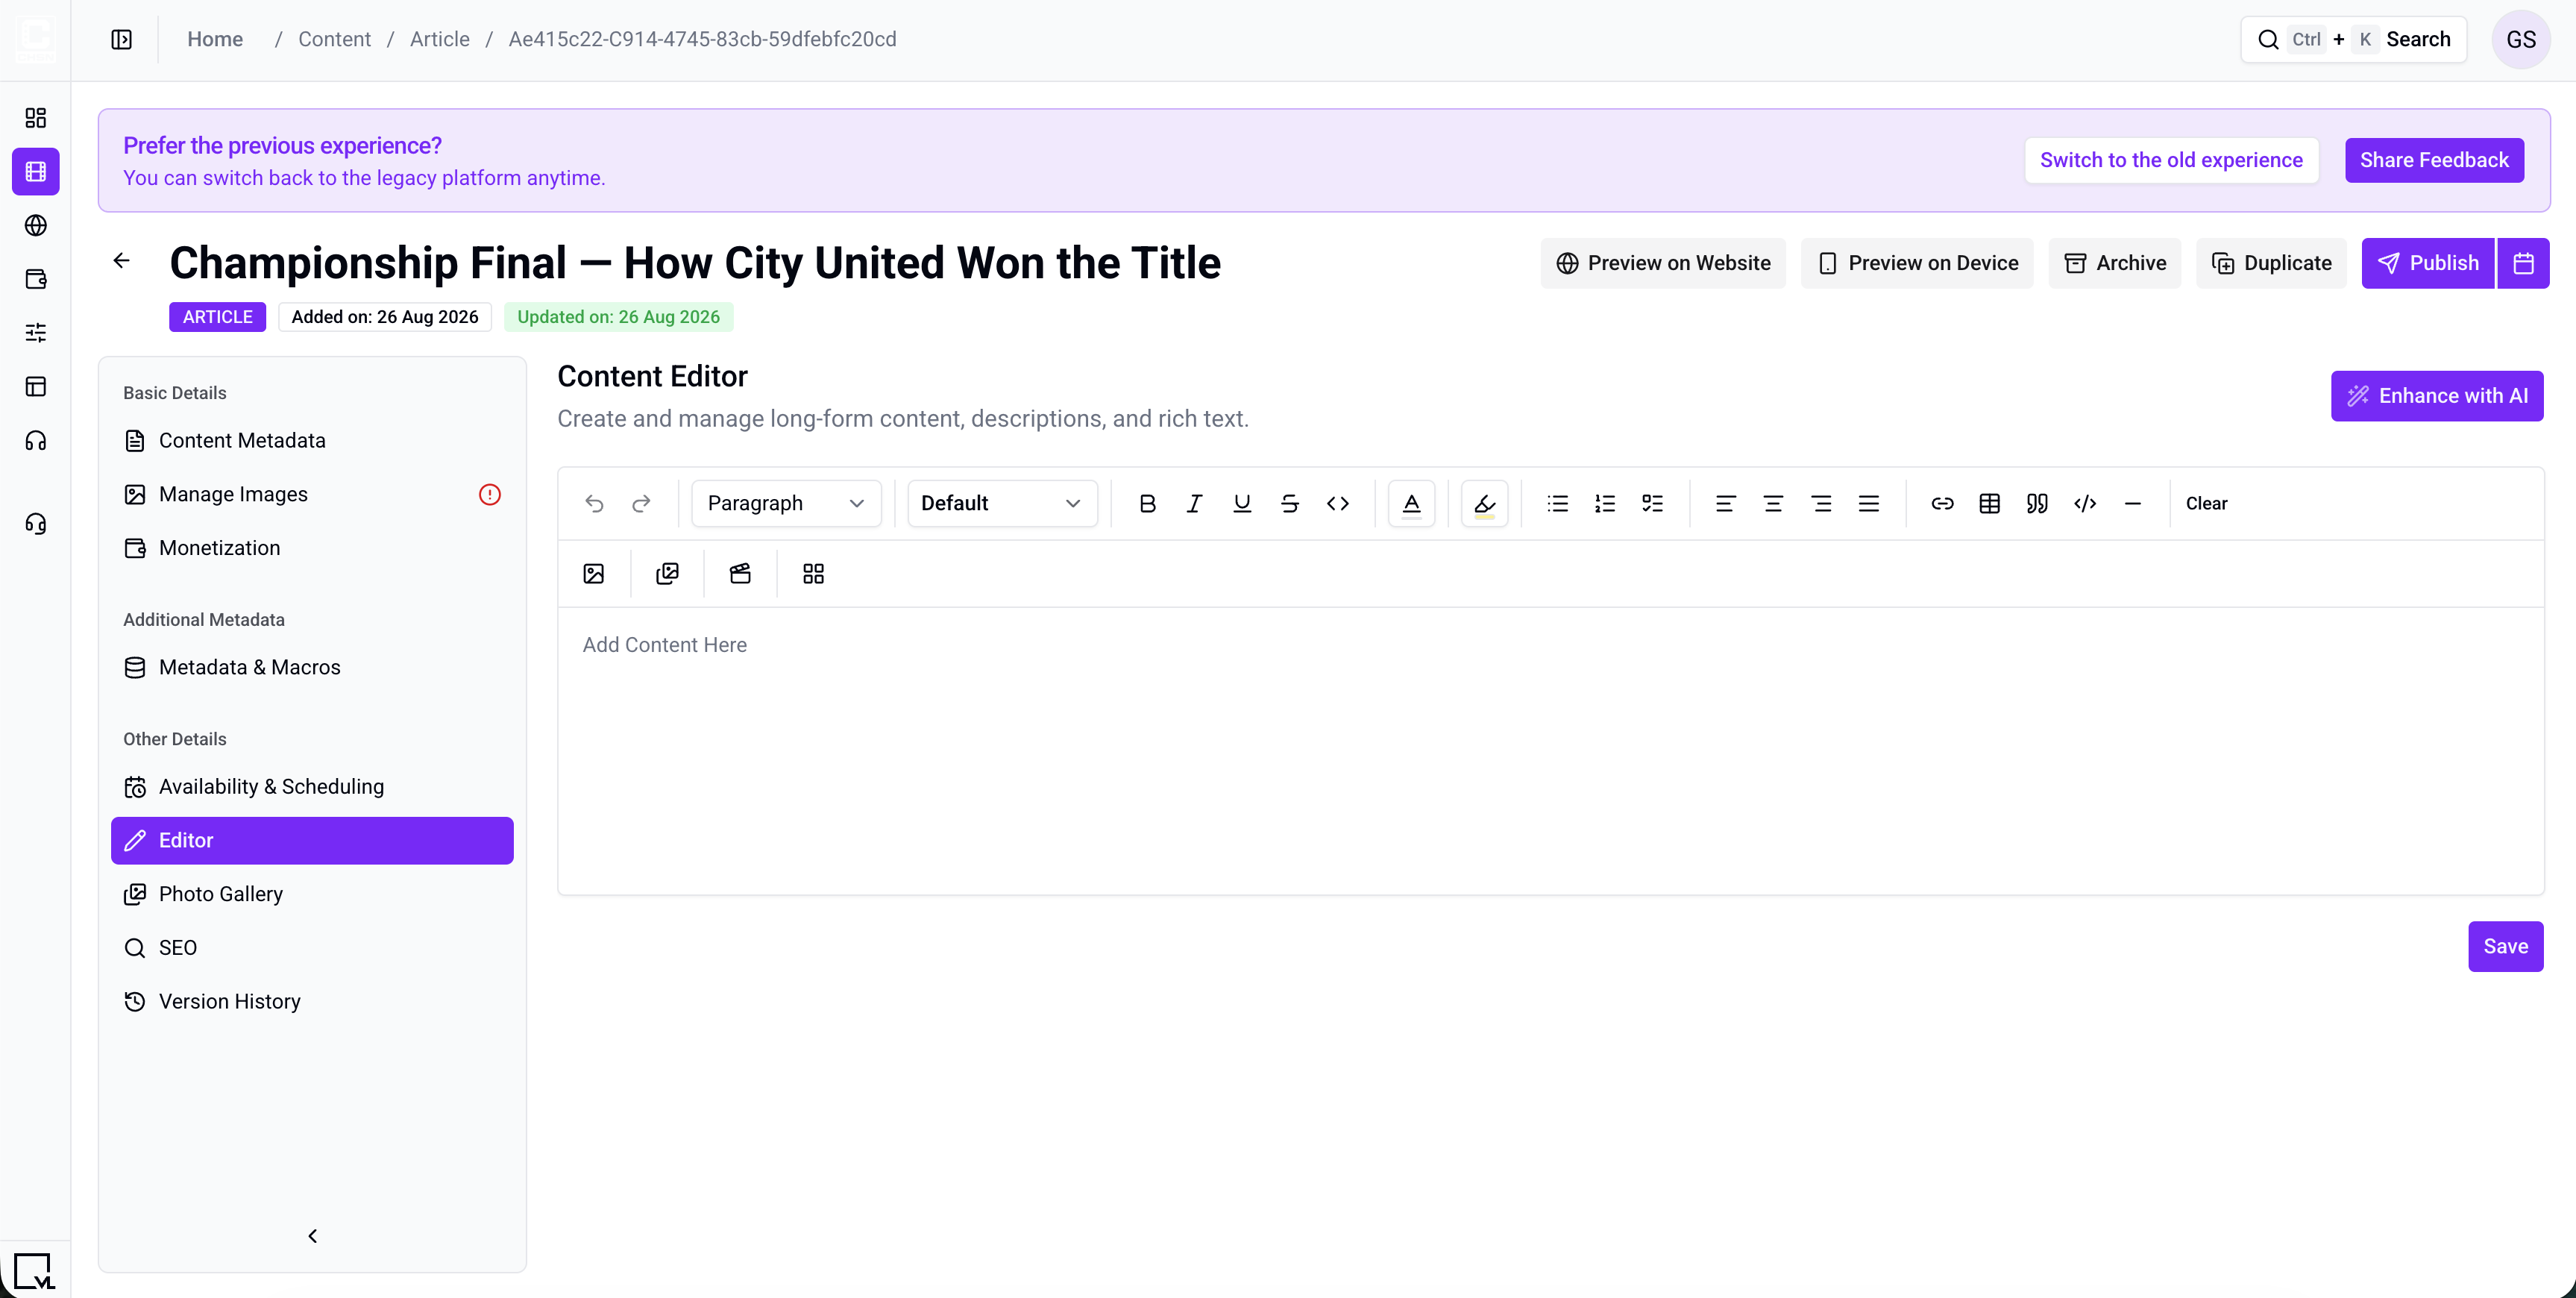
Figure 5. Editor. Add the article body, use the text and media toolbars, then select Save.
Editor changes are not complete until you select Save.
Step 6: Configure Additional Article Settings
Complete the sections your service uses before you publish.
Monetization
Attach the subscription model, plans, or plan groups that should unlock the article.
- Select Add Model.
- Choose the monetization model.
- Select the plans or plan groups that can access the article.
- Save the selection.
If the article is intended to be free, follow your site’s normal entitlement configuration.
Availability & Scheduling
Set when users can access the article:
| Field | Description | Example |
|---|---|---|
| Start Date & Time | Before this time, the article is unavailable. If set, it must be a future date and time. | 15 Sep 2026, 08:00 |
| End Date & Time | After this time, the article becomes unavailable. Optional; if set, it must be in the future. | 30 Sep 2026, 23:59 |
| Timezone | Timezone used for the availability window. | America/New_York |
Article does not have AIR Date, Season AIR Date, or the legacy Show in Advance checkbox.
The availability window does not publish the article. You must still use Publish or Schedule in Step 7.
Metadata & Macros
Use Metadata & Macros for additional key/value metadata required by your site. Select Add Metadata to add a row.
Photo Gallery
The Photo Gallery tab adds an ordered gallery to the article. It is separate from the inline images, galleries, and grids inserted in Editor.
You can add images in two ways:
- Upload files through Drag & drop images to upload
- Search the image library on the right and drag images into Gallery on the left
Drag gallery cards to set their order. Use the remove control to detach an image from this article without deleting it from the image library.
When the Unsaved Changes banner appears, select Save Changes before leaving the tab. Gallery membership and order are not auto-saved.
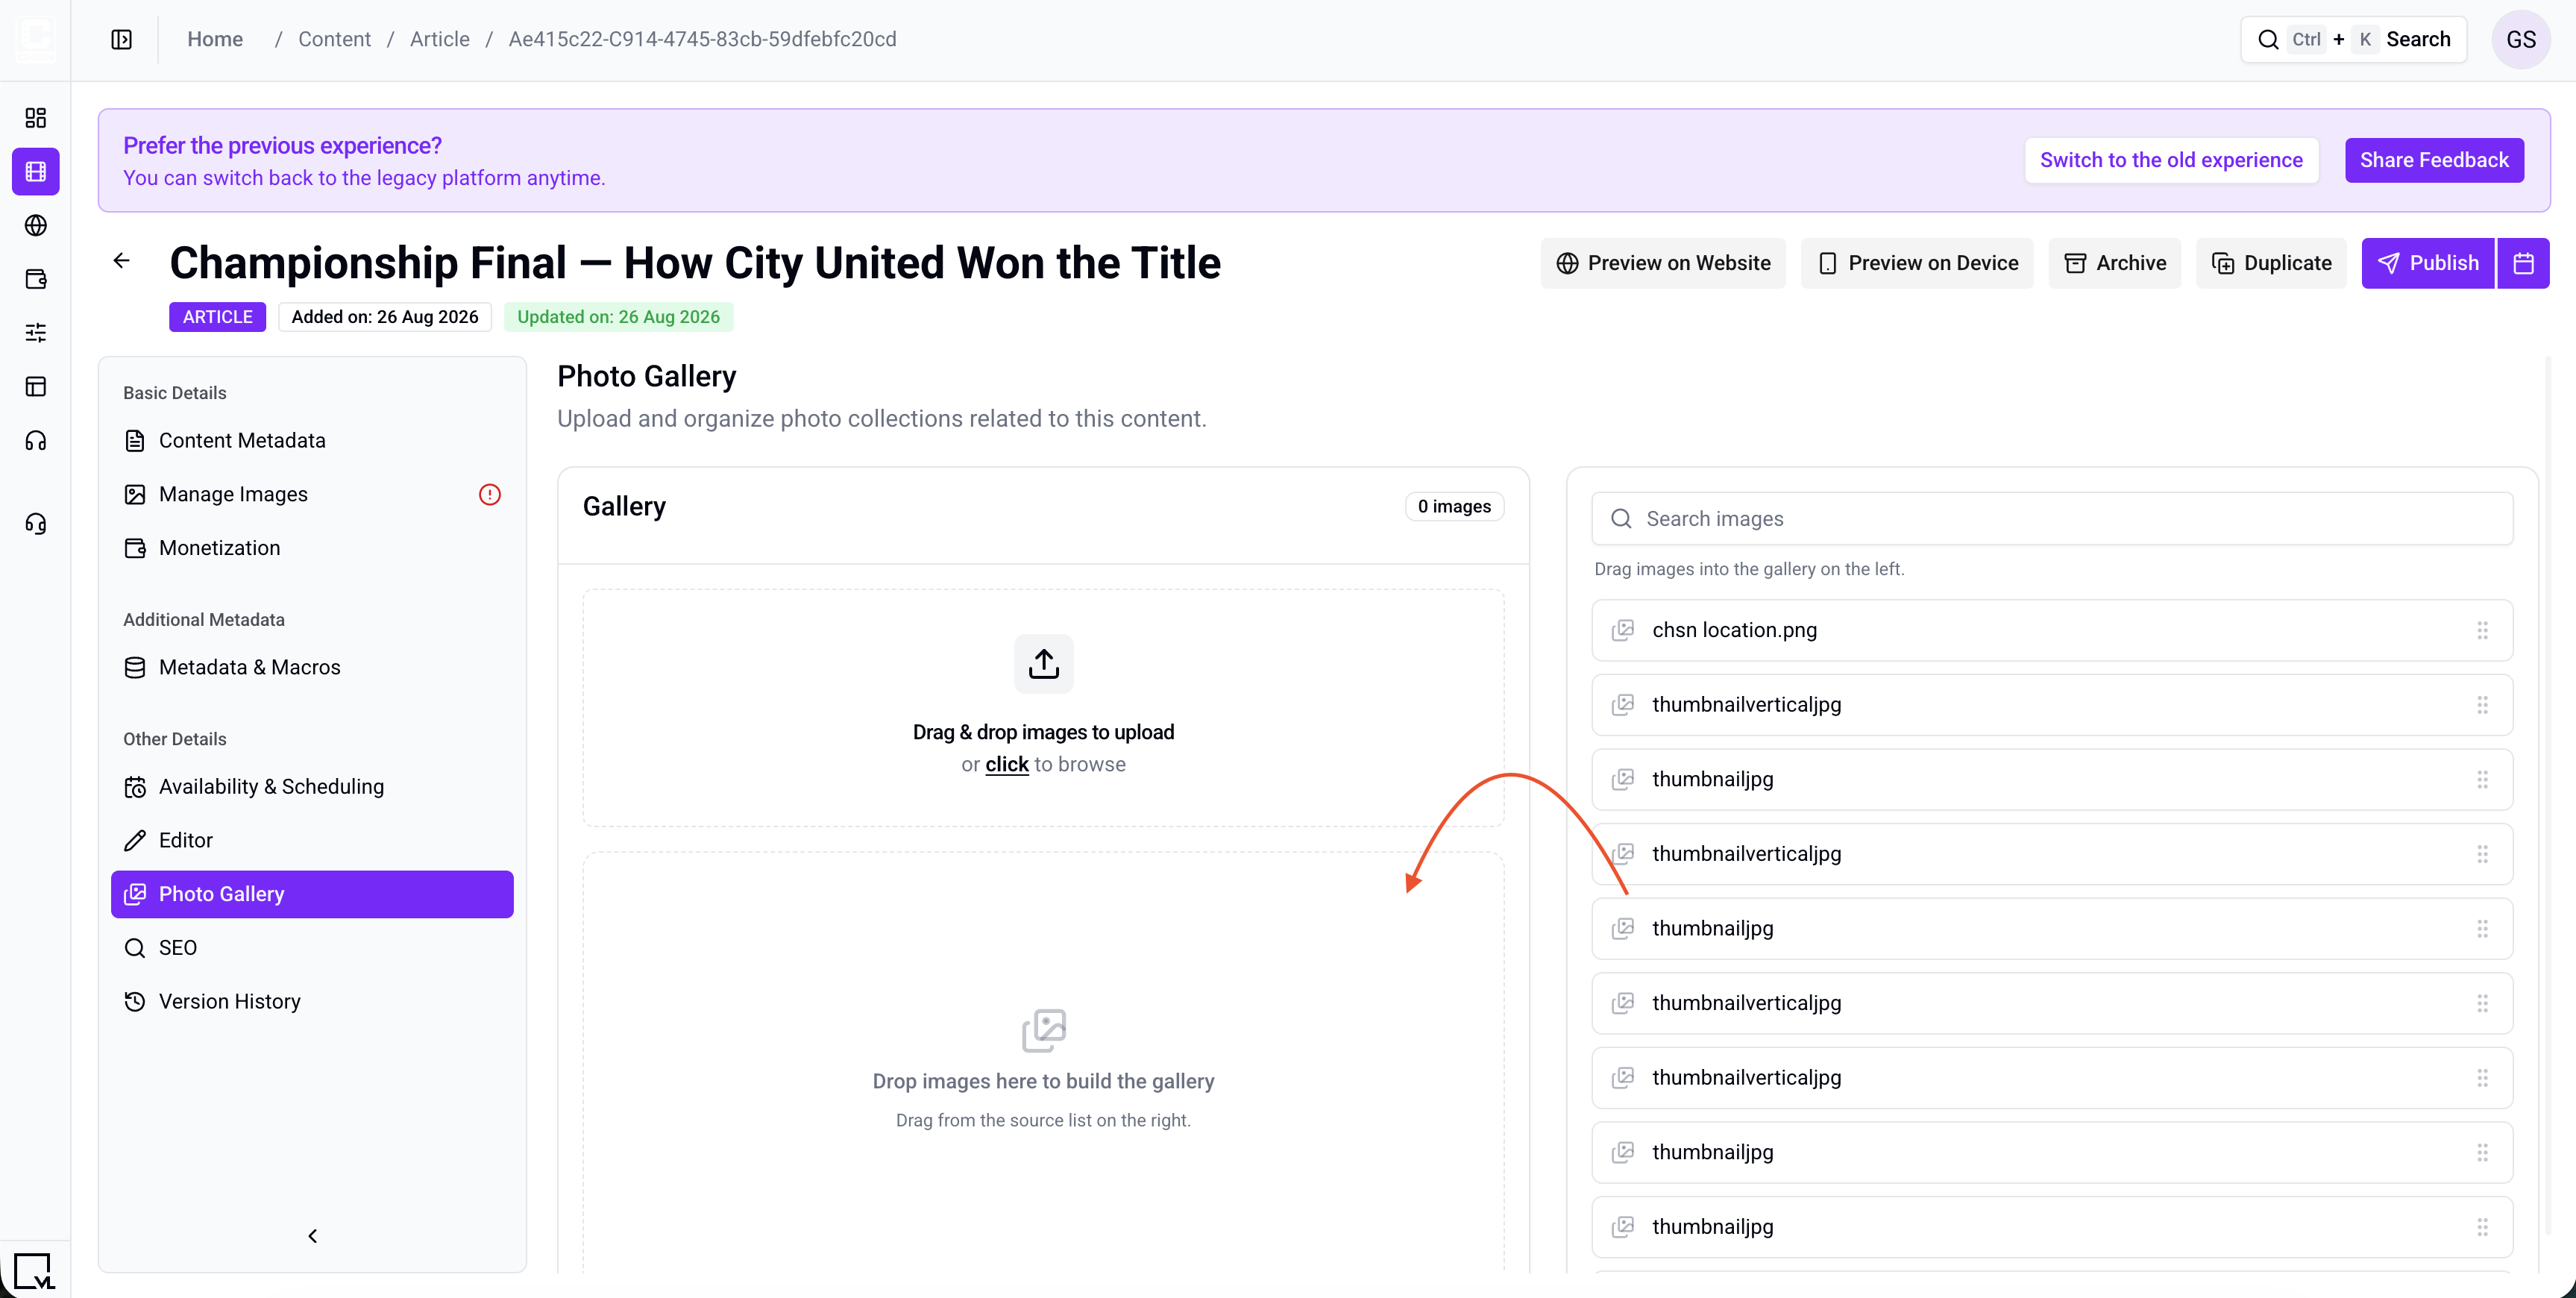
Figure 6. Photo Gallery. Upload images or drag existing images into Gallery, arrange their order, then select Save Changes.
SEO (Search & Discovery)
These fields are optional:
| Field | Description | Example |
|---|---|---|
| Title | SEO title shown in search results and browser tabs | How City United Won the Championship Final |
| H1 Title | Main on-page heading | Championship Final — How City United Won the Title |
| H2 Title | Supporting heading | The tactical changes behind the victory |
| Description | Meta description; aim for 150–160 characters | Inside the tactical changes and decisive moments that helped City United win the championship final. |
| Keywords | Search terms associated with the article | championship final, City United, match report |
| Redirect URL | Optional SEO redirect destination; include http:// or https:// |
https://example.com/championship-report |
| Redirect Code | HTTP redirect status, commonly 301 or 302 |
301 |
Version History
Open Version History to review article versions. The table shows publication and update times, user, and status.
Select two versions to use Compare Versions.
Step 7: Publish the Article
Required before publish:
- Title
- Permalink
- 16:9 Landscape image
Author, Description, and article body are strongly recommended, but they are not part of the current common publish validator.
- Select Publish to publish immediately.
- Or use the calendar control to schedule publication for a later date and time.
- After publication, use Update for changes, Unpublish to take the article down, or Archive to retire it.
Preview becomes available for a published article.
You can also Duplicate an article. The copy is a separate draft with a new ID and permalink. Publication state, dates, permalink history, monetization, article assets, and related-content data are not carried into the duplicate.
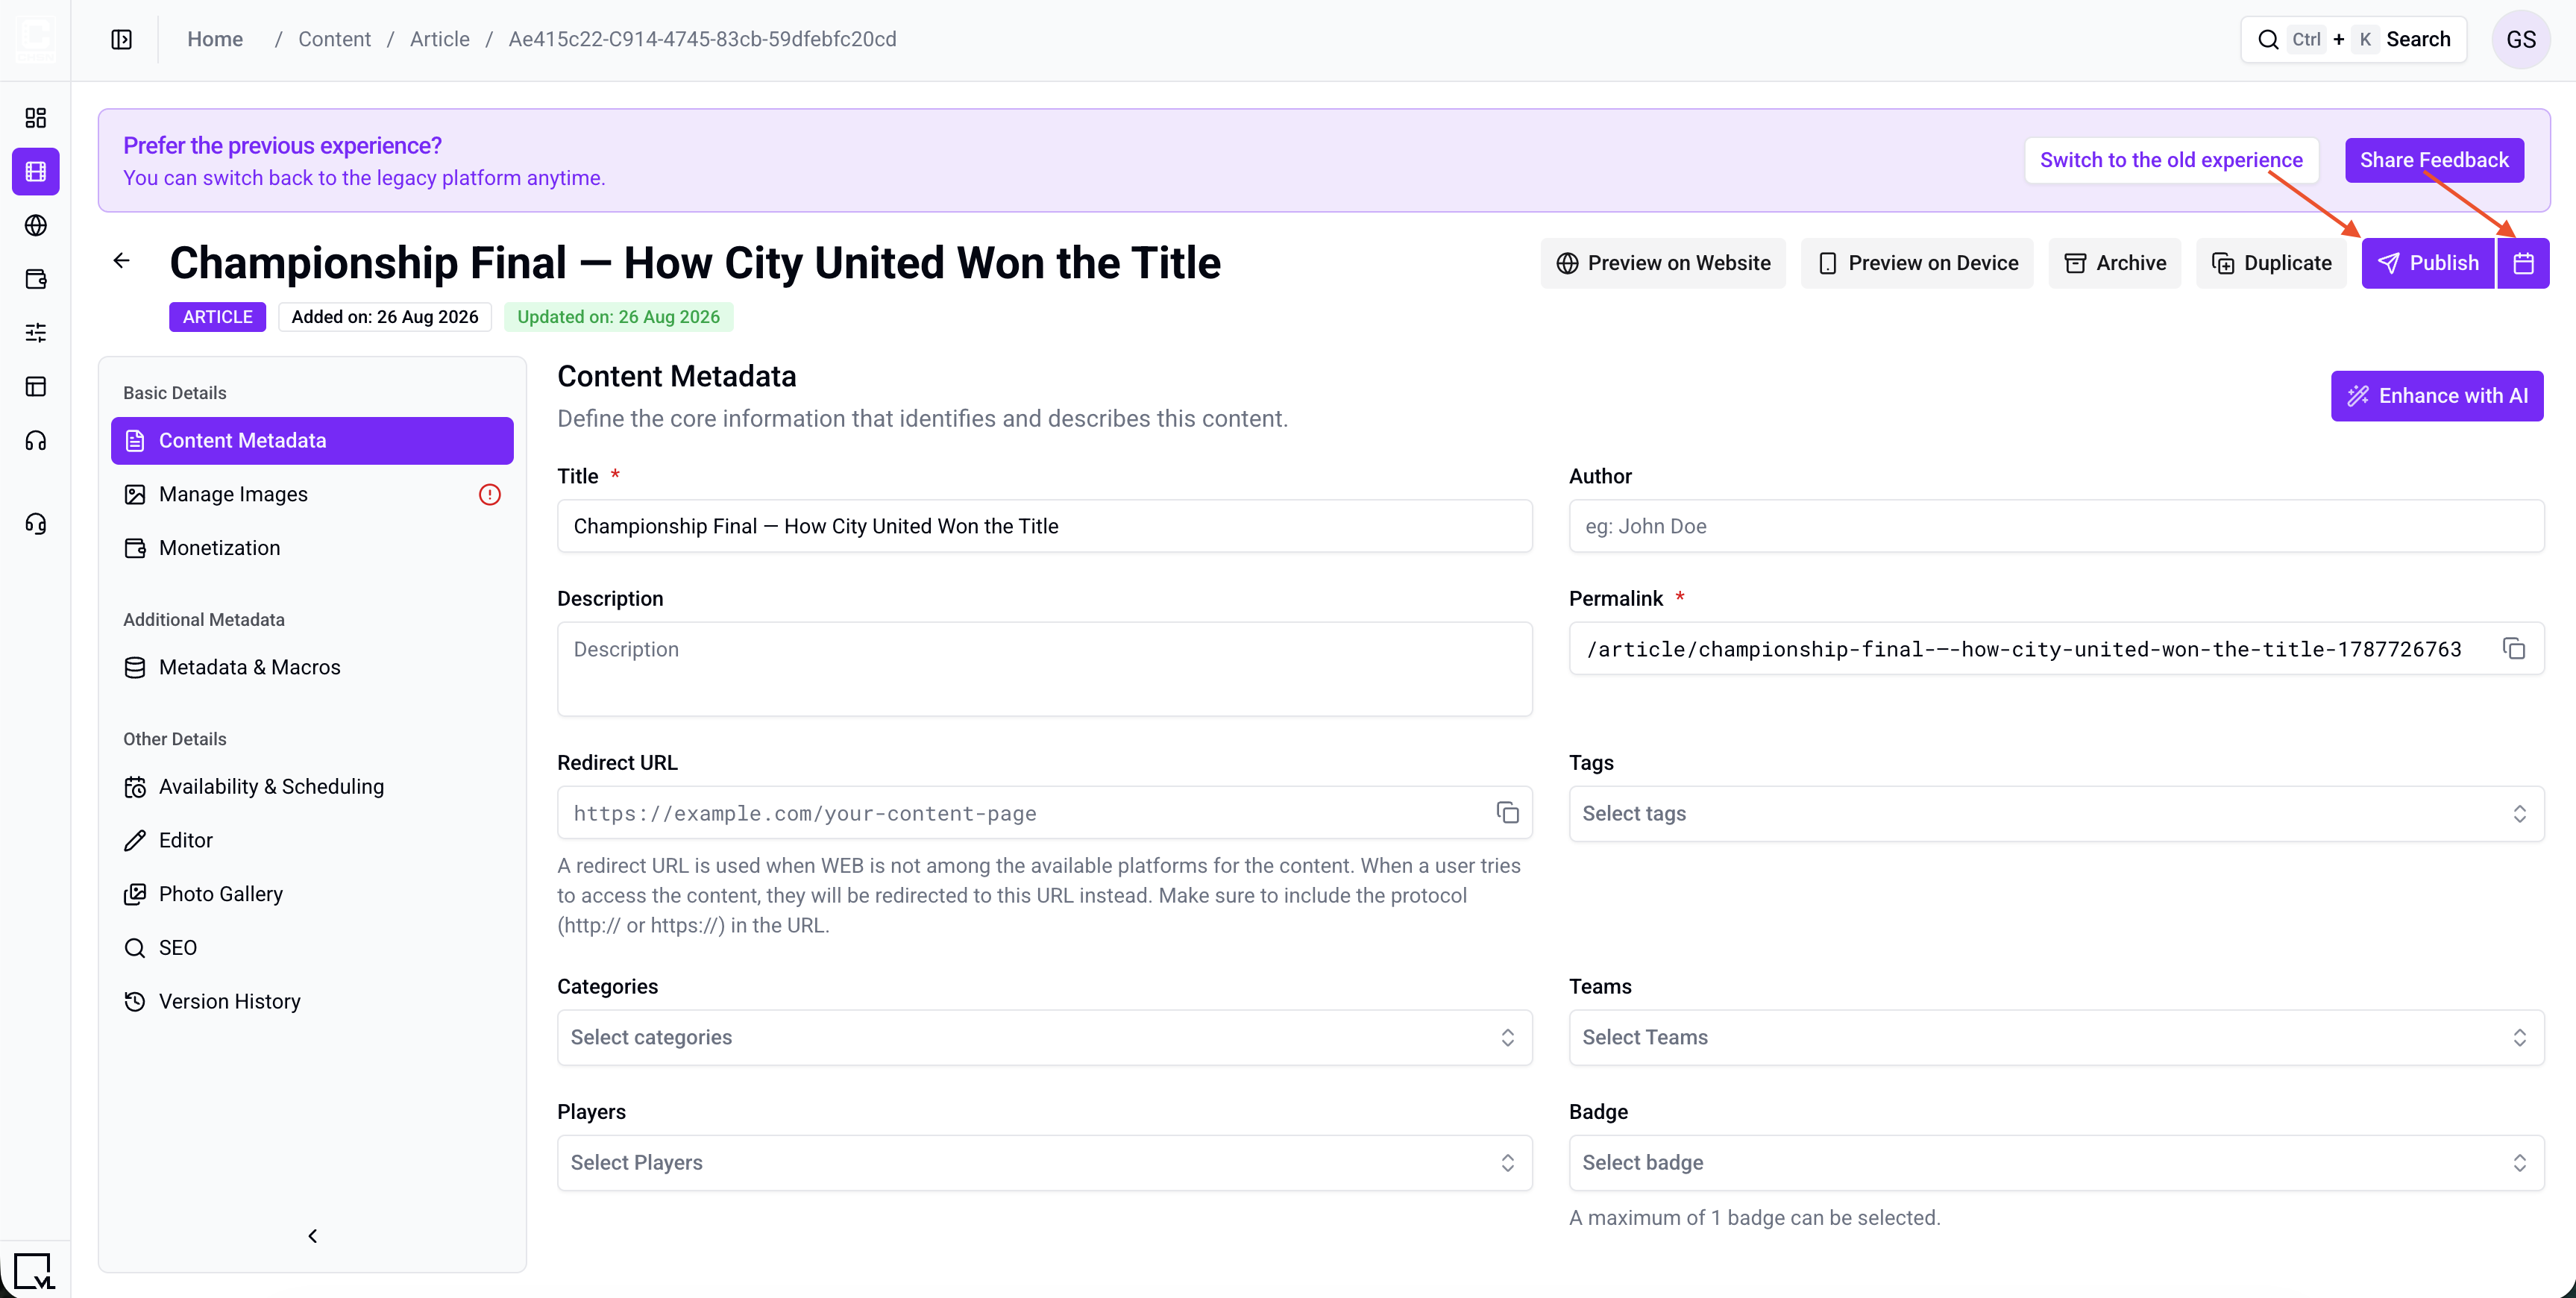
Figure 7. Article detail header. Use Publish to publish now or the calendar control to schedule publication.
Publishing adds the article to the CMS library. It appears on a site page after you curate it in Template Builder, or when a user opens its permalink.
Step 8: Curate the Article on a Template Builder Page
To show the article on Home or another Modular Page:
- Open AppCMS → Edit Template Builder.
- Open Modular Pages and select the page.
- Add or select a tray module. Common options include:
- VL HighlightTray
- VL LandscapeTray
- VL Vertical Tray
- Open the module settings and enter a tray title, for example
Championship Stories. - Choose Content Selection:
- Manually Curate — search for the article. It appears as Article. Arrange items in the order you want.
- Programmatically Generate — populate the tray from tags or categories.
- Set Content Type to Article (or Any) if the tray provides a content-type filter.
- In Thumbnail Type, choose a ratio that matches an image uploaded in Manage Images. Template Builder writes ratios with an asterisk, such as
16*9,3*4,32*9,1*1, and4*3. - Publish the Template Builder page.
Changes can take about 5–10 minutes to appear because of caching. To verify sooner, use a private window, another browser, or clear cookies and cache.
Step 9: Configure the Article Template Page
The layout for an individual article is defined by the Article Template Page.
- In Template Builder, open Template Pages.
- Open Article Template Page.
- If it is available for your site template, select VL Article Detail. The current Template Builder registers this module for the Sports template; other template configurations may not show it.
- Configure the article experience as needed. Available settings include:
- Show Recommended
- Enable Published Date
- Enable Updated Date
- Show Monetization Badge
- Display Badge on Thumbnail
- Disable Like Action
- Disable Watchlist Action
- Enable Sharing
- Article colors, fonts, and localized labels
- Publish the template.
You can have more than one Article Template Page, but only one is selected as the default.
Troubleshooting
| Problem | What to check |
|---|---|
| There is no RSS option | RSS ingestion is not part of the current Create New Article dialog. Create the article manually. |
| Editor changes disappear | Select Save at the bottom of the Editor tab before leaving it. |
| Photo Gallery changes disappear | Select Save Changes when the Unsaved Changes banner appears. |
| Publish is unavailable or shows an error | Confirm the article has a Title, Permalink, and 16:9 Landscape image. |
| The article is published but does not appear on Home | Curate it onto a tray and publish the Template Builder page. Allow several minutes for cache. |
| The thumbnail is missing or stretched | Ensure the tray’s Thumbnail Type matches an uploaded image ratio. |
| The article is unavailable by permalink | Check the availability start/end dates and timezone. |
| A video cannot be found in Editor | The Editor media library searches existing VOD objects. Create the VOD first, then search again. |
| VL Article Detail is not available | Module availability depends on the active site template. The current Template Builder registers it for the Sports template. |
Best Practices
- Write the Title as a headline. Use a clear customer-facing headline instead of an internal file name.
- Save the Editor before changing tabs. Body content has its own Save control.
- Keep thumbnail and body imagery separate. Use Manage Images for discovery artwork and Editor for images inside the story.
- Use the Photo Gallery intentionally. It creates an ordered article gallery and is separate from inline Editor media.
- Tag consistently. Programmatic trays depend on exact tag and category values.
- Complete SEO fields for articles intended to receive search-engine traffic.
- Set monetization before publishing when the article must be restricted to subscribers.
FAQs
Q. Can I ingest articles from an RSS feed?
Not through the current Create New Article dialog. The RSS workflow in the legacy Document360 article is no longer present in Tools.
Q. Which fields are required to publish?
Title, Permalink, and a 16:9 Landscape image. Author and Description are recommended but not required by the current common validator.
Q. What is the difference between Manage Images, Editor images, and Photo Gallery?
Manage Images supplies thumbnails and banners. Editor images appear inside the article body. Photo Gallery creates a separate ordered gallery associated with the article.
Q. Can I add a video inside the article?
Yes. In Editor, use Insert media and choose an embed URL or an existing VOD from the video library.
Q. Can I revert to an older version?
The current Version History interface supports viewing and comparing two versions. It does not show the legacy gear-menu Revert action.
Q. Can I duplicate an article?
Yes. Duplicate creates a separate draft. It does not carry publication state, permalink, dates, monetization, permalink history, article assets, or related-content data.
Q. Can I edit an article after publishing?
Yes. Make the changes and select Update. Remember to use the separate Save control in Editor and Save Changes in Photo Gallery when applicable.
Q. I published the article but do not see it on Home.
Publishing adds it to the CMS library. You must also curate it onto a tray and publish that Template Builder page.
Q. Can I have more than one Article Template Page?
Yes, but only one is selected as the default.
Important Information
- The legacy RSS import path is not available in the current Article create dialog.
- Create the article in Tools. Template Builder places the published object on pages and defines its detail layout.
- Title, Permalink, and a 16:9 Landscape image are the current common publish requirements.
- Editor body changes require Save.
- Photo Gallery membership and ordering require Save Changes.
- Article has no Geo-Restrictions or Related Videos tab in the current sidebar.
- Version History supports comparison; the legacy Revert action is not shown.
- Use
/lowercase-path-with-dashesfor the permalink. - Template Builder thumbnail ratios use an asterisk, such as
16*9. - Cache can delay frontend updates by 5–10 minutes.
Glossary
| Term | Definition |
|---|---|
| Article | A written content object managed in ViewLift Tools. |
| Editor | Rich-text authoring area used for the article body. |
| Manage Images | Article artwork used on trays, search, and supported detail layouts. |
| Photo Gallery | Ordered set of images associated with the article. |
| Article Template Page | Template Builder page that defines the article detail layout. |
| VL Article Detail | Article detail module available to supported site templates (currently the Sports template). |
| Permalink | Permanent URL path for the article, for example /championship-final-city-united-title. |
| Tray | Horizontal or vertical content row configured in Template Builder. |
| Monetization | Entitlement rules that determine which viewers can access the article. |
| SEO | Metadata used by search engines and browser previews. |
Contact Support
If you need help beyond this article, contact the ViewLift support team.
- Email: techsupport@viewlift.com
- Phone (US): +1-800-859-0420
- Phone (UK): +44-203-014-8921
Support hours: B2C requests are handled Monday to Friday. B2B support is available 24/7.
After the article is published in Tools, users can open it by permalink or from a tray after you curate it in Template Builder. The detail layout is the Article Template Page.